Tuesday, October 31, 2006
Samhain snacks
Creepy chips and salsa are displayed at Spirit Halloween Superstore in Beaumont on Monday, Oct. 23, 2006.
Photos by Mark M. Hancock / © The Beaumont Enterprise
Scary sweets are displayed at Spirit Halloween Superstore. Samhain is a Pagan crossquarter festival to celebrate deceased ancestors, final harvest and the beginning of a new year. It's commonly known as Halloween.
Halloween treats are displayed at Spirit Halloween Superstore.
 
Monday, October 30, 2006
Staind concert
Aaron Lewis of Staind performs during Dog Jam '06 at the Ford Pavilion on Friday, Oct. 6, 2006.
Mark M. Hancock / © The Beaumont Enterprise
Nov. iTunes selections
* So Far Away (clean) by Staind
* Always Something Better by Trentemoller (free download)
* Blue on Black by Kenny Wayne Shepherd
* Crazy by Gnarls Barkley
* Sadeness Part I by Enigma
* Saved By Zero by The Fixx
* Stacy's Mom by Fountains of Wayne
* Steal My Sunshine by Len
* The Rockafeller Skank (short edit) by Fatboy Slim
* The Way You Move (clean version) by OutKast & Sleepy Brown
* What it's like by Everlast
Check out the iTunes samples.
It's a little early for Nov., but I'm on vacation starting today. :-)
Sunday, October 29, 2006
Midway stroll
Rudy Buckley of Escanada, Mich. walks through the midway before closing day of the South Texas State Fair at Ford Park in Beaumont on Sunday, Oct. 22, 2006.
Mark M. Hancock / © The Beaumont Enterprise
Labels:
American Indian,
annual,
Beaumont,
festival,
Ford Park
How to make invoices
When I graduated from college, I was woefully unprepared for the professional PJ world. I knew enough about making images, printing, media law and such, but I didn't know how to acquire work or make an invoice.
Now, invoices are simply part of the workflow. However, some new PJs might not have a standard format, so let's examine one. Please see these sample newspaper and magazine invoices on the glossary blog. Although these aren't formatted to look like my actual invoices, they have the same general information.
I use a simple, clean invoice format. Incidentally, editors and accounts payable departments also prefer simple invoices because they're easier to pay and result in fewer mistakes. Give everyone a break and (if you must) save the fancy stuff to get gigs.
Invoice immediately
For this example, let's consider this a once-a-month or less frequent client. If a newspaper is a daily client, bill at least each two weeks. However, input the day's assignments into the upcoming invoice each day so none are forgotten.
Pro PJs understand invoices are part of the assignments. No assignment is complete until a payment is in the PJ's bank account. It's best to consider an invoice as THE critical part of a freelance PJ's workflow. Without income, a freelancer's days are numbered.
When an assignment isn't on deadline (not immediately transmitted), an invoice is included with the delivery package.
If the assignment is on deadline, don't consider the assignment complete after the publication confirms getting the images. The invoice must still be sent before the PJ moves to the next assignment.
At the absolute least, PJs can't crash for the day until the invoice is complete and ready to mail. Yes, it's that important.
Invoices separate professionals from amateurs. If an editor gets an invoice a few weeks (or months) after an assignment, they must wonder about the PJ's professionalism.
Satisfaction guaranteed
Conscientious PJs don't want to be paid until the client is absolutely satisfied with the work. I can promise the PJ won't be paid until this happens. However, bill the client immediately. The client has the option (within reason) to sit on the invoice until they're satisfied.
If the client is thrilled with the images, they may want to pay the bill immediately. Pro PJs give them this opportunity. :-)
Parts of an invoice
PJ's info block
The first section of the sample invoice is the information block. This contains the information required for accounts payable to send the check. It has the PJ's name, followed by a social security number (or taxpayer ID), address and phone numbers.
Because this first information block contains very sensitive information, it's critical for PJs to background the client before accepting assignments. I should probably expand on this some other day. For now, we'll assume we're dealing with a solid client with honest business practices.
Invoice number
The invoice number is typically centered and in bold. This is the tracking number for both the PJ and accounts payable. If there's a problem, the PJ can call accounts payable and see if a check was sent for the invoice number. It also lets the PJ know which invoices have been paid and are still outstanding.
A simple, logical way to make traceable invoice numbers is to use a code similar to the example. The newspaper sample code for this invoice is TDN06-10B.
This invoice number tells PJs the company name, invoice year, month and sequence within the month. In six years, PJs can locate detailed information about this invoice and shoot with only the invoice number.
TDN is the company name. It's normally a three-letter abbreviation for the company name. Common examples could be SIM for Sports Illustrated magazine, DMN for The Dallas Morning News or BEN for The Beaumont Enterprise newspaper. Any letters can be used, but make sure they're logical and use them consistently.
The next two numbers are the year. Since most of us won't live more than 100 years, it's safe to use the last two digits of the year. However, it's important to include the zero during the first 10 years of a century (06 because 6 means 60).
The next two numbers are the month. I put a dash, but it's not necessary.
The final letter is the sequence within the billing month. In the sample, it's the second invoice to this company in Oct. 2006.
Billing info block
The second information block contains billing information. Unless told otherwise, this is the name and address of the assignment editor or designated payment editor.
Date
This is the date the invoice was made and mailed. Send it the same day. If the invoice is made after post offices close, date it for the next business day. This is the tracking date for the invoice, so it must be mailed on the date of the invoice to accurately track invoices.
Billing description
This describes what the company bought. The samples are editorial assignments. Other options might include one-time or first reproduction rights, a (limited time) image lease or some kind of other freelance work.
Be logical and succinct in this section. I was paid $85 to eat cookies and drink coffee while a commercial photographer decided if he wanted to work in the rain or not. He didn't. The invoice stated "photo assistant fee" rather than "munching cookies fee." ;-}
Itemized fees
This section is normally inset by tabs on word-processed invoices. It lists all the fees included in the total amount due.
Newspapers typically pay a flat editorial fee. In the example used, the newspaper pays $110 for the first assignment of the day and $85 for each additional assignment on the same date.
For the assigning editor, use their actual initials or name. This allows accounting to confirm the assignments and speeds payment.
The assignment numbers are in the order shot. Often, assignment numbers are assigned as assignments are entered into the system. It's merely a way of tracking the assignment rather than a specific shooting order.
If a shoot is particularly time consuming or travel heavy, an editor may authorize a double bill to offset expenses. Use the same assignment number a second time with the secondary fee ($85 for the sample). Because the assigning editor's initials are noted on the invoice, it can be cleared internally without delays.
Magazines often allow a digital fee (for use of dit cards and CDs), mileage (at IRS rate), meals, access fees (entrance and parking fees as well as road tolls), rentals (for specialty cameras or other equipment) and incidental fees (explain them). Depending on the publication, copies of receipts should be attached to the invoice to justify expenses. Otherwise, these are understood and authorized expenses.
Some magazines offer a cover incentive (extra money if the image is used as a magazine cover). This typically involves a second invoice noted as such.
Commercial invoices contain the same itemized fees as magazines, but may include additional fees for model and/or property releases as well as any prints or other specially requested photo products.
Consumer (retail) invoices can include all of the above as well as sales taxes.
Total
This is the most important part of the invoice. Make sure it's accurate. See below. Make the amount and word "Total" bold as well.
Gratitude note
Don't get too fancy. Say thanks and possibly solicit more business, but don't be obnoxious.
Signature
It's not on the sample, but sign below the gratitude note. This signifies that the invoice is accurate and speeds things along through accounts payable.
If there's enough room after all the detailed information, it's good to include the PJ's name below the signature as well.
Online contact info
List a Web site and primary e-mail address. Invoices are filed for seven years or more. The company may look for contact info at a later date. PJs who own URLs have a universal means of contact - no matter where their career leads them. By listing the Web site, the client can easily locate PJs in the future. It also eliminates the "I didn't know how to contact the PJ" (orphan works) excuse on possible copyright violations.
E-mail addresses give accounts payable a phone-free way to quickly settle any invoice questions.
Organizing invoices
PJs must track invoices from the time they're made until they're paid (and beyond for the IRS). Electronic invoices are the preferred method, but let's do this section "old school." Computer savvy PJs should know how it applies. However, it's wise to also keep a hard copy of each invoice for folks who are doing this electronically.
Make an invoice folder
Title the folder "2006 invoices." This is where all invoices go this year. It later becomes part of the year's tax records. Make a new folder each year for invoices.
Place a sample invoice or several blank invoices into the file and place it in a file drawer.
Copy and file invoices
As invoices are made, make duplicate copies for the PJ's records and place them into the annual folder. Make sure invoices are filed alphabetically by invoice number (best) or by date (easiest).
Track invoices
The more clients a PJ has, the harder it becomes to track invoices by memory alone. If PJs follow the information listed in "Manage your money," they already understand how to track invoices.
Otherwise, go through the post (or the longer "Budget for three months" post). For folks doing this on paper only, write the invoice amount, number and expected pay date on the outside of the folder or on a separate sheet of paper in the front of the folder. Draw a single line through the entry as they are paid.
As explained for electronic record keeping, PJs place invoice numbers into the checking account on the anticipated payment date (about one month). Behind the invoice number, include the amount expected in brackets. It's vital not to include this number in the active column until there's a check in the PJ's bank account.
Most invoices are paid on or before the anticipated date and PJs simply move the bracketed number into the active column.
If it's not paid by the due date, immediately send an e-mail or pick up the phone. I'll write a post about collecting delinquent invoices, but for now the contact should resolve the problem.
Use a spreadsheet
Although PJs perform complex calculus all day (balancing optical cube root exposure values against multiple sets of lighting square roots), most seem to be horrible at simple addition and subtraction. Spreadsheets solve this problem.
Although I tend to use old invoices as templates for new invoices, new PJs may want to set up a few template spreadsheets. These could quickly handle the majority of assignments and speed delivery while ensuring accuracy.
Why a spreadsheet?
Everything a computer does is mathematical. The mouse cursor isn't moving across the screen, it's actually a visual representation of an electronic X-Y coordinate. Math is what computers do. So, it can make calculations faster and more accurately than PJs.
Set up an invoice spreadsheet
Open a blank spreadsheet in an over-the-counter software program and save it as "InvoiceSample" in an invoice folder.
List the text information above in the first column. Give each line its own cell.
In the itemized section, name the 2nd cell "Fee," the 3rd cell "Date," the 4th cell "Assignment," and the 5th cell "Editor."
Below these list the correct information for all assignments being billed.
For the total, paste this formula =SUM(B20:B28) into the first cell. Type the text into the second cell (same row, 2nd column).
The formula =SUM(B20:B28) means something specific to the computer. In a spreadsheet program, it tells the computer this is a mathematical formula (=). Then, it tells it to add together (SUM) a set of numbers (B20:B28 or the cells in the second column on rows 20 through 28). Adjust this formula to the actual data needed.
The rest of the form is text. Place as appropriate.
Print preview
Use the print preview function of the software program to make adjustments to the invoice. The goal is to be able to print a professional-looking invoice directly from the spreadsheet. It saves the step below.
Convert the spreadsheet to text
Lately, some companies want invoices submitted electronically via e-mail. Because there's no telling what software they use, it's best to send the invoice as a text file (.txt). Everyone can read these.
Simply open the invoice spreadsheet and save it as a text file with tabs. This should keep the file simple, understandable and professional. It might need some extra spaces or tabs, but these are minor adjustments.
Double-check the total
Although computers are infallible, those who program them aren't. I hate to admit it, but I've added assignments onto an invoice and forgot to change the formula.
When rows are added to an invoice, the formula doesn't automatically understand this and, depending on where the rows are added, may not include these rows in the final total formula.
So, a client got free assignments because I didn't double-check the total. Not taking the time to manually calculate the invoice total cost me about $300. Don't make the same mistake.
Other kinds of invoices
Although the sample invoices are for editorial work, they can quickly adapt to any form of professional photography.
As necessary, add sales taxes (for consumer sales) or other calculations to the spreadsheets or paper forms to accommodate other kinds of invoices. Although there are prefabricated sales books at office supply stores, these are not recommended. They scream "amateur."
Time is money to PJs and clients. Electronic invoices (printed or e-mailed) are more efficient and professional. It only takes a few minutes to make a new, custom invoice to ensure proper payment.
Enough for now,
 
Saturday, October 28, 2006
Sgt. Daniel W. Winegeart funeral
Photos by Mark M. Hancock / © The Beaumont Enterprise
Patriot Guard members prepare for the funeral of Sgt. Daniel W. Winegeart at the First Baptist Church of Kountze in Kountze, Texas on Thursday, Oct. 26 2006. Spc. Winegeart was serving his third deployment in Iraq when he died. He was posthumously given the rank of sergeant.
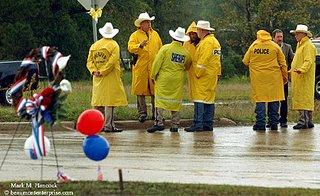
Law enforcement officials ensure unlawful protests wouldn't happen during the funeral of Sgt. Daniel W. Winegeart at the First Baptist Church of Kountze.
Members of a Kansas church planned to protest at the funeral. However, a city ordinance requires a peaceful protest permit application at least two days before the planned protest date. The church hadn't applied for the permit by the deadline for the funeral.
Patriot Guard members form a barrier to protect mourners from potential protesters at the First Baptist Church of Kountze during the funeral of Sgt. Daniel W. Winegeart. The Houston Patriot Guard group was halted en route by severe weather.
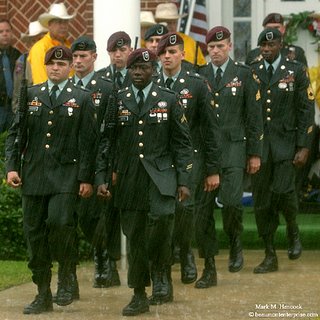
An honor guard detachment of the 5th Special Forces Ranger Group of the U.S. Army march through the rain of Hurricane Paul into position during the funeral of Sgt. Daniel W. Winegeart at the First Baptist Church of Kountze. Sgt. Winegeart was serving with the 5th Special Forces Ranger Group when he died in Iraq.
An honor guard detachment of the 5th Special Forces Ranger Group stands guard in the rains of Hurricane Paul during the funeral of Sgt. Daniel W. Winegeart at the First Baptist Church of Kountze.
Please read the story about the funeral by F.A. Krift. Please also read a statement from Terri Sue Winegeart, Sgt. Winegeart's mother, and "Mother mourns soldier she says never lost smile" by F.A. Krift.
 
Labels:
funeral,
Hardin County,
Kountze,
military,
patriot guard,
water,
weather
Friday, October 27, 2006
Central runs over Vidor
Mark M. Hancock / © The Beaumont Enterprise
Central's Morris Thomas breaks through Vidor's defense during a high school football game at Vidor High School on Friday, Oct. 20, 2006.
 
Thursday, October 26, 2006
More layout options
Kinky Friedman campaigns for Texas Governor at Lamar University in Beaumont on Monday, Oct. 23, 2006.
Photos by Mark M. Hancock / © The Beaumont Enterprise
Comedian and singer Kinky Friedman campaigns for Texas Governor at Lamar University.
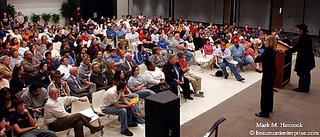
A relatively large audience listens as Kinky Friedman (right) campaigns for Texas Governor at Lamar University.
Earlier this month, I stated PJs often don't know how images will be laid out on a page. Consequently, it's best to present both horizontal and vertical options to the layout desk. It's also good to give the layout desk left, right, center and behind options if possible.
The top two images are similar, however PJs can give layout the option of left or right orientation. This is particularly important on assignments near deadlines. Page designers make the page with a hole for the image. PJs can ask if the hole is on the left or right-hand side of the page and deliver the appropriate image without layout needing to rearrange the text (and possibly create other design problems).
In the example above, we also have the option of horizontal or vertical. All four options (VL, VR, HL, HR) were shot and available, but this post is redundant enough. ;-}
Although it would be ideal to manage to have equally "useful" shots from both sides, it's important to understand the PJ (or photo editor) can change the entire deal. If one image is much better than the others, the image determines layout. The best image always trumps layout decisions.
If all options are about equally publishable, give the desk what works best for it.
Get the options
When covering a speaker (or singer) at a microphone, the first objective is to get the mic out of the person's mouth (or nose). This is best accomplished from the sides. Occasionally, the entire mic can be cropped in-camera. Otherwise, its interference is minimized by the angle.
To get both left and right angles, the PJ needs to move to the opposite side of the stage. The speaker continues to look forward. For PJs, s/he is looking both directions depending on shooting angle.
The third option above is tricky for some folks. Whenever possible, try to work the speaker and the audience into the same shot to show turnout. In the image above, he had a fairly good audience in a relatively small room.
I'll write about "shooting blind" sometime soon to explain how this angle is accomplished.
Enough for now,
 
Labels:
Beaumont,
everything else,
Lamar University,
politics,
portraiture
Wednesday, October 25, 2006
Fair ends with a squeal
Photos by Mark M. Hancock / © The Beaumont Enterprise
A pig looks out of its pen on the closing day of the South Texas State Fair at Ford Park in Beaumont on Sunday, Oct. 22, 2006.
A goat leans against its pen during the closing day of the South Texas State Fair at Ford Park.
Tuesday, October 24, 2006
Beaumont floods
Photos by Mark M. Hancock / © The Beaumont Enterprise
Roses continue to bloom as water from Brakes Bayou floods homes on Manning Street in Beaumont on Sunday, Oct. 22, 2006. Most area residents have evacuated.
Laura Bellard (left) and her husband Larwrence Bellard (right) try to convince relatives Edna Mae Dejean and her son Lawrence Dejean to leave their home on Manning Street as flood waters rise in Beaumont.
Lawrence Dejean (right) helps his mother Edna Mae Dejean (left) as they evacuate their home on Manning Street in Beaumont before it floods.
Ants cling to sticks along Astor Street in Beaumont as the flood waters from Brakes Bayou rise.
Flood waters from Brakes Bayou begin to flood a home on Manning Street. Most area residents have evacuated.
Maybe the "soft wash" a week ago wasn't so gentle further north. The one day totals in counties north of Jefferson were about a foot. The rain was caused by the remnants of Pacific Tropical Storm Norman. Now, Hurricane Paul is expected to seriously weaken, but still head this way to dump a few more feet of rain onto the saturated Southeast Texas landscape.
 
Monday, October 23, 2006
Cameron recovery celebration
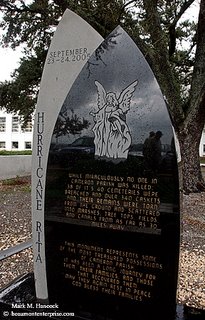
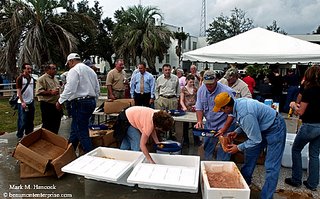
Guests reflect on a commemorative monument during a celebration and shrimp boil in Cameron, La. on Saturday, Oct. 21, 2006. Cameron Parish dedicated a monument to commemorate the restoration of its cemeteries. The parish has recovered and reburied about 300 of the 340 caskets and remains uprooted by Hurricane Rita.
Photos by Mark M. Hancock / © The Beaumont Enterprise
Leann Stewart (from left to right), Shane Manuel and Karl Miller prepare meals for guests during a celebration and shrimp boil in Cameron, La.
Cajun-boiled shrimp steam in a cooler during a celebration and shrimp boil in Cameron, La.
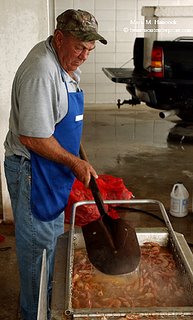
Volunteer Galton Boudreaux of Oak Grove stirs shrimp with a shovel during a celebration and shrimp boil in Cameron, La.
Clifton Hebert, Cameron Parish's emergency operations center operations chief, (right) relaxes during a celebration and shrimp boil in Cameron, La.
For additional coverage, please see Hurricane Rita's toll on SW Louisiana or Mark's Hurricane Rita visual timeline.
 
Sunday, October 22, 2006
Midway in motion
Photos by Mark M. Hancock / © The Beaumont Enterprise
Riders scream on the Spin Out ride during the South Texas State Fair at Ford Park in Beaumont on Tuesday, Oct. 17, 2006.
Riders scream on midway rides during the South Texas State Fair at Ford Park in Beaumont. Rides (from left to right) are the Century Wheel, the Orbiter and the Cliff Hanger.
 
Saturday, October 21, 2006
Marine surprises great aunt
Photos by Mark M. Hancock / © The Beaumont Enterprise
Cpl. Jeff Liddell, a radio operator with the 1st Battalion, 7th Marines, surprises his great aunt Opal O'Neal at Calder Woods retirement community in Beaumont on Thursday, Oct. 19, 2006.
Cpl. Jeff Liddell visits with his great aunt Opal O'Neal after surprising her at Calder Woods retirement community in Beaumont. Liddell was home on leave from Iraq and returns tomorrow.
 
Friday, October 20, 2006
ExxonMobil CEO visits Energy Museum
Photos by Mark M. Hancock / © The Beaumont Enterprise
Rex W. Tillerson, chairman and CEO of ExxonMobil Corp., (center) gets a tour of the new Texas Energy Museum exhibit by Ryan Smith, director of the museum, (right) in Beaumont on Wednesday, Sept. 20, 2006. Part of the new exhibit allows visitors to see an oil tanker ship's voyage up the Neches River.
Rex W. Tillerson, chairman and CEO of ExxonMobil Corp., (right) has a laugh with Ryan Smith, director of the Texas Energy Museum museum, (left) after a tour of the museum. ExxonMobil Corp. contributed $250,000 to the new million-dollar exhibit.
Rex W. Tillerson, chairman and CEO of ExxonMobil Corp., (left) gets a tour of the new Texas Energy Museum exhibit by Ryan Smith, director of the museum (right).
 
Thursday, October 19, 2006
A day at the fair
Photos by Mark M. Hancock / © The Beaumont Enterprise
(Above) Tyler Campbell, 5, (right) laughs as centrifugal force squeezes him against his mother Tiffany Campbell of Port Arthur on the Sizzler ride during the South Texas State Fair at Ford Park in Beaumont on Saturday, Oct. 14, 2006.
(Right) Riders scream on a roller coaster during the South Texas State Fair.
Ramie Griffin, Jr. (right) of Beaumont points out fair features to his daughter Jamie Griffin, 4, during the South Texas State Fair.
(Above) Kaelyn Oliver, 3, of Beaumont meets deer in the Children's Barnyard area during the South Texas State Fair.
(Right) Braulio and Ambrosia Galaviz of Vidor walk through the midway area during the South Texas State Fair at Ford Park in Beaumont.
Primary education photo lesson plan
Last time, we discussed some basic understandings teachers of children should address before starting a photo class.
This post should establish some standard operating procedures for the class as well as a logical "Intro to Photo" lesson plan for at least one semester.
Digital photography is encouraged
Digital photography (dry lab) eliminates the time limitations of many exposure problems as well as processing and printing. The learning curve is immediate because students can see failures on the LCD screen and continue working until they solve the problem. Although pre-press techniques (cropping, color correction, etc.) should be introduced, image procurement, delivery and volume can be much higher with digital photography.
For photo-chemical courses (wet lab), processing and printing absorb the majority of the student's time and/or delay students' learning time. Students can't know the film couldn't handle low light until they get an envelope of black images a few days later or find blank negatives after 30 minutes of loading, processing (and probably chemically burning) the film by hand.
Both film and digital processes teach students valuable lessons. While digital photography (particularly "chimping") allows students to bypass particular basic photography lessons, it allows them to immediately express their vision with satisfactory results. They'll repeat mistakes, but they're only wasting their own time.
Film forces students to learn techniques or continue to fail. This approach teaches correct exposure approaches better, but can be extremely disappointing and discouraging for less-motivated students.
Reasonable work load
For an introductory digital photo course, I don't think it's unreasonable for any student to produce, edit and digitally deliver six images per assignment. If wet lab techniques are also taught, one to three prints per assignment is reasonable.
Wet lab time restrictions make students want to edit their own images. It can take beginners about 30 minutes to make one proper resin-coated print. Few students want to spend three hours in the lab when they could be shooting. So, they'll pick an image or two, crank them out and they're done.
Digital delivery makes students do the opposite. They want to deliver everything. However, six images of a duck in a swimming pool tells as much of the story as 20 images.
Teachers don't need to wade through a sea of similar images to find the best ones. This is the student's job. The students must select only the best images to learn to differentiate between "best" and "average."
Minimum shots
It's wise to assign a minimum number of shots. A common roll of film is 36 exposures. It would be fair to require a minimum of one full 36-exposure roll of film. Likewise, it's fair to require 50 digital images.
This minimum pushes the students to shoot more than one photo of a subject. It encourages them to explore shape, composition, juxtaposition, light angle and so forth. When combined with a subject minimum (four subjects should work), students acquire enough variety to select a decent set of images.
By setting both a shooting minimum (number of frames shot) and a delivery range (minimum and maximum), the students are forced to edit their own work and critique themselves first.
Critique
The students should push themselves and each other through constructive critique to make better images.
In the beginning, teacher critiques should concentrate on the basics: exposure, focus and timing. If young students' images fall somewhere within an acceptable range on these basics, they did well.
If something goes drastically wrong with these core issues, it's best to discuss the equipment problem with the entire class so everyone can learn.
Otherwise, it's best to avoid "talking down" images for beginners. Instead, find the best image examples and explain what works in the images.
It's important to involve the students in the critique. They need to be able to analyze the images and assess what is successful and what fails. It may require polling the class by student, but open format critique is the standard practice.
Rebuttal
It's common to want to defend one's work. So, it's important to let students know they must be silent while their work is critiqued. This makes them listen to the good and bad about their work without escalating and compounding pre-existing personality conflicts.
After the critique of their work, they get to defend their work and also get the final word about their work. If a critique is unjust to them, they can correct the record before the critique moves to the next set of images.
Award slips
One way to involve shy students in the critique is to have them award slips of paper by category. If using a cork board, students pin up the images. Then, they initial their category award slips and pin them next to the images they feel deserve the awards, but they can't vote on their own images.
Images without awards are removed from the board. The remainder of the class is spent discussing the reasons why students bestowed the awards. They aren't defending their own work, but defending the work of their classmates. This results in a much more positive experience since most folks are sensitive about their images at first.
Good starting award categories are:
Universal image problems
Throughout any basic photography course, universal problems will arise. There are common ground issues as well as camera shake and many other beginner-level problems. These must be addressed as they appear in students' images.
I've written posts for most universal problems. They're included in the "All PJ-related posts" section of this blog. Although most of the posts are designed for working pros, there should be useful information for teachers in the list.
Grading guidelines
Since the eventual goal of this instruction is photojournalism, deadlines are the single most important factor in grading. This should be strongly emphasized. Images must be delivered in the proper format by the proper time to get a satisfactory grade.
Aside from deadlines, I believe it's most important for students to try hard. Therefore grading should be about objective factors rather than subjective results. Students will be rewarded or punished for subjective issues during critique. That's enough punishment or praise.
The following factors could determine a course grade from an objective standpoint:
Ultra-basic photo
Most photo classes make assignments which involve some level of failure. It's not a failure on the part of the student, but a failure of the equipment. Thus, the student learns the limitations of the equipment. The really smart students quickly find ways around these problems.
These assignments concentrate on one mechanical limitation while provoking student problem solving and discussion. The subject matter is left to students' imaginations.
For introductory photo courses, it's best to introduce the photographic limitations as well as techniques to handle the limitation. Often, instructors select successful images from professionals to illustrate the concepts and give a presentation about how to create successful images for the assignment. Then, they allow the students a week to work on the problem.
Some common beginning assignments include:
What's next?
I encourage teachers to dedicate significant time to each lesson so the knowledge can seep into students' brains. Consider these assignments as the alphabet of photography. Once the students learn how to handle these, then they can move on to understanding visual verbs and storytelling.
Enough for now,
 
This post should establish some standard operating procedures for the class as well as a logical "Intro to Photo" lesson plan for at least one semester.
Digital photography is encouraged
Digital photography (dry lab) eliminates the time limitations of many exposure problems as well as processing and printing. The learning curve is immediate because students can see failures on the LCD screen and continue working until they solve the problem. Although pre-press techniques (cropping, color correction, etc.) should be introduced, image procurement, delivery and volume can be much higher with digital photography.
For photo-chemical courses (wet lab), processing and printing absorb the majority of the student's time and/or delay students' learning time. Students can't know the film couldn't handle low light until they get an envelope of black images a few days later or find blank negatives after 30 minutes of loading, processing (and probably chemically burning) the film by hand.
Both film and digital processes teach students valuable lessons. While digital photography (particularly "chimping") allows students to bypass particular basic photography lessons, it allows them to immediately express their vision with satisfactory results. They'll repeat mistakes, but they're only wasting their own time.
Film forces students to learn techniques or continue to fail. This approach teaches correct exposure approaches better, but can be extremely disappointing and discouraging for less-motivated students.
Reasonable work load
For an introductory digital photo course, I don't think it's unreasonable for any student to produce, edit and digitally deliver six images per assignment. If wet lab techniques are also taught, one to three prints per assignment is reasonable.
Wet lab time restrictions make students want to edit their own images. It can take beginners about 30 minutes to make one proper resin-coated print. Few students want to spend three hours in the lab when they could be shooting. So, they'll pick an image or two, crank them out and they're done.
Digital delivery makes students do the opposite. They want to deliver everything. However, six images of a duck in a swimming pool tells as much of the story as 20 images.
Teachers don't need to wade through a sea of similar images to find the best ones. This is the student's job. The students must select only the best images to learn to differentiate between "best" and "average."
Minimum shots
It's wise to assign a minimum number of shots. A common roll of film is 36 exposures. It would be fair to require a minimum of one full 36-exposure roll of film. Likewise, it's fair to require 50 digital images.
This minimum pushes the students to shoot more than one photo of a subject. It encourages them to explore shape, composition, juxtaposition, light angle and so forth. When combined with a subject minimum (four subjects should work), students acquire enough variety to select a decent set of images.
By setting both a shooting minimum (number of frames shot) and a delivery range (minimum and maximum), the students are forced to edit their own work and critique themselves first.
Critique
The students should push themselves and each other through constructive critique to make better images.
In the beginning, teacher critiques should concentrate on the basics: exposure, focus and timing. If young students' images fall somewhere within an acceptable range on these basics, they did well.
If something goes drastically wrong with these core issues, it's best to discuss the equipment problem with the entire class so everyone can learn.
Otherwise, it's best to avoid "talking down" images for beginners. Instead, find the best image examples and explain what works in the images.
It's important to involve the students in the critique. They need to be able to analyze the images and assess what is successful and what fails. It may require polling the class by student, but open format critique is the standard practice.
Rebuttal
It's common to want to defend one's work. So, it's important to let students know they must be silent while their work is critiqued. This makes them listen to the good and bad about their work without escalating and compounding pre-existing personality conflicts.
After the critique of their work, they get to defend their work and also get the final word about their work. If a critique is unjust to them, they can correct the record before the critique moves to the next set of images.
Award slips
One way to involve shy students in the critique is to have them award slips of paper by category. If using a cork board, students pin up the images. Then, they initial their category award slips and pin them next to the images they feel deserve the awards, but they can't vote on their own images.
Images without awards are removed from the board. The remainder of the class is spent discussing the reasons why students bestowed the awards. They aren't defending their own work, but defending the work of their classmates. This results in a much more positive experience since most folks are sensitive about their images at first.
Good starting award categories are:
Best photo
Best timing
Best framing
Most humorous
Most serious
Most artful (or creative)
Rarest (most difficult to acquire)
Universal image problems
Throughout any basic photography course, universal problems will arise. There are common ground issues as well as camera shake and many other beginner-level problems. These must be addressed as they appear in students' images.
I've written posts for most universal problems. They're included in the "All PJ-related posts" section of this blog. Although most of the posts are designed for working pros, there should be useful information for teachers in the list.
Grading guidelines
Since the eventual goal of this instruction is photojournalism, deadlines are the single most important factor in grading. This should be strongly emphasized. Images must be delivered in the proper format by the proper time to get a satisfactory grade.
Aside from deadlines, I believe it's most important for students to try hard. Therefore grading should be about objective factors rather than subjective results. Students will be rewarded or punished for subjective issues during critique. That's enough punishment or praise.
The following factors could determine a course grade from an objective standpoint:
30 pts - Deadline met
20 pts - Minimum number of images shot
20 pts - Minimum number of images turned in
10 pts - Assignment shot as directed
10 pts - Images properly exposed (excluding special assignments)
10 pts - Critique participation
Ultra-basic photo
Most photo classes make assignments which involve some level of failure. It's not a failure on the part of the student, but a failure of the equipment. Thus, the student learns the limitations of the equipment. The really smart students quickly find ways around these problems.
These assignments concentrate on one mechanical limitation while provoking student problem solving and discussion. The subject matter is left to students' imaginations.
For introductory photo courses, it's best to introduce the photographic limitations as well as techniques to handle the limitation. Often, instructors select successful images from professionals to illustrate the concepts and give a presentation about how to create successful images for the assignment. Then, they allow the students a week to work on the problem.
Some common beginning assignments include:
Shapes - have students collect one image of each major geometric shape.
Motion - teaches panning, blur (virtual volume) and stop action.
Light and shadow - this often throws details off both ends of the dynamic range.
High key / Low key - all white / all black. The camera will over and under expose. If there is some way to compensate for this on the camera, teach students the correction techniques first to avoid mass failure. Otherwise, this is simply a mass failure assignment to let them all know photography is trickier than it looks.
Same place at different times of day - this teaches about quality of light.
Same subject wide and long - this teaches about lens compression and relative position.
Close up - for point-and-shoot cameras this teaches where the focus will fail.
Light direction - left & right side light, front and back light to teach depth with light.
Types of light - have students shoot sunlight, cloudy, open shade, tungsten, fluorescent, halogen, sodium vapor to learn how the camera records different light colors.
2D - 3D - flat subjects that appear 3-dimensional. The principle is to show how tonal shading changes the textural appearance of flat objects. A good example is a wet or polished slab of marble. It is a really difficult assignment to convey to students.
Basic portrait - this is slightly more than mug shot. Both hands of the subject must be visible in the frame.
Scene - this is another hard one. This is a prep assignment for environmental portraiture. Students find a place where a portrait could be made. Once completed, have the kids print the image and move different-sized coins or ovals through the scene to see where they could put people's heads to achieve clean backgrounds without having tangents.
Environmental portrait - this combines the two previous assignments.
Self portrait - if camera allows it.
What's next?
I encourage teachers to dedicate significant time to each lesson so the knowledge can seep into students' brains. Consider these assignments as the alphabet of photography. Once the students learn how to handle these, then they can move on to understanding visual verbs and storytelling.
Enough for now,
 
Wednesday, October 18, 2006
World's largest smoker and grill
Photos by Mark M. Hancock / © The Beaumont Enterprise
Dana Arnold, co-owner of The Ultimate Smoker and Grill, of Justin, Texas prepares ribs and hot dogs at the Kroger store on Dowlen Road in Beaumont on Tuesday, Sept. 26, 2006. Proceeds from the event went to the Southeast Texas Food Bank.
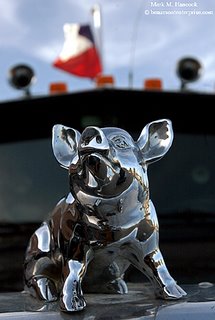
A Texas flag flies near one of the smoke stacks above a pig-shaped hood ornament on The Ultimate Smoker and Grill at the Kroger store on Dowlen Road in Beaumont. The 55-foot-long trailer can grill 200 steaks simultaneously and slow smoke 2,000 pounds of meat.
Dana Arnold prepares ribs and hot dogs as she squints against the smoke at the Kroger store on Dowlen Road.
Customers purchase ribs and hot dogs from The Ultimate Smoker and Grill at the Kroger store on Dowlen Road in Beaumont.
 
Tuesday, October 17, 2006
West Brook catch
Mark M. Hancock / © The Beaumont Enterprise
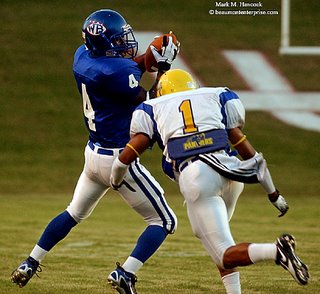
West Brook's Jordan Garrett (No. 4, left) pulls down a pass as Ozen's Ben Wells (No. 1) moves in for the tackle during a football game at Cardinal Stadium at Lamar University in Beaumont on Friday, Sept. 1, 2006.
 
Labels:
Beaumont,
football,
Ozen HS,
sports,
West Brook HS
Primary educator's intro to PJ
Recently a few elementary and middle school teachers asked for help with lesson plans for introduction to photojournalism (PJ) classes. Personally, I think this is like asking children to repair a diesel fuel injector before they master riding a bicycle, but I'm probably underestimating some kids' abilities.
I should also mention that I'm probably too blunt for most primary school teachers' sensibilities. My only baby has interchangeable lenses. So, I'll hope professional educators soften the tone between what I write in this series and its eventual audience. :-)
General intro
There is a progression to PJ. It involves a mastery of photography (evidentiary), documentary and finally photojournalism. Most beginning assignments tend to result in evidentiary images. It's a good place to start, but it's only the first step if PJ is the desired goal.
A logical class design would teach students about the equipment, working with people, writing cutlines, basic event coverage and finally story telling.
I always suggest it's wise to include "basic photography" in introductory photojournalism classes. It teaches the students to use the camera as a tool for their vision. It also teaches the abilities and limitations of the camera so they can refine their vision.
Photojournalism - like journalism - looks easy, but it takes a lot of training and mistakes to get it right. PJs must understand how to be a journalist and a photographer as well as post-production (publication applications) and media law.
Setting ground rules
First and foremost, teachers need to protect themselves legally. With the world being as crazy as it's become, teachers need to be absolutely certain students understand what are "inappropriate" photo subjects.
A common beginning assignment could be for students to document their day. Part of most 3rd-graders' days is bath time. It could be their most or least favorite part of the day. They may wish to document it. However, when they turn in a photo of their bath time, it's placed onto a school computer and has an entirely different meaning.
Consequently, bath time should be strictly off limits. If they want to show their little brother brushing his teeth while fully clothed, it's OK. But, draw this line early and don't allow anyone to cross it.
Legal issues
As soon as a student has a camera in hand, legal issues arise. The camera is an instrument of freedom of speech and legal limitations. By including photography in a class setting, teachers must determine how much responsibility they're willing to accept.
Since this post is designed for primary and secondary teachers, it's probably best to tell the students and their parents that they're responsible for all their own actions. It's also best to inform them that the school is NOT willing to defend their freedom of speech or press rights. This keeps the teacher from having an unnecessary confrontation with parents, fellow teachers, a principal, school board members, a district attorney, etc. (and losing the battle as well as possibly a job).
Without delving too deep, the kiddos need to understand that if they do happen upon something scandalous, they won't get to publish it. Yes, it's newsworthy. Yes, it's a matter of freedom of speech and press, but they're in a controlled environment.
Juveniles have varying human rights. It's not fair, but it's a fact. Depending on the circumstances, law centers and other defenders will step up to protect children's rights (speech and press). But, don't count on it.
Prior restraint is alive and well for students (of all ages) in educational institutions.
What are the boundaries?
Again, I'm not going to digress into court case minutia of privacy, trespass, intrusion, false light or any of the other legal issues. I'm also going to hope these classes aren't taking place in a combat or other crisis zone.
These are some safe, broad boundaries to keep the kids and teachers out of trouble.
1) Establish who can and can't be photographed. This has become customary in the last decade or so in most school districts. If the district requires parental approval for photographs, then only those children with signed releases on file can be photographed. No exceptions.
Any student without a release shouldn't be in a PJ class. They can work in the office during photo time. If kids really want to be photographed or be in the class, tell them to get their parents to sign the school district release.
2) Establish what is "public" for the students. This is different than the professional level because the students are actually in the facility more time. Generally acceptable rules for students might include the photo classroom, hallways, cafeteria, playground and gymnasium or auditorium. Other areas such as gardens or libraries can be determined as needed.
Off limits areas would be other classrooms, offices and "private areas" (particularly health services).
3) Set off-campus shooting area limits. The general rule is anyone can shoot from a public place. Students may not understand a mall is a private business. This needs to be properly explained.
It's safe to limit photography to places the student lives, is invited to attend (friends' homes) and public facilities (parks, recreation centers and private vehicle commutes). In general, let the children know that if they don't see anyone else with cameras (excluding pro shooters), it's probably off limits.
Equipment
Whenever possible, it's best to have all the students use the same style of camera. This makes critiques uniform and keeps the children from facing awkward/hateful conflicts from the kid whose parents own the universe.
For introductory classes, point-and-shoot digital or single-use 35mm film cameras are probably best. Single lens reflex cameras are best reserved for high school and beyond.
If film cameras are used, make sure there is some fair way to pay for the cameras, film, developing and printing. Poor kids deserve to express their vision as much as rich kids.
If the children must take turns sharing equipment, set firm, fair rules. How long does each student get to use the camera? What happens if the camera is left at home, stolen or breaks? Where and how are the cameras to be stored when not in use?
Don't freak out
Well-intentioned teachers want their students to be happy and use all their senses and abilities. After reading the cautions above, they might re-think their decision to teach photography.
Don't worry, as long as these rules are understood and enforced, everything should go fine.
The next few sections of this series are about making assignments and letting the students find their vision. From here onward, it's the fun stuff.
Enough for now,
 
Monday, October 16, 2006
South Texas State Fair opens
Photos by Mark M. Hancock / © The Beaumont Enterprise
Eight-year-old twins Preston (left) and Tina Powell (right) of Beaumont wait for the South Texas State Fair gates to open at Ford Park in Beaumont on Thursday, Oct. 12, 2006. The fair continues through Oct. 22, 2006.
Forest Adams of Beaumont Tractor Company moves a tractor into position before opening night of the South Texas State Fair. Hurricane Rita canceled last year's fair for the first time in its decades-long history.
Kelli Stokes, 8, of Hamshire, Texas (front) listens with other competitors during her Boer goat division judging during opening night of the South Texas State Fair.
The midway offers food and rides during opening night of the South Texas State Fair.
Fair patrons move through the carnival rides during opening night of the South Texas State Fair at Ford Park in Beaumont.
 
Look through life's viewfinder
When the mirror flips up, I can't see what's before me. I've said this before. However, today I mean it differently.
I've been busy lately with work, freelance gigs, art and trying to make it from day to day. This takes a lot of time and effort. However, it's never too much.
The mirror flipped up. Nothing more.
Today was my first day of "rest" in a long time. I spent time with Fayrouz. I caught up on some "busy work." I watched a movie and my favorite TV show.
It rained. The rain was mostly a soft wash. It rinsed the dust off the leaves and made the world green again. It gave the plants a rest. They needn't worry about digging for water today. They could relax and drink.
So could I (coffee).
In other words, what's before life's viewfinder today are the colors, hues, textures, shapes and movement. These are taken for granted while the mirror is down. They are there, and we can see them. This is what surrounds us and makes us happy or concerned.
This view only exists today while the mirror is down. Tomorrow is unknown. We can only expect, anticipate and hope for a good result - a "useful" image.
This requires faith. It requires either faith in our equipment or something else.
I don't talk about faith much. It's not my job. However, it's part of how I do my job. I believe what I believe. I ask nobody else to believe what I believe. I don't hold anything against anyone who believes otherwise. This is also part of my job.
Through the years, I've been privileged to meet people of different religious and spiritual followings. I've also been privileged to meet people who follow no religion, nor believe in a spiritual world whatsoever. In short, I'm privileged to meet anyone who welcomes my camera. I can only express thanks for the opportunities through my images.
Throughout life, PJs compose many images. We wrap our frame around parts of our lives and work on the composition. We want to make these images as good as possible. But sometimes we don't succeed to our own expectations. The background is a little messy. The focus is a little soft. The layers don't quite work. The subject moved. This is life.
When we get near the end of a roll of film or are running low on our memory card, PJs are very cautious about when they allow the mirror to flip up and obscure our view. Each frame becomes precious as we know we're about to capture our last image.
The last image should be our best. After all, we're only as good as our last image. This requires patience. This requires preparation. This also requires faith - in whatever.
Why this philosophy?
The mirror is down. It's time to recompose.
I never truly expect my last frame to be my final frame. I understand one day it will be. This is part of the reasoning behind this little blog on the outskirts of the Web. My wish is to compose an image to teach other PJs about the job and maybe help them avoid some of the problems we all face.
While I try to compose an image for pro PJs to understand, I'm also asked to make images for the little ones. One day, they may be pro PJs too. If not, they could appreciate and support the work of pro PJs.
I'm working on images for the little ones (at least for their teachers), and I'll post soon. Not soon enough because there is only now. Tomorrow isn't here and may never come. The next frame might be the last. This would be unfortunate. But, I can only make one image at a time.
How this applies
When PJs are on assignment, they work hard to make a perfect image. Sometimes they are tired, cold, hungry and want to rest. But, there isn't time to rest. Deadline is approaching and there are few frames left.
This is when we must reach deep within ourselves. We must find the strength to make one more frame - the best frame. If we think we have done well and quit, we may not have honestly made the best image. So, we make one more. And then, one more. This is all we can do.
When PJs are the most exhausted, we must ignore the pain in our bodies to get the image. The best image isn't for ourselves particularly. Of course ego has a hand in this process; however, the best frame is what our readers and the subjects deserve.
It could be a subject's only frame. This might be the final frame on their roll. We don't know. It might be the last image on the page for our readers as well. Either way, they deserve the best.
There's still more film
If we obsess on the final frame too much, many delightful images will be missed. Take time to enjoy the process and remember there's more film (or another memory card). If we run out of time, it's fine. We did our best and have no regrets. We can rest after deadline.
Although PJs see many horrible scenes, there is always one beautiful image hiding within it. Find it. This is the challenge for the next roll. There's always something extraordinary to shoot if you seek it and believe you'll find it.
I'm happy today and merely recomposing. I think I have plenty of film left in the camera, but I'm not certain. I'll trust myself, expect the best, and bless the present. I'll try to do my best until deadline - whether the mirror is up or down.
Enough for now,
 
Sunday, October 15, 2006
Ramadan in Beaumont
Photos by Mark M. Hancock / © The Beaumont Enterprise
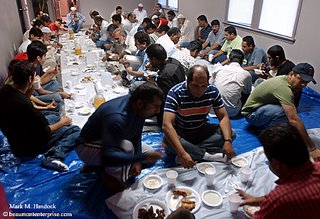
Muslim men gather break their day-long Ramadan fast at the Islamic Society of Triplex activities center in Beaumont on Tuesday, Oct. 3, 2006.
Umar Ghaffar, 3, of Beaumont looks up from eating as Muslim men break their Ramadan fast at the Islamic Society of Triplex activities center.
Muslim men help each other to attend a service after they break their Ramadan fast in the activities center at the Islamic Society of Triplex.
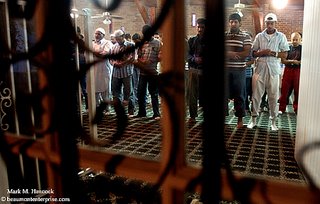
Mosque congregants pray during a Ramadan service at the Islamic Society of Triplex in Beaumont.
 
Subscribe to:
Posts (Atom)