Photo Illustration / Mark M. Hancock / © The Beaumont Enterprise
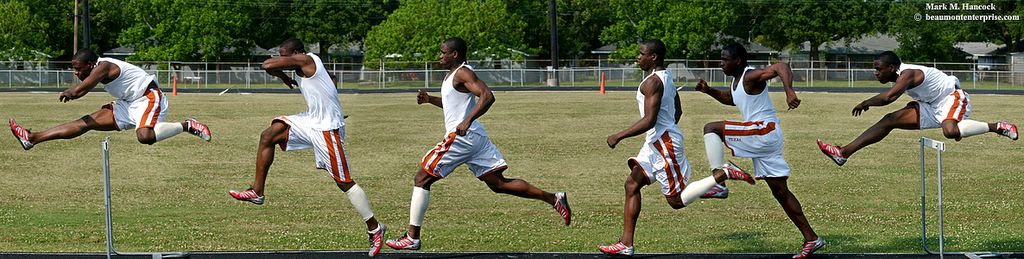
Port Arthur Memorial High School's Jamaal Charles demonstrates his hurdling stride at the school on Thursday, May 12, 2005. (Click on the image to see a larger version. Click on it for an even larger version.)
This illustration contains six different individual frames of Jamaal Charles. He's an outstanding athlete with great potential. I photographed him two weeks ago when he beat the No. 1 and No. 3 nationally-ranked hurdlers during the Region III Track and Field Championship meet in Humble (near Houston). This weekend, he won the state 5A championship.
As you might guess, this image created a little buzz at the office. Mostly the questions were about how it was done. I'll explain why it was done, then I'll explain how.
But first, let's discuss the role of ethics in photojournalism as it applies to digital manipulation of images. I believe all digitally manipulated images should have the designation "Photo Illustration" to differentiate them from photojournalism. Moving image elements (pixels) without disclosure is the visual equivalent of a lie. It's contrary to photojournalism, which aims to show the truth.
Although there are times when a photo illustration is appropriate, it's best to avoid them and use them only when there is no better way to tell the story.
Why it was done
This assignment was designated as "hot," meaning they needed it quickly for the next day's newspaper. The story idea was to explain the stride and steps a champion hurdler takes from one hurdle to the next.
I could have shot it as a straight sequence to show the stride and distance. However, the track configuration at the time of the shoot would have placed the hurdler's face in shadow instead of light. His skin tone was not reflective enough to handle the two-stop difference. Additionally, a straight sequence would take more space than needed and still wouldn't accomplish the explanation.
My options were:
1. Shoot whatever he did during his normal practice, have his face be lost in the shadow, and possibly not get what I needed anyway - not a good option.
2. Fake the scene (subject manipulation) and have him run into the light several times until I had a good sequence - an IMPOSSIBLE option for my ethics.
3. Make an illustration where I had exactly what I needed while fully disclosing the situation as an illustration with subject and digital manipulation.
Consequently, I committed to a photo illustration to keep on ethical high ground.
Previsualize the final image
To shoot an illustration, the PJ must previsualize the final image. This means the PJ considers the various obstacles and understands what elements are required to accomplish the desired final image. It also makes the PJ consider camera angles, light, background elements and other factors, which could weaken the final image.
For this image, I knew the hurdler must run into the sunlight to have facial details. I also knew I needed enough room to back up and shoot it flat with a longer lens. Furthermore, the background needed to be neutral rather than the high key (which the visitor's stands would have created).
The only area of the track which accomplished the majority of these needs also contained the shadow of one of the light poles. In a perfect world, we would have waited for the shadow to pass from the hurdling area, but we were on a tight timetable.
Ideally, I would've gotten a ladder to use the football field turf as a background, but this was a last-minute decision and no ladder was available. We did what we could with what was available. Sometimes it's how news PJs must do things.
Correct lens angles
This image required me to "shoot it flat." Flat sequences are different than panoramas because the camera moves as well as the subject. In a traditional panorama, the camera is stationary while the subject is either stationary or moving. A panorama thereby creates a curved distortion caused by changing camera angles. I have an admittedly rough example here.
Shoot for the final purpose
Because it was for an illustration, I asked the athlete to run the hurdles four times. I included most step sequences from one hurdle to the next to show the distance traveled, the stride and the number of steps involved.
The second step is missing because it would have crowded three images into an already tight portion of the image.
The images were shot with a 200mm lens from three different locations along a fixed path (two frames per position). This set the background at the appropriate angle. I can't overemphasize the importance of shooting the right image angles to create the final image.
How the digital image was done
The remaining steps are done in PhotoShop. When processing the images, it's best to handle the whole batch in its original files before color correction. Then, the color corrections are consistent throughout the whole image.
Set the canvas
First, open the base image in PhotoShop. This sets the image to the extreme right or left of the final image. I chose the right-hand image because he was running to the left.
Next, choose Image and then Canvas Size. A pop up window appears. Choose the Anchor quadrant from the 10 options to set the base location. Then increase the height or width to slightly more than expected for the final image's size. Then choose OK. This increases the canvas size to the new dimensions and includes the base image.
Save often
Throughout the process, much of the computer's random access memory (RAM) is used. The likelihood of a computer crash is good. Consequently, folks should Save their work after each completed step. This creates much less stress when the computer does eventually crash.
Once layers are introduced in the next step, the image suffix converts from a .jpg (joint photographic expert group) to .psd (PhotoShop Document). The file size also dramatically increases. The advantage of this change is the image doesn't lose information on each additional Save.
The .jpg protocol compresses the file upon each Save and ultimately degrades the image. However, once the image is completely assembled, it's best to Flatten the layers and Save the final document as a .jpg image to compress the overall image for storage.
Working with Layers
Anytime more than one image, text or graphic element is introduced into a PhotoShop image, a new Layer is created. On extremely complex images, it's best to choose Layer and Flatten Image at each major project point to cut down the size of the total PhotoShop image.
While working with layers, it's possible to become confused because all layers appear simultaneously as a two-dimensional image on the screen. To distinguish between layers, choose Window and then Layers to see the set of options. As each layer is chosen from the list, it moves forward in the master image. This doesn't mean it appeared this way when flattened. It only designates which layer is currently active.
After several attempts, it becomes easier to learn the layering patterns and how to use them appropriately without confusion.
Place a second image
Next, open the second image in the series. Select all and copy the image. Paste the image onto the original image. It should appear in the middle of the canvas. Use the Movement tool (on the toolbar it looks like arrows pointing in four directions) to set the image where it belongs according to all image elements.
If the image is "simple," the image elements align near the edges with a slight overlap to allow placement. If the image is complex - such as this one - locate guide points (landmarks) within the image to determine what must be covered or revealed in either the forward or back image layers.
Once the guide points are determined, choose Window and History and delete everything from the last Paste command. Save.
Paste options
Now it gets tricky to decide whether to layer the top image over the bottom, the bottom over the top or a combination of both. Often the primary subject and background determine needs.
Using the Lasso tool, select the area to remain forward in the original image. Then, select the remainder of the original image area(s) to keep. The remaining portion of the image(s) could be overwritten (depends on the incoming image).
Because the selected area is the area we want to protect, we must choose Select and then Inverse. This actually chooses all remaining portions of the image and canvas. Now, choose Edit and Paste Into options to place the new image or graphic element. It must be moved into position, but it slides behind the originally selected areas.
On the image to be introduced to the master file, use the lasso tool to select areas to be introduced to the master file. With this illustration, I selected the whole image and subtracted the areas I didn't want to overwrite. The same effect is accomplished either way.
Once the area is selected, Copy the area. Change back to the master image and Paste the copied area. Move it into position. The copied area has the shape selected in the first image. It moves over the existing image(s) and becomes the top layer.
Continue the process
Continue the copy and pasting process until the images fill the blank canvas area. If additional canvas is needed, simply increase the canvas size in the required direction(s).
Finishing touches
Once all the pieces are assembled into the master document, Flatten the image. Save the image.
It'll probably have a ragged edge. Use the Crop tool and crop off the ragged edges to make the image appear complete. Then color correct, sharpen and adjust as needed.
Once the image is absolutely completed, convert it to a .jpg and Save the final image for storage.
Enough for now,


5 comments:
In PhotoshopCS I've tried the Automate>Photomerge setting with success on similar images. Of course, I also designate the result as a 'photo illustration'. I use a tripod to set my fixed horizon and shoot away. Photoshop does an excellent job of blending the images with distortion control. I understand( so long as you leave an appropriate 'bleed' area). I'll have to try your method although I'm not completely clear on the whole subject of flat sequences. In any case--great shot! I'm sure the folks down there are loving you and your photography. I mean, what's not to appreciate? Hope Fayrouz is enjoying it as well.
Interesting that something as straightforward as this causes so much ethical controversy. Thanks so much for keeping up the blog during the busy days of your move and resettling!
David
For a flat sequence, the camera is moved along a two dimensional plane in concert with the background. In a panorama the camera is stationary. The difference is when the images are combined, there is no curvature caused by camera angle changes.
James Balog is good at it. He makes images of huge trees, and they are not distorted. He also gets some nice effects by having multiple horizons although the primary subject is stationary (because of subject-to-lens angles and focal length).
Just curious, why didn't you just have a stationary tripod with a wide lens and shoot at 8fps and then crop your image down to the panorama? Even if you don't shoot at the 8fps and pause so you shoot at the precise time this seems it would be easier than panning and having to worry about horizons and piecing it together on a tight deadline.
That would make him really tiny over the hurdles and a giant in the middle. The perspective would also be be all messed up. This way, you get a realistic idea of the distance he's traveling and the background doesn't shift.
Post a Comment