Showing posts with label lighting. Show all posts

Sunday, November 12, 2023

Harry Potter Experience 2023

 
We visited “Harry Potter: A Forbidden Forest Experience” last week in Little Elm. It was about as we expected. The lighting is phenomenal. The statues are designed to withstand any weather. You should go in costume if you’re extremely into Harry Potter. This short video has the highlights. It will continue through January 2024.

I’ve Got Your Six!

Mark M. Hancock, GRI, MRP, AHWD
REALTOR, New Build certified
214-862-7212
DFWmark.com

#DFWmark #HarryPotter #ForbiddenForest #LittleElm #DentonCounty #colorful #lights #statues #forest

Monday, November 28, 2005

Understand basic flash exposure

We've discussed making correct exposures under available light conditions. Anyone can do this with varying success. Now we're going to discuss one of the key ingredients to separate pros from amateurs - artificial light (flash).

As we've determined, the flash is a critical part of photojournalism. When there is no light, it's impossible to make a photograph. At times, a flash becomes the only light source available. Even available-light purists must use a flash or go home without an image (not an option for a deadline PJ).

It's easy to talk about the marvels of through-the-lens (TTL) flash metering. It allows PJs to operate with speed and accuracy most of the time. However, the flash may fail in TTL mode while on assignment. Likewise, a complicated lighting scheme may require the PJ to make manual calculations. Consequently, PJs must know how to handle the situation, or they'll fail.

Many people avoid flash because the terms and mathematics sound complicated. At first it is. With a little practice, it becomes second nature and frequently the PJ can use previous experience to "guess" the correct exposure on the first try. However, it's still advisable to double-check with both a flash meter as well as a quick manual calculation (not to mention chimping).

Basic flash definitions
The following are critical definitions while working with flash. We'll keep referring to the terms, so they need to be understood. Once we need to change EV ratios with flash, lack of understanding these terms leaves some people in the dust. The next step is basic calculus. It'll leave even more folks scratching their heads. But let's not rush into it yet.

If anyone's eyes ever glaze over when talking about photography, it's now. Consequently, I'll simply give the terms, definitions and some practical equipment testing advice today. We'll talk about how to use a flash later. Hang in there, it's worth it.

f-stop
An f-stop expresses a focal ratio of the aperture diameter to the effective focal length of the lens. For example, f/8 represents a diaphragm aperture diameter that is one-eighth of the focal length. For a 50mm lens, the opening would be about 6.25mm at f/8 (50 / 8 = 6.25 or 6.25 * 8 = 50).

The effective focal length varies with zoom lenses.

Guide number (GN)
The guide number is a numeric value for the amount of light emitted from a flash (flash output). It's represented in whole numbers. By knowing a flash unit's GN, PJs can determine the correct exposure for any subject at a known distance from the flash.

Don't trust the manufacturers suggested guide number. Instead do your own equipment calibration at 10 feet. At 10 feet (FD for this example), fire the flash at the flash meter. Multiply the f-stop by 10, and it'll be the correct guide number for the flash.

GN = FD * f
At 10 feet:
f * 10 = GN
f/8 * 10 = 80

Where
GN – Guide Number
FD – Flash-to-subject distance
f – f stop

This calculation should also be done for various flash attachments (softboxes) and gel combinations to understand all possibilities.

Flash-to-subject distance (FD)
The flash-to-subject distance is literally the distance light must travel from the flash to the subject. This distance includes the distance to a bouncing surface (a wall or ceiling) and the distance from the bouncing source to the subject. Unless the flash is on-camera and directly pointed at the subject (yuck), it'll almost always be different than the camera-to-subject distance.

GN = FD * f
f = GN / FD
FD = GN / f

Where
GN – Guide Number
FD – Flash-to-subject distance
f – f stop

Or:

80 = 10 * f/8
f/8 = 80 / 10
10 = 80 / f/8

With an accurate GN, PJs can correctly calculate exposures with a flash set on manual (or fired with remote, slave or pc-sync). To calculate the correct exposure, establish the flash-to-subject distance (FD). Next divide the GN by the FD to get the correct f-stop.

Enough for now,

Saturday, March 19, 2005

Behold "The Beast"


© Mark M. Hancock and The Dallas Morning News

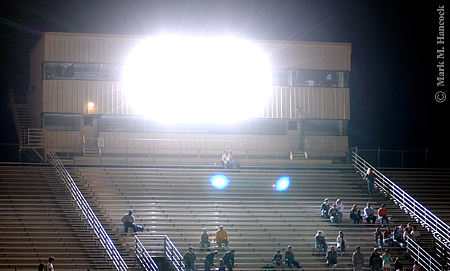
"The Beast" fires from the press box during a soccer game at The Colony High School in The Colony on Tuesday, February 15, 2005. The Colony won the game in a shoot out.

Many folks have asked what kind of lights I use for indoor sports and portraits. I call it "The Beast," but everyone else calls it a Norman P2000D studio flash system (since replaced by the Norman D24R Series 900, a 2400WS studio flash system with built-in Pocket Wizard reciever).

Technically, it's incorrect to call a studio flash system a "strobe." I do so for brevity and to distinguish between a hand-held flash/speedlight and a studio flash system. Therefore, when talking outside the PJ world, it's accurate to call a studio flash system as such and a hand-held flash as such, but inside our little world it's fine to say flash and strobe.

My plan was to have everyone understand lighting, guide numbers and all, but more readers were interested in the biz side. So, I caved to reader pressure. Consequently, if you don't understand what follows, I'll clear it up in the next month or so.

For the shots above and below, I used two heads and set the power for 800 Watt Seconds (WS) instead of 1200WS to avoid frightening people or getting in trouble with game officials. Incidentally, it has a single combined-output plug for 2000WS output with a suggested guide number of 168. I don't use it. It's spooky.

In Texas, the standard rule is flash must be above the 13th row of gym bleachers during sanctioned high school games. I place mine on the top row unless it's a really large coliseum.

For hoops, I typically use one head at 800WS bounced off a neutral wall or ceiling. For hockey, I either bounce it off the wall behind the penalty box or I use two heads and bounce them off the wall toward the ceiling and onto the ice (basically over the stands). For volleyball, I use one head set at 400WS with a softbox.

Last month I had a soccer assignment without a tight deadline, so I lit it. I wouldn't suggest this for most people, but it turned out OK. It fell into the "must try" category since it supposedly can't or shouldn't be done. It would've really rocked if the game was more violent. I could see it being major cool for night track events.

The nice stadium officials let me put my strobes on the filming deck of the press box at a standard high school stadium. With all these variables mentioned above, I could have gotten f/4 at 1/500 on the field at 800iso. I didn't really trust how it looked on the LCD, so I chose a setting on the safe side (f/2.8 at 1/250th). In retrospect, I wish I had at least increased the speed because the highlights (Zone VII) are still hot and there was a little more ambient light blur than I wanted.

In the end, I learned a few things. I learned it's possible to light an entire playing field from the press box resulting in better light than available. I learned that Pocket Wizards are good for at least 150 yards, and I learned the strobes at this setting and height can kick out enough light for 150 yards plus tip-in. I suppose I should test the 2000WS one day to get an absolute range on it.

Some day, I'll sweet talk my wife into getting me a second power pack and another Pocket Wizard to cross-light events. Imagine the tribal sounds I'll make in the scanning room when I shoot football or light an entire gym at f/22. :-}

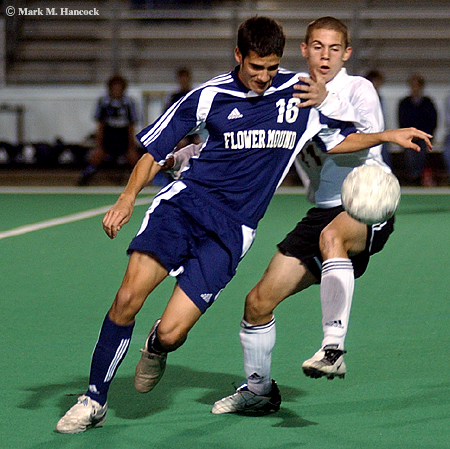
I admit the shot below isn't great. I posted it to show the difference between the available light shadows and the strobe shadow (the darkest one). In other words, at much less than full power and at great distance, "The Beast" is still more powerful (for milliseconds) than the banks of lights at most high school stadiums.


© Mark M. Hancock and The Dallas Morning News

Flower Mound High School's Richard Oliva (No. 16, left) tries to get past The Colony's Jake Oldham (No. 11, right) during a soccer game at The Colony High School in The Colony on Tuesday, February 15, 2005. The Colony won the game in a shoot out.

Enough for now,
 

Monday, February 28, 2005

Sometimes it's too fast


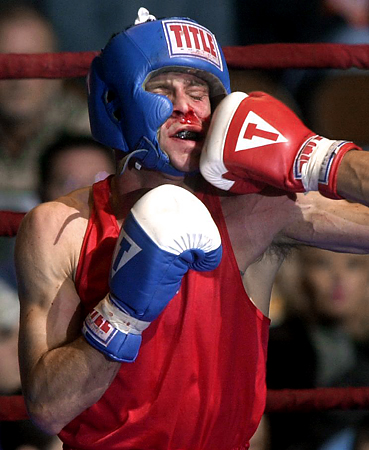
Featherweight open boxer Raul Barrientes (left) takes a shot from Jose Hernandez (red glove right) during the Fort Worth Golden Gloves boxing tournament at the Will Rogers Memorial Center complex on February 23, 2002. Hernandez won the fight.
Mark M. Hancock / © The Dallas Morning News

This is an example of a rare occurrence of my strobes/shutter set too fast. This frame is shot somewhere around f/8 at 1/500 or 1/640. The resulting image looks like the red glove is placed delicately in the frame.

If we look closely, his head is beginning to spin around inside his safety headgear. Had I shot at 1/250 or maybe a little slower to let some available light blur the frame, it would've been more obvious how hard he was hit.

Consequently, sometimes it's important to keep the speed slower than possible. Hockey, boxing and karate look the most strange if there is no touch of motion to give the feel of speed and power. Basketball and volleyball hold up the best at super-high speeds.

Enough for now,
 

Tuesday, December 28, 2004

Balance the light

A photograph is a cumulative record of light. The light can either be reflected or transmitted. Furthermore, each thermal light source has a different color measured in Kelvin (K) degrees.

End easy part.

PJs must deal with whatever light they encounter and try to make it look as it would to the human eye. Since the camera records in absolute terms, this is frequently impossible and requires color correction or filtration.

Color correction ethics
Before anyone has a cow, understand all photographic processes are corrected to what the human eye sees. The use of color correction (cc) gels with light sources or correction filters on the lens is typically employed to make the scene appear as it would to the human eye.

Most modern films are panchromatic. This means they capture the color spectrums most humans see. Color negative film is on a brown substrate, which requires correction. Then, it must be corrected back to standard colors from their complementary color (i.e. cyan = red, magenta = green and yellow = blue).

Furthermore, each brand and type of film has a color bias. Films are selected specifically to exploit these biases. Since film is becoming less common, we won't discuss it much here. Positive film (chrome, slide) is the closest to neutral although each has its own bias as well.

In short, we're not talking about changing the color of someone's tie to please a design color pallet. We're discussing light and film balance to make sure Granny's hair doesn't turn green under a fluorescent kitchen light because it doesn't appear green when the PJ sees her sitting there.

What is normal light?
Daylight and artificial light (flash) are around 5000K degrees. Common films and digital cameras record everything at this color temperature unless corrected.

The PJ's goal is to record all light as if it were normal (5000K degrees). Sometimes this requires putting cc gels on light sources, putting cc filters on the camera lens or adjusting the color afterward via software. For film it's often all of the above.

Common light colors
In loose terms, the light sources encountered most by PJs are daylight, shadow, tungsten and fluorescent. Each has its own color and correction method. Although there is no "one" way to correct for these light colors, we'll discuss the most likely methods to be successful.

Here's a list of the commonly encountered light colors. Although all of them could be balanced and/or corrected, we'll only deal with the most common. However, it's important to understand where each light source falls within the Kelvin black body measurement spectrum.

1000K Candles; oil lamps; most open flames
2500K Household light bulbs (tungsten)
3200K Studio lights, photofloods (tungsten)
5000K Typical daylight; electronic flash; strobes
5500K Noontime sun
6000K Bright sunshine with clear sky
7000K Slightly overcast sky
8000K Hazy sky
9000K Open shade on clear days
10,000K Heavily overcast sky
20,000+K Open shade in mountains on clear days

Using cc gels
Once PJs start shooting color and move beyond standard daylight environments, it becomes necessary to use cc gels with a flash and/or use correction filters on the lens.

To gel a flash, simply cut a large sheet of gel material into a segment slightly larger than the flash head. Then use tape or Velcro to fasten it to the head. Softboxes, bounce cards and other light-diffusing devices can be added after the cc gel is attached.

An inexpensive way to manage this is to buy a Roscolux Swatch Book (about $2.50). The book has one sample of every gel they make. These gels are about the same size as most hand-held flashes.

Instead of buying the larger (and more expensive) individual sheets of cc gels or an entire cc kit, PJs can get the swatch book and have everything. However, I'd suggest getting two books because they get torn up with use and once PJs are past the learning curve, they can't live without these.

When purchasing the gels, make certain they are photographic quality and heat resistant. I've had several (expensive) gels evaporate into oblivion after one flash pop.

Daylight
Daylight is fairly simple. It's already around 5000K. Use standard film or set digital cameras on daylight. Use flash/strobes without filtration.

Shadow
Shadow color temperatures can vary widely. Basically, it's all shades of blue. Blue is considered a "cool" light temperature. It's a fine background color and actually helps lift the subject off the background if the subject is lit with standard flash or strobe (5000K-5500K). It allows the subject to reflect "warmer" tones and appear more alive than the background.

Shadow corrections
Correct for open shade with digital cameras by setting to shade. The overall scene will be warmed. It's important not to have natural daylight spilling into the scene or it'll appear grotesquely yellow.

For many years, I didn't correct for shadows while using a flash unless I saw a distracting difference. However, it makes a significant difference in the red and yellow portions of an image. Consequently, if the subject(s) has blonde or red hair or the scene is red or yellow, use the gel. It only takes a few seconds to attach the filter and it makes all the difference.

To correct for shadows, add a Cinegel Half Blue #3206 cc gel onto the flash and set digital cameras to shade. Film needs to be corrected in Photoshop or PJs can add a "warming filter" (81A) to the lens to correct in camera for chrome film.

Tungsten
Tungsten light is the light emitted from most household light bulbs and photofloods. The light is created when an electronically charged filament (wire) is heated and glows. It is a constant light source (as opposed to pulse). It measures around 3200K degrees on a black body light chart. To film and filtration, it's reddish orange.

Tungsten corrections
In all cases where tungsten light is the prominent light source, it's best to gel flash and strobes to match available light. With flash, Rosco suggests Cinegel #3411: Roscosun 3/4 CTO. It converts 5500K daylight sources to 3200K to somewhat match ambient light.

Although household light bulbs are about 2500K, the gel correction leaves a touch of warmth in the room once color corrected. It's enough red to give the background a "home" feel without making it look like a furnace or disco.

There are both positive (chrome, slide) and negative tungsten-balanced films. Using available tungsten light, shoot as normal with T-type film.

With digital cameras, set the color balance for tungsten and shoot as normal with available light.

With standard negative film, shoot as normal for available light. Color needs to be corrected in Photoshop.

With standard positive film (chrome, slide) consider sacrificing two stops of light and use an 80A filter. It filters 3200K to 5500K.

Fluorescent
If you noticed, fluorescent light doesn't appear on the chart above. It isn't part of the black body light spectrum. Instead, fluorescent lamps create light by electronically charging phosphors within a vacuum-sealed tube. Each fluorescent tube transmits a different range of colors depending on the age and composition of the tube. Generally, it transmits light in the yellowish green range.

Furthermore, it's a pulsating light source. It's regulated by alternating current (60 cycles per second in the U.S.). This means any shutter exposure faster than 1/50th is still unpredictable after all other variables are removed.

Fluorescent corrections
Most PJs start banging their head on the counter when asked how to correct for this light. There really isn't a sure-fire correction for fluorescent light. As stated above, each tube is different and unpredictable.

However, we must still do what we can to make it look somewhat "normal."

The best way is to custom white balance the light with a digital camera. Next would be to shoot with available light on negative film (try adding an FL-Day filter to the lens as well) and color correct in Photoshop. Then, it gets harder.

With flash, Rosco suggests Cinegel #3304: Tough PlusGreen gel. This gel "adds green to natural and artificial daylight sources to balance with U.S. Cool White or daylight type fluorescents. To be used with overall correction at the lens or in the lab."

Frequently, the gelled flash appears more cyan than the background. By the time it's corrected, the background shifts slightly toward red, which is good in moderation.

With positive (chrome, slide) or negative film, PJs can gel the flash and try to counter filter the color with a FL-Day correction filter on the lens. It frequently doesn't work, but it's still better than bug green.

Although I can't see a PJ doing it, I'll also mention cc gels can be purchased by the roll and sleeved around the light tube to restrict green range transmission. Supposedly this has adequate results, but it takes time, labor and permission to start ripping down lights.

Mark's solution
My solution isn't for everyone, but it works. Blast the heck out of all available light with a really powerful strobe at a high synch speed, on a low ISO with a small aperture (F/22 is my favorite). Then, the color of available light isn't an issue. ;-}

How's this possible? A strobe can fire at about 1/8000th of a second. The camera's synch speed is determined by the speed at which the shutter is completely open. This means the strobe has the same effect at 1/500th of a second or several minutes. The only difference is the accumulation of available light.

If the available light is metered on 200 ISO at 1/30th on F/2.8, and the PJ sets the strobes on 200 ISO at 1/500th on F/16, the stop difference (using EV calculations) is nine stops. As we've determined before, the dynamic range is only five stops. We've effectively moved middle gray deep within the black range. We've also moved the highlights with detail to four stops below black with detail. Therefore, it's negligible. So, only the light from the strobe accumulates on the film or CCD. End color correction debate.

An extra bonus to this method is no blur. Since strobes actually fire somewhere around 1/8000th of a second. It becomes the de facto shutter speed. Angry bulls fly through the air and move in several directions simultaneously. But they are frozen in time at 1/8000th of a second. Any subject blur is a result of available light accumulation.

Now does everyone understand why I got so upset when the camera manufacturers decided to use a "new technology" and slowed the synch speed to 1/250th? Color correction and blur became problematic again.

Enough for now,

What's a Kelvin black body?
William Thomson was an Irish mathematical physicist, who specialized in thermodynamics. He created the absolute temperture scale. He was titled 1st Baron Kelvin for his work. The Kelvin River flows past Glasgow University in Scotland where he was a professor.

Gustav Kirchhoff actually introduced black body radiation theory into the mix. According to Wikipedia, "In physics, a black body is an object that absorbs all electromagnetic radiation that falls onto it. No radiation passes through it and none is reflected. It is this lack of both transmission and reflection to which the name refers. These properties make black bodies ideal sources of thermal radiation."

From there it becomes quantum physics and drool. Just consider the colors magma would radiate as it's heated. It starts black, warms from red to blue and then becomes invisible (again, due to your friend: quantum physics).
 

Sunday, December 19, 2004

Eliminate red eye

Red eye is a common theme elsewhere (I've seen too many examples lately). I haven't fully addressed it here. Let's solve the problem.

Red-eye can be touched up after-the-fact with pens and software, but it doesn't look completely correct. It's best to avoid it altogether particularly when shooting film.

How it happens
Red-eye occurs when light (primarily from a flash) reflects off the retina of the subjects' eyes at or near the axis of the lens.

When subjects are in low light, their eye pupils are required to open wider (dilate) to allow more light into the eye. This is also when most people tend to use a flash. So, the light from the flash moves from the camera to the subject and reflects directly off the retina.

The retina is a wide area located at the back of the subject's eyes and continuous with the optic nerve. It consists of several layers and a web of blood-carrying veins. Therefore, the color reflected from humans is red or occasionally brown (depends on light angle). Color varies with different animals depending on the shape and the natural filtration qualities of their eyes.

How to eliminate red eye
Increase ambient light
Instead of making a portrait in a dark room, take the person to a better lit area. The subject's pupils constrict and red eye vanishes most of the time.

Red eye camera programs
Cameras equipped with red-eye reduction systems emit a series of pre-flashes or a beam of light to try to cause the subjects' eyes to constrict. This works sometimes, but not well enough or often enough. The process is annoying to both the photographer and the subjects. Use one of the methods below instead. Everyone will be happier with the process and the results.

Change light angle
To eliminate red eye, change the light angle. Since light is restricted as it passes through the pupil, it only reflects in the direction of the light. The remainder of the retina remains unlit and thusly appears normal.

Bounce light
The fastest way for most PJs to change the light angle is to bounce the light off a neutral-colored ceiling or wall. With tilt head flashes, the head is pointed in one of these directions and red-eye vanishes.

The additional benefit is the light becomes softer and more even. However, watch out for colored walls because they change the color of the light to the color of the wall surface.

Diffusion
If the flash is integrated with the camera body, try diffusing the light with a handkerchief, gauze or other neutral material. Simply tape a small piece over the flash. Although red eye can still occur, the light direction may be scrambled enough to avoid red eye.

If nothing else, a diffused image looks much better - even with slight red eye.

Move closer
This is a worst-case attempt at a solution. Parallax is the difference between the view of object through a camera lens and a separate viewing eyepiece.

The same occurs with light (light parallax). Since the flash is separated from the lens, the closer the photographer is to the subject, the more parallax occurs between the flash angle and the lens axis. If the photographer is close enough and the camera can handle close focus, red eye can be reduced.

The opposite is almost certain. As the PJ moves further from the subject, red eye is more likely to happen because the parallax allows the axis lines to intersect and overlap.

Change PJ angle
Since PJs cover events and try to be unobtrusive, they normally move around and can decide when and from what angle to shoot. If PJs move to the side of subjects rather than directly facing them, the likelihood of red eye is reduced from an oblique angle.

Shooting from an oblique angle to the eye opening restricts the amount of light actually bouncing off the retina. Since red eye happens mostly when the flash is shot directly into a person's eye through a wide, circular pupil opening, it's less likely to occur when the circle becomes a tight oval (i.e. from the side).

Although it's not a guaranteed method to eliminate red eye, it helps.
Everything from here onward involves additional hardware. Most of these items are listed in the PJ Candy Store.
Get the flash off camera
This is the preferred method. A through-the-lens (TTL) sync cord is about $80 and worth every penny. It allows PJs to control light volume and angle. I need to do a whole entry about how important it is to have the flash off camera. For now, we'll say this is best.

Special circumstances
Night sports are notorious for red eye. PJs must use long lenses and powerful flashes in low light to capture fast action across the field. As the lens angle and the flash angle reach further to a subject, the angles are more likely to intersect and cause red eye.

If PJs are shooting players' faces at a considerable distance in low light, red eye is almost certain. Using a combination of suggestions above is helpful. For example, PJs might diffuse with softboxes at close range from an oblique angle.

Flash brackets
As insurance, many PJs use flash brackets. A flash bracket is a metal or durable plastic frame equipped to mount both a camera and a flash. It increases the distance from the flash axis to the lens axis and increases light parallax angle.

Because PJs want the flash to hit the exact area in which the lens is viewing, the bracket locks the light and lens angles together to allow maximum light coverage. This increases the likelihood of red eye at greater distances, but reduces it at a normal distance even in low light (because light parallax is less).

Telescopic flash brackets are most useful for longer lenses. The further apart the PJ can mount the light from the lens, the higher the parallax angle is. Telescopic flash brackets extend mount sections to as much as a meter above the camera lens. As with tripods, the bracket becomes less stable the further it's extended. This does become more problematic when action goes out of bounds and lands on the PJ, but it's an issue each PJ must address.

When using most common flash brackets, see if the manufacturer makes camera-specific anti-twist plates to keep the flash and camera aligned.

Light the whole venue
PJs with Pocket Wizards and hand-held flashes or studio strobes (400WS minimum) commonly cross light gyms.

It can also be done with an outdoor field. This isn't a good option for most PJs. It takes a lot of work, time, weather cooperation and deadline flexibility. But, I've done it before. I'll probably do it again.

Undermount the flash
I haven't tried this because I prefer shadows to go down, many sports shooters mount their flash on a monopod below the camera with a Super Clamp or similar bracket. It achieves the same red-eye elimination as an extended flash bracket, but is more stable and mobile.

If choosing this option, make sure flash is set below ambient light (use as fill) so the shadows aren't as obvious. Low flash angle typically produces a horror-movie look and doesn't work well with face mask patterns.

Reverse engineering
Let's say you want someone to have red eye (for an illustration or you really dislike someone). Place the flash as close as possible to the lens axis. The light bounces off the subject's retina and directly back into the lens. Obviously, this works best in an unlit environment where the subjects' eyes are forced to dilate.

Enough for now,

Saturday, December 18, 2004

Turn down the light

While making a portrait in a home or office with a common flash, turn off or dim most of the lights. This eliminates stray, off-color light from reflecting from the subject and keeps the color balance to only the light emitted from the flash.

I'll get into color temperatures and color balance soon, but this is the most expedient way to make satisfactory portraits.

The point of this strategy is to have enough available light to properly focus. Any more available light starts to create color balance problems unless the available lights are properly color balanced (most aren't).

Alternatively, PJs can arrange the portrait subject, set focus, turn lights off, shoot and then turn lights back on. This is best done with a volunteer near the light switch, but it can be done singly by a PJ in a small room.

Enough for now,
 

Thursday, November 18, 2004

Soften artificial light

Although beautiful, natural light is preferred, let's talk about making the best of what we get.

PJs use flash. Sometimes it may be our only light source other than stars. At other times, we may need to open up shadows within a scene (fill flash at noon). However, it can look artificial and harsh if not softened.

For PJs, even light with shadows within one to two stops of the highlights is considered "soft." Strong directional light with a three-to-one or greater ratio is considered "harsh." These designations have nothing to do with focus. It's only about the characteristic qualities of light.

The point of softening light is to scatter the light rays in various directions. This allows light to ease into areas which would otherwise remain underexposed (dark) if directional light is the primary source. In effect, it reduces the impact of highlight areas while filling the shadow areas. As such, it will typically create a reduction in the effective power and exposure of the flash (make appropriate GN deductions).

Point source light
Light refracts through the atmosphere, but generally travels in straight lines from a source. Unless the light is redirected by diffusion, refraction or reflection, it will lead to higher light ratios the further it is from the point source.

In real terms this means the difference between highlights and shadows (contrast) on a subject decreases the closer it is to a direct light source. Subject contrast will increase the further it is from the light source. This doesn't mean much to folks who are working with flash on camera (and red-eye), but it is significant for major lighting schemes.

Fall off
Disclaimer: "fall off" is technically the decrease of intensity of light from a point source. I may also use it to describe divergent or stray light particles because "pixie dust" has already been overused elsewhere. ;-}

The Inverse Square Law of Light states how light will work from a point source. If we think of a flash as a firehose, we can understand the closer we are to the nozzle, the harder the water will hit us. The further away we are, the less painful it would be.

We also understand that if we walk below the main stream of water, we'll still get wet from stray water molecules.

Directed light works similarly. If a flash is aimed directly at a subject, the subject will be brightly lit. The closer the subject is to the flash, the brighter the subject will appear in relation to surrounding objects.

Furthermore, light falls onto subjects like pixie dust near the main stream of light at a lesser intensity than those objects in the main path of directed light. Instead of drenching subjects in direct light, they can be moistened by stray light particles.

Tip in
PJs use these stray light particles to "tip in" light. The method uses the Inverse Square Law and fall off to more evenly distribute light. Tipping in light is best used with TTL (through the lens) metering, but the light can be manually metered or chimped and adjusted.

Instead of directing the flash at a subject, the light is directed above or beside the subject. The stray light particles pixie dust fall onto the subject while the main flow of light bypasses the subject and is subject to normal physics for the remainder of the scene.

The end result is a subject with similar light characteristics of the background. This method can be combined with other methods below to average and soften light for the entire scene.

Softbox
Softboxes both scatter and direct light simultaneously. A softbox channels and redirects light through an opaque medium such as material or plastic. The end result is a portable, wide area of scattered light from multiple directions.

Softboxes are manufactured for both large strobe and hand-held flashes. Both are extremely valuable for light control.

Bounce card
A bounce card is a simple way to reflect and redirect light. PJs can purchase extremely expensive, pre-packaged items to attach to their flashes, but a folded photo assignment and a rubber band do the same darn thing.

PJs attach a white reflector (paper, cardboard, whatever) to the back of a flash where it extends beyond the flashhead. Ideally, it curves around the flashhead and the end pitches slightly forward to reflect more light.

Instead of the flash being the point source (for light calculations), the bounce card becomes the point source while scattering light more evenly across the scene. Because each reflecting medium has a different absorption rate, it's important to test various bounce cards to get proper exposures in non-TTL mode.

Regular bounce
PJs often bounce direct light off other objects to spread and redirect light. Occasionally it will be used to move light around other larger objects (bleachers, trees, beams, etc.), but it has the same softening effect.

Total distance
For exposure calculations, the cumulative flash-to-subject distance must be considered each time light is bounced. If the distance to a ceiling is three feet and the distance from the point on the ceiling to the subject is five feet, the flash-to-subject distance is eight feet (3+5 = 8). Again, different ceiling materials and colors (see below) will affect the actual exposure, but for a white or light cream ceiling, it should be close.

Color shift
An additional problem with bouncing flash is color balance. Different color surfaces get their color by reflecting only one color and absorbing other colors from white light. The same occurs when light is bounced off this surface.

White, cream and even some pale yellow surfaces don't do much harm to the overall image. In some cases, they are actually helpful. Red, green and some brown surfaces are a nightmare for final image color balance.

Do whatever's necessary, but keep this in mind while making lighting decisions. Occasionally an alternative lighting scheme is preferable (particularly with chrome film).

Reflectors
A reflector is a catch-all word for any mobile bounce surface. A photo umbrella and a folded piece of paper are both reflectors. The purpose of these items is to redirect (and typically scatter) light from the point source to the subject.

Most reflectors are neutral hues from white to black. However, gold reflectors slide in and out of vogue each few years.

Although PJs may purchase fancy spring-steel reflector discs and any number of other items targeted at "rich" photographers, an economical alternative is a silver windshield sunshade (they roll up). Likewise, a piece of cardboard with some aluminum foil and tape serves the same purpose.

Again, remember to calculate the total flash to subject distance when using any reflectors (flash to reflector + reflector to subject = total flash-to-subject distance).

Omni-Bounce diffuser
PJs seem to either love or hate the Omni Bounce diffusers. It's marketed as a product which creates a bare-bulb effect from a flash. Frankly, so does a cheap plastic drinking glass or small milk jug. I suppose it's hard to look cool with a milk jug on your flash. "Take me to your leader."

Nonetheless, it's a popular device for PJs who must work with flash on camera. It's not as harsh as direct light and allows for fairly wide light coverage by extending the point source a few inches and redirecting it outward from this point.

They make a green version for fluorescent color balance and a gold one for warming effects. However they don't seem to make a tungsten-balanced one, which is honestly beyond my comprehension.

Simple diffusers
These items are effective, but don't look as cool. Simple diffusers include handkerchiefs, wax paper, bubble wrap or any other semi-opaque diffusion materials. Recalculate the guide number for each new diffuser to ensure proper exposures.

Caution: Do not use flammable diffusers with powerful strobes or at least have a fire extinguisher handy.

Enough for now,

Tuesday, October 12, 2004

Use the dynamic range

Photographers talk about Adams’ Zone System when they often mean the dynamic range. His system contains 11 zones of image tonality (0-10), while the dynamic range contains five. The Zone System is cool for art photographers, but is less useful for PJs and the general public. Most PJs use a dynamic range for daily work.

I’m not bashing the Zone System. It’s a wonderful system for those who have the time, knowledge and inclination to use it. However, it’s not practical for PJs who have one hour to drive through snarled traffic to a scene, get the shot and transmit to make deadline.

The Zone System
For those unacquainted, the Zone System operates along the standard dynamic range (see below) with the addition of photographer controlled film exposure, development and additional tinkering while printing on a calibrated system. Frequently, a photographer is required to push or pull film to constrict or expand the tonal range of a single frame. Additionally, a deliberate base fog on the film may be required to open up shadow detail while reducing development time to restrict highlight density.

I don’t suggest PJs try to lay down a base fog on a digital exposure or dunk their dit into a bucket of Dektol or T-Max to control development. It will control the development, but not the way anyone wants.

Dynamic range
A good guide for most photographers is the dynamic range. It consists of five stops of light. The dynamic range shifts light from white to black and vice verse anywhere along this range. Furthermore, the photographer sets a point along the range for each tone by deciding which tones to let fall away.

On the dynamic range, these are the five tones:
1. white with detail
2. light gray
3. middle gray
4. dark gray
5. black with detail

A simple explanation is at the end of most people’s arms. Look at your hand. Imagine your middle finger is middle gray. In stops of light, this example makes your pinkie white and your thumb black, both with detail information. Consequently, if you want to turn your pinkie black instead of white, you must stop down four stops. Conversely, if you want your thumb to appear white, you must open up four stops.

I know, it's a strange example, but wait until the next time you want to photograph a swan and you catch yourself looking at your fingers to find the right exposure. ;-}

This exposure control can be accomplished with the aperture, shutter speed or film ISO. The camera doesn’t care which adjustments are made, but it will require manual control.

We understand how a camera’s reflective meter works. A camera meter tries to make a general scene middle gray. If the camera is pointed at a tire, it will make the black tire gray (overexposed). If the camera is pointed at a cloud, it will make the white cloud gray (underexposed). If the camera is pointed at a small fire at night it will make the fire solid white and most of the rest solid black. Joy.

Some of the high-end professional cameras use complicated algorithms and RGB multi-sector metering to avoid this basic problem, but it’ll do the same darn thing more often than not.

Therefore, it’s important to know how to out-think the meter. With digital cameras, you can "chimp" (look at the display screen) and adjust. However, it’s better to hand meter the scene because the viewing screen can be off by two stops. We’ve discussed several ways to ensure the correct exposure.


Choose what to keep
We’ve metered the light and set the correct exposure. We've even double-checked the exposure with one of the alternative methods. However, the image isn’t getting the color saturation or pop we want. Sometimes, we simply don’t like the tonal shades in which we’re working. What can we do? Shift the tonal range.

In flat, even light, there isn’t a problem. A proper exposure yields blacks and whites with texture. However, when the light is raking the subjects from one angle or the light sources are dim or unevenly distributed, the PJ must make some choices. Something isn’t going to fit within the standard five-stop variance.

The tonal range can be shifted with any of the three methods listed above. Some make more sense than others depending on the subject matter. The point is to find which parts of the tonal range to keep and which to let fall away. The ends of the dynamic range (detailed blacks and whites) are the sacrifices. The whites can either blow out or the blacks can become voids. However, the right decision will save the overall image. The PJ must choose what to save and what to let go.

An extreme example
Most of the time, PJs are dealing with people as subjects. We encounter every possible skin tone and must make quick decisions under often stressful circumstances and incredibly bad lighting.

Consider for a moment the exposure for a person handcuffed on the street at night with police lights flashing behind the subject while a spotlight is on the subject’s face. What’s the correct exposure?

First, switch to spot meter on the camera’s reflective meter. Next, color balance for the tungsten light of the spotlight. Now it gets interesting.

If someone has particularly less-reflective skin, I’ll lean toward overexposing actual tones by one stop (-2 + 1 = -1 from middle gray). I’ll do the opposite if they have overly reflective skin and hair (+2 – 1 = +1 from middle gray). I still get the same five stops of dynamic range, but I have set which five I want to capture.

With less-reflective skin, I’ve moved the black zone to dark gray. I understand this takes all the detail out of everything four stops lighter, but it’s my choice. With highly reflective people, I’ve added some texture to their skin and hair, but black T-shirts lose texture and becomes a dark voids. Again, this is my aesthetic choice rather than a meter reading.

In most cases, the red and blue police lights will accumulate on the CCD or film and become glowing white. Meanwhile the surrounding area, which is not in a spotlight, will drop down to black. So, I’m stuck with a relatively proper exposure of a suspect’s face while everything else in the scene pushes off both ends of the dynamic range.

Since I know I’ll be facing an editor, I’ll also make an overall scene exposure. This increases the saturation of the police lights, but drops the subject’s face back into darkness with the rest of the scene. However, this might be useful to set the mood of the scene or conceal the subject (if a minor). Yet again, this is not setting the scene to middle gray, but setting the lights to middle gray to saturate the color.

Handling less extreme dynamic range choices
Sometimes, a subtle decision must be made about the dynamic range. Light raking over a subject will make the PJ decide between highlight and shadow detail. Only one can be kept if the light has more than five stops of exposure latitude.

Each subject will typically dictate the best decision. If there is something interesting within the shadows, shift the range to keep the shadows and let the overall image become high-key. If something interesting is in the highlights, keep the highlights and let the shadows drop.

Dramatic dynamic range shifts
Occasionally it’s interesting to give a scene a little push. In these cases, PJs may deliberately set a tone to something other than the standard. Digital cameras allow immediate feedback at least. If it doesn’t work, there’s no harm done.

Some common examples of dramatic use of the dynamic range include silhouettes and high key portraits. When combined with a strobe or flash, it gets even more interesting.

Silhouettes
A silhouette is nothing more than setting the shadow below the 1st step of the dynamic range. When middle gray or dark gray are set on the light source (the sun for example), the color saturation will increase while dropping other subjects and environments into two-dimensional blackness.

To make silhouettes pop, a primary subject with a strong shape is in sharp focus and normally a shallow depth of field. This defines the outline while minimizing competing elements within the frame. A giraffe in a barn would make a good silhouette.

High key
High key images are commonly used with fashion and bridal portraits. Like the silhouette, it's frequently shot toward the light source (an open window for example), but middle gray is set for the subject’s shadow detail and the background is allowed to blow out to white.

High key images are frequently "soft" because the subject’s edge detail is blocked up. Typically more depth of field is used to make these images and creates slight movement in the subject to further soften the overall appearance. A bride in a white gown would make a good high-key subject.

Combo dynamic range
Once the general principle of the dynamic range is understood, it can be combined with stobes, flash or even reflectors to make stunning results. The PJ can prepare a portrait for a silhouette scene and selectively light the subject within the silhouette framework. Likewise the PJ can prepare a high-key portrait and still maximize foreground detail.

Silhouette combo
The image in my mind is by Tom Fox. He made a portrait of a jockey on horseback inside a barn. The horse and jockey are silhouetted against a well-saturated blue sky and framed in the doorway of the barn. Instead of leaving it as a featureless silhouette, Tom snooted a strobe and lit only the face of the jockey to match the (probably -2) exposure of the sky.

In other words, he completely ignored the actual dynamic range of the scene, moved the range to have a well saturated sky, and then placed the jockey’s dynamic range within this exposure framework. The end result was an excellent image which used the power of a silhouette with the detail of the jockey’s face. It immediately told the readers who this person was in a dramatic way.

High key combo
This light combination can also used with the high-key scene. To get a soft white background and still retain maximum detail in a white wedding dress, PJs will use a strobe to balance the front light.

Measure the foreground light at middle gray (properly exposed). If the subject is a bride or some other subject wearing white, the PJ might want to set the white to light gray for extra detail.

Once the primary light is established, boost up the background's available light to blow out one or two stops above white. In other words, remove the background texture so it doesn’t compete with the subject. This is typically done by increasing exposure time because it’s the only loose variable once the strobe exposure is set. The result is a bride with full detail in her dress with a pleasant white glow engulfing her.

Enough for now,