Thursday, August 26, 2004

How light meters work


Mark M. Hancock / © The Dallas Morning News

Chris (left) and Nancy Tanner (right) of Denton kiss at Medici, a private lounge for Nick & Sam's customers, in Dallas on Friday, May 21, 2004.

A light meter uses a photocell to measure the amount of light falling upon a subject (ambient light) or reflected from a subject (reflective light). Almost all modern cameras are equipped with some form of light meter (usually reflective).

A perfectly focused view of a world-changing event is worthless if the exposure is drastically wrong. PJs must know when the meter is wrong and compensate. In other posts we discuss the Sunny 16 Rule and dynamic range, but let's take the little steps first.

Reflective light meters
For consumer uses, these meters often set the correct exposure for most general subjects. Some images may be over or under exposed, but 10 bad frames from the vacation is an acceptable loss for most consumer camera operators.

The reflective light meters in most cameras see the world as neutral gray and make an averaged reading. A typical meter reading turns a white wall gray (underexposed) or a black tire gray (overexposed). The key to photography is allowing the right amount of light to hit the film or digital sensor.

Pro reflective light meters
Modern high-end professional cameras measure reflected light and compare the information collected from an array of sensors through a complex algorithm of similar images to produce the most probable subject and appropriate exposure. It isn't as accurate as an ambient light meter, but it's better than a standard reflective light meter.

For instance, a modern professional camera understands the PJ is about to photograph a full moon on a cloudless night and gives a reasonably accurate reading compared to a standard reflective meter, which would produce a drastically wrong reading.

For those interested, the light reflecting from the moon is the same as it is during daylight on Earth because the moon's distance from the sun (the light source) is similar to the Earth's distance from the sun. This holds true with the general inverse square law. We'll talk more about this one day.

Ambient light meters
Ambient light meters are often more accurate than reflective light meters. Ambient light meters measure the actual light falling on the subject. It doesn't matter if the subject is black velvet or a polished silver tray. The light reading is stable with a constant light source.

If PJs are unable to meter the light near the subject (during a hostage standoff for example), an ambient light meter in the same light source, direction and distance yields a correct exposure. It's important to stress the light must be from the same source, direction and distance (inverse square law of light). If artificial light is the source, it's very possible to get a wrong reading from disparate locations.

Ambient spot meters
For a higher level of accuracy, a spot cover can be placed over a hand-held, ambient light meter's photocell. It limits and measures light from different directions to give the PJ more control over which light source is most accurate for the subject.

A dedicated, incidence spot meter is the most accurate of all meters. It measures the exact amount of light falling on the photocell from a limited angle of light. Often, these meters also measure flash output, color temperture and more. They also come with an appropriate price tag.

Enough for now,

Wednesday, August 25, 2004

Halt a horse


Mark M. Hancock / © The Dallas Morning News

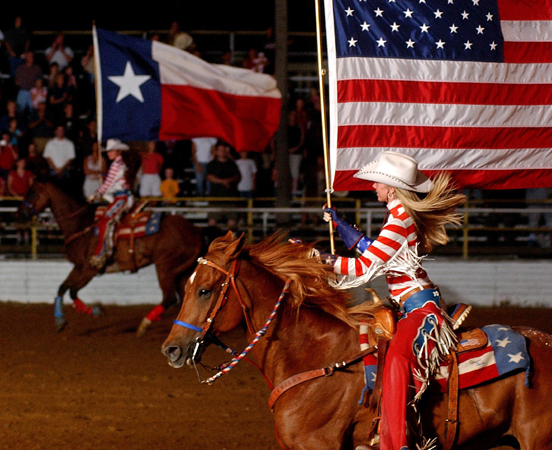
Kara Lowe (right) of the All American Cowgirl Chicks horseback drill team from Weatherford performs during the opening ceremony for the Lewisville Saddle Club's 39th annual Labor Day Rodeo at the Lewisville Saddle Club on Saturday, August 30, 2003.

What’s wrong with this photo?

This is a nighttime photograph. The horses are at full gallop. The horses and riders are moving forward as well as up and down. The flags are fluttering as they race along. But somehow everything is still sharp.

As always, click on the photo to see a larger, sharper image.

Most country rodeos have a few (maybe 10) flood lights. At really classy community rodeos, organizers rent mercury vapor flood lights with generators to light the arena with a beautiful bug-green light. This might yield an ambient light of about f/2.8 at 1/60 on 1600iso – not enough to even get mutton bustin’ at night. The animals (bulls particularly) move in multiple directions simultaneously and make everything blur.

For the photo above, I used my beast-strobe (1200 watts per head) and shot f/8 at 1/640 on 800iso – with 3’ by 4’ softboxes on two heads. Aren’t you jealous. :)

The organizers were super cool (thanks guys!), and let me set up my strobes in the announcer’s booth over the chutes. I hung the softboxes over the rail so they lit the chute end of the arena.

Since the booth was wired with household current, I thought they were going to make me stop because the whole arena would dim after each shot (I was pulling 2400 watts in two seconds after each shot). It made some folks nervous, but I showed them the results on my LCD, and they let me keep working.

For their coolness, I posted this image to let everyone know this rodeo will be held again this year in Lewisville, Texas over Labor Day weekend. Go see it so they won’t hate me forever. Take your kids, and let ‘em ride a sheep. Additional images from this event are posted on my portfolio.

Enough for now,

Save money with a film puller

Photography is expensive. When PJs first start, it's really expensive.

One of the cheapest and most useful items a film-based PJ can carry in the bag or vest is a film puller. It's a tiny set of two thin spring-steel leaves. It allows PJs to grab film inside the canister and pull it back out. They cost about $5. If the PJ saves only one accidentally rewound roll of film, it pays for itself.

What a film puller does
Film pullers allow PJs to change film speeds during assignments while only killing a frame or two on the roll. Although this isn't the best way to accomplish changing speeds, it works.

If a PJ shoots 10 frames on a 36 exposure roll of 100ISO film, then s/he needs to go indoors to complete the shoot, it causes a problem. Either the PJ needs to rewind the film and lose the other 26 frames (but still pays the same to have it developed [in chemistry or lab fees]) or use a different camera body indoors. Nobody trots around with nine different camera bodies, so frames get wasted.

However, if the PJ has a film puller, s/he can rewind the film, mark the number of frames shot, and come back to finish the roll later. It's important to mentally note the frame number before rewinding the film. It's equally important to store partially exposed rolls of film separate from unexposed film (to avoid accidental double exposures).

When PJs are back to a same-speed environment (light level), use the film puller to recover the film tab. Load the camera with the already exposed film. Set the camera to manual at the highest shutter speed and stop down the aperture (f/22ish). Cover the lens with a lens cap, coat or hand and fire the same number of frames plus one more for insurance. Depending on the type of camera, there should only be one or two dead frames. Point-and-shoot folks need to completely block light from the lens because the flash will probably fire.

Additionally, PJs who process their own film have a much easier time if they square the film before going into the loading room. It's impossible to machine process without having the tab pulled, but you don't initially need the film-pulling machine professionals use (BTW, a $5 puller often works better).

Art photographers and PJs working on illustrations can deliberately double expose film with the help of a film puller. If the camera doesn't have a shutter reset and the camera has a stable loading pattern, the artist can place multiple elements on the same frame by reloading the film.

How to use a film puller
With the film inside the canister, rotate the spool to tighten the film. When it's tight, there's an audible click each time the film tab passes the exit slot. PJs need the film tight to insert the puller and grab the film.

Place the leaves of the puller in the back position with the ends even. Insert the puller inside the film slot of the canister. Pull the bottom leaf back while letting the top leaf remain fully inserted. Place the film against your ear and rotate the tightly wound spool slowly. As soon as it clicks, stop turning. Slide the other leaf forward inside the canister.

At this point, the film is between the two metal leaves. Bend the puller against the outside lip of the film exit slot to put pressure on the film. Quickly yank the puller out of the canister. The film tab should come out with the puller. If it doesn't repeat the steps listed.

Enough for now,
 

Monday, August 23, 2004

Have one in the bag


Haltom City municipal court judge Kyle Knapp reacts as organizers add a garbage can of ice to the dunking water during the city's National Night Out celebration at Haltom Road Park in Haltom City on Saturday, July 31, 2004.

Mark M. Hancock / © The Dallas Morning News


The above shot reminds me of three important lessons of photojournalism.

Lesson No. 1
I've already written about getting safe shots immediately upon arrival. The image above is an example. I was actually assigned to shoot the city's mayor. I got this shot in the first 15 minutes and expected it to go to publishing purgatory.

However, a gasoline tanker flipped over and caught fire in another city. So, this image had to represent the event while I sped across the county to the fire. So, I'll again emphasize the importance of shooting what isn't on the assignment first to have something in the bag.

Lesson No. 2
Lesson two of this day was to get the scene first. The police blocked every possible approach to the fire. The truck was burning on the lawn of a gas station next to a highway. Since it was a big, potentially dangerous fire, it was logical and appropriate for police to keep people away and shut down the highway.

When going to breaking news, have a map sitting on the passenger's seat. As roadblocks are encountered, find different approaches. I'll say it's amoeboid movement to get to the scene, but it's actually more like the situation the male RNA strand faces.

Along this same line, the one who gets to the spot news first wins (particularly with fire). A freelancer got there first, got a great shot and the Metro page. I stayed for the clean-up phase, but knew I was smoked. Nonetheless, the competition didn't beat our paper and that's what really matters. Better luck next time.

Lesson No. 3
Good people should be honored.
In the process of walking a few miles to get within shooting distance (the other media types were on the opposite side of the freeway), I lost my work ID and access badges. I didn't miss the badge until I arrived at a transmission location we had near the fire. Without the badge, I needed to go downtown.

I made deadline, and searched the following day (in the sunlight on a day off) for the badge. No badge found.

I'll cut the story short and get to the important part. Heather Miller, a young woman who lives near the fire, found my badge and was honorable enough to call the office and even mail it back to me. I had a print made for her of one of my favorite photos and mailed it (with permission) to her. She rocks!

The lesson:   we all depend on the help of others. Also, honest people need to be rewarded and honored whenever possible. Lastly, even though it makes us look like nerds and gets tangled with the cameras, we should probably wear our credentials around our necks instead of on our hip (it can always be tucked in a shirt pocket).

Enough for now,

Saturday, August 21, 2004

Iraqi links

Since I’m moving from a "general daily rants" blog to a more specific photojournalism blog, I’m letting Fayrouz handle the links to Iraqi blogs. Here are the ones I particularly like:

My War
A star from Mosul
Loser's blog
Baghdad Dweller
Healing Iraq
Iraq at a glance
Life in Baghdad
Mesopotamian

As a side note, if I add a blog to the sidebar, and it doesn’t have anything new within a reasonable time; I’ll remove it.
I’ll even do a shameless plug here: If you want me to consider your photoblog for the sidebar, please list this blog on your favorites list, and I’ll give it a look. Thanks.

Enough for now,

Friday, August 20, 2004

Photos find home


Urban Tapas offers Caribbean Crab Salad with mango and rum-vanilla vinaigrette at the restaurant in the Village at Colleyville on Wednesday, June 18, 2003.

Mark M. Hancock / © The Dallas Morning News


I've decided how to handle the photo delay. I'll post an image fairly regularly on this blog. I'll leave images with blog entries on the day it's posted. I'll move images posted independent of blog entries to their proper date after they roll into the archive.

This way y'all can check out the images and post comments for a while before they move to where they belong. Then, search for your name with the Google toolbar at the top and see if anyone took offense. :-)

All in favor? All opposed? Public comment?

Enough for now,

Wednesday, August 18, 2004

How to shoot football - Part II

Southlake Carroll's Adam Hansen (No. 31, left) sacks Coppell's Ross McKnight (No. 5, right) during a high school football game against Coppell at Dragon Stadium in Southlake on Friday, November 7, 2003. The game's winner became the District 7-5A champion and advanced into the playoffs.*
Mark M. Hancock / © The Dallas Morning News

*Note: due to deadline, this cutline was written while the game was still in progress. The information needed for the copy desk is available. They'll change "the game's winner" to the actual team name of the eventual champions (Southlake).

Some guidance for game action
In part I of this series, we considered some football basics. Today we'll discuss the action shots.

Obviously, get the safe shots first.

As we did with volleyball, we will only consider one side in the newspaper coverage zone to make things easier. The team inside the coverage area is called "home." The opposing team is called "visitors." If both teams are inside newspaper coverage, work the Average and Good shots hard before considering the rare shots. We'll also limit this example to the home team side and endzones. In an actual game, work the field as is best for the PJ and forget about which side is occupied by whom.

Let's also assume operational freedom for the PJ on the home sideline. Some teams refuse to allow PJs between the 25 yard lines. Most high school teams don't have a problem as long as the PJs don't interfere with sideline activities or give the coaches grief about jumping in front of the lens during a play (it happens at least once each quarter).

For the sake of this chapter, few teams have female players. Therefore we'll use the masculine form with the understanding there are rare exceptions. In such cases, shoot "her" the same way.

Lens conversions
The suggestions in this entry are directed toward digital camera shooters. PJs who prefer to use film need to substitute larger lenses for those listed. Digital cameras add about a 1.5 virtual extension to each lens due to sensor size.

Get eyes
Although it's easy to get caught up in the action and shoot the play, remember the result must work as a photo. Get the players' eyes. An image of a player's back is a follow shot, not a game shot. There are exceptions to every rule, but try to see the players' faces and save the film/disk space for the right shots.

Average

These are the file shots of particular players. If something goes dramatically wrong, they can be used as game shots, but these are more about the players involved. They're mostly shot with a 80~200mm zoom lens, camera, monopod and frequently with a flash (on a flash bracket is best).

The first shot is the kickoff. If the home team kicks off, shoot the kick from the visitor's 40 yard line. Get the kicker's (K) foot on the ball. If the home team is receiving, shoot the return team from the home 25 yard line. Even if they waive for a fair catch, get a shot of the receiver with the ball in his hands.

QB and RB
Next the teams line up and start playing the normal gridiron game. Absolutely get the quarterback (QB). He is the critical player on the team, and he'll be talked about frequently in the newspaper. Line up three yards behind the scrimmage line. After the runningbacks (RB) take off, the QB is in a clean background. Get at least three different looks at the QB (passing downfield, passing home sideline, handing off) before moving to other players.

Next, get the RBs. These can normally work into the QB shots as well (both in one frame). Shoot from three yards behind scrimmage or on the scrimmage line itself for end-around plays. Wishbone teams run up the middle and cause a big problem for PJs unless the RB breaks out of the pack.

Linemen
If possible, get a shot of the offensive line (OL) and (if possible) a clean shot of the center as they move to the line or set into position. Do the same for the defensive line (DL).

When the home team is defending, try to get a few good open-field tackles. These normally happen about five yards in front of the scrimmage line.

Key players and coaches
Look for players who get instructions from the sideline. These are key players who relay play instructions to teammates. Get some frames of them as they look back to the sideline. Get some shots of the coach barking in commands and the specialty coaches working with small groups on the sidelines.

As a final note on safe shots, get something (anything). If the lights are really miserable, the PJ may max out their EV controls and still need to shoot f/2.8 at 1/60 with a 200mm. Two players stand and talk at about 1/60th. It's better than nothing. Don't rely strictly on game shots if there is absolutely no light. Find alternative ways to represent the game.

Good (job-keeper shots)

Fill the Frame
Fill the frame. Good sports images run big. A cropped image can't run as big because it falls apart (film grain or pixels). If PJs depend on crops to make images look better, there are several problems. Fix the problems fast.

Shoot verticals
Frequently, the difference between an average and a good shot is the direction of the camera. Shoot some verticals. If PJs are close enough or have big enough glass, rotate the camera and shoot vertical for a while. It allows the action to be followed for more time before the crop gets too tight. It also helps isolate players from the rest of the chaos. As an additional bonus, vertical images tend to run larger and need less cropping.

Passing zone
After all the safe and average shots are in the bag, move 15 yards in front of the scrimmage line with a 200mm or 20 yards with a 300mm (300mm and 400mm respectively for film). This is the area where passes and interceptions are caught. The background cleans up considerably in this area as well.

Track the receivers with the camera, but watch the quarterback with the other eye until the ball is out of his hands. Understand where the ball is going and adjust to be on target for the reception or interception.

Get the sack
When the home team is on defense, move three yards behind the visitor's scrimmage line and wait for a sack. The best sacks happen as the quarterback has his arm back and the defender puts a helmet into his spine. The quarterback shows plenty of expression, there's a ball and defender. This shot works.

Shoot from the endzone
Move to the back, center of the endzone when the scrimmage line is at the 30-yard marker (300mm and 400mm) or the 20-yard marker (200mm). Look for a running push up the middle or any touchdown pass attempts toward the corners. This is a good time to have an autofocus 50mm on the PJs 2nd camera. As the players get closer, PJs need to widen out the frame to catch what's happening (otherwise PJs get part of a number instead of the touchdown).

Field goals and extra points
On fieldgoal and extra point attempts, line up on the scrimmage line and focus on the holder. If it's a kick, the K moves to this same place. Save the background blur for other shots. If the holder fakes, get the run or throw and try to get the reception if possible.

Excellent

Many of these shots are attributed to a lot of luck and preparation (nobody knows when a helmet will fly) or near-death encounters with the second camera.

Use two cameras
Follow the action as long as possible with long glass. When PJs sees the QB look at the PJs, it's coming. Switch to the wider lens (50mm or wide lens). The second camera should be hanging around the PJ's neck, and switched to "on" during the game. Hopefully the PJ knows the framing area without directly looking through the camera. Keep the camera pointed to the center of the action and jump up and away when the action is about to crush the PJ (but keep firing). PJs may not get anything but dead frames, but there might be a diamond in there. The other camera and monopod should be in the PJ’s non-shooting hand at the time.

Long glass
Use the biggest lens possible (500mm or 600mm) to get ultra tight shots of key players. During daylight a teleconverter can be used. At night, remember there's at least a 1.5 stop light loss. Make sure the EV can handle the loss.

Layer images
Check out potential foreground and/or background elements for layered images. Pre-think the play required for the image. Find the negative space to place the player. When it looks possible, line up and hope.

Extreme angles
Use some extreme angles. Shoot from the top of the press box. Try some endzone shots from the ground in a prone position (aim the flash carefully for this one). Some covered stadiums may allow (with enough coaxing) remote cameras in the rafters. Lock it into place and tape all the pieces together and use it when possible. Otherwise, try a monster lens on a tripod with a remote on the press box, endzone stands or a nearby building. Focus on a likely area such as the goal line corners and hope.

Ultra-wide
Try some ultra-wide shots. Put the 17mm on a film camera and actually try to use it as a main camera for passes. Yes, I know this is deliberately putting the PJ in harm's way, but think of how cool the image looks. I can't find it on his site now, but Ryan Donnell had an award-winning touchdown shot this way that was simply amazing. At the time, he said it wasn't a calm moment in his life.

Pans and other stuff
Try panning on the running backs in the open field. Consider a pan with a rear-synch flash to give the players a Superman look. Look at other images and see how to replicate it and then up the ante. Finally, look around for anything reflective or translucent to give an overshot sport a new look.

Enough for now,
 

Tuesday, August 17, 2004

How to shoot football - Part I


Mark M. Hancock / © The Dallas Morning News

Southlake Carroll High School football players take the field before a football game against Irving High School at Irving Schools Stadium in Irving on Friday, September 5, 2003.

Texas is about to be absorbed by something many sociologists classify as a religion: Friday night high school football. Football can be challenging for most PJs. When it's played in a barely lit stadium, it gets really vicious. Here are some suggestions to get rookies through the first season.

I've broken this entry into two parts because football is more complex than many other sports due to the number of players and strategies involved. This entry will discuss some of the shooting issues. The next entry discusses some of the strategies for successful action images.

The first game of the season requires extra effort because this particular game may yield images needed for several weeks. At papers with large coverage areas and limited resources, the PJ may only get to all the teams by the end of the season. In the meantime, Sports reporters are constantly churning out updates about the teams already shot and the individual players on those teams (not to mention the season recap). So, plan an excessive amount of images from the first few games of the season.

Get the ball
Get the ball in every shot. Aside from jubilation and sideline shots, it's very rare for ball-based sports photos not to have the subject of the game included. The closer to a player the ball is, the more useful it is and the tighter it can be cropped (to run larger).

Shoot from one knee
Consider shooting on one knee with a monopod. This angle allows the PJ to see inside players' helmets. It's particularly helpful since players often put their head down to run. The point is to see the expression on the players' faces if possible. Compelling images can be made from a standing position, but they tend to lose a lot of the fire. An additional advantage is the perception of large players. If the PJ is a seven-footer and shoots from a standing position, even the college kids look like little leaguers. Shoot from the ground to make the players appear larger-than-life.

Jump!
Here's a cautionary note about close encounters of the football kind. Since football is often shot through long, fast glass, the PJ typically has time to scramble out of the way. However, sometimes the play lands on the PJ's feet.

When it happens (it will) jump straight up into the air. The players will hit the PJ and bounce her/him, but the only worry is a bruise and landing. In some cases, the players slide under and past the PJ and all is good.

If the PJ stands still or tries to plant a leg for an escape, there is a chance to break or sprain a knee, ankle or other critical body parts. I've seen a PJ have both of her knees broken and lose her career on one sideline play.

When the players are too close to focus, jump straight up.

Know the game
Images improve as PJs learns the rules and strategy of the game. Watch college and pro games when not shooting and think about where to be positioned, when to shoot and what to expect. Learn to predict the plays to capture defining shots.

The more PJs know about a particular team, the more successful PJs are. If PJs prepare for passing plays from a wishbone team, it's a waste of time. A pass might happen, but it's far less likely. Also, if the team's quarterback has the greatest arm in the division, don't spend too much time looking for the handoff when balls are getting yanked out of the air on every play.


Report special stories
Along this line, know about special stories on the team. Is anyone about to break a school or district record? Are any players in the halftime band show? Are there any female players? Are there any exchange students? Is anyone recovering from some life tragedy (death of a relative, auto accident, burn victim, etc.)? Are there any players with prosthetic limbs?

Get these shots and be prepared to explain the importance of the player or the play to the editing desk as well as being able to write solid cutlines with this information. There's no difference in the game shots, it's a matter of highlighting the player to personify the game.

Use a flash
Frequently, flash is required to get any image. It's nice to use fill flash to put a little light inside the helmet and see the players' faces. Occasionally, the flash is the main light because the lightning bugs are doing a better job than the four 100-watt lightbulbs positioned around the field. Remember it's better to transmit flash images than no images.

If the PJ has a turbo battery, use it. This ensures the flash recycles fast enough to handle the action. If it's raining, either don't use the turbo or wrap it safely in a waterproof wrapper. The burning sensation in the PJ's leg isn't a suddenly-pulled muscle, it's electrocution (trust me).

Eliminate red-eye
For fill flash, red-eye shouldn't be a problem. A flash bracket gets the flash further away from the lens plane and minimizes red-eye. If there is no light, the players are likely to be red-eyed meanies no matter how high the flash is (due to distance and light angle parallax combined with the players' dilated eyes).

In extreme cases, red-eye reduction in Photoshop is authorized for sports images. Try everything to avoid it (I use a 2-foot-high telescoping bracket), but if it happens, don't kill yourself over needing to color correct the eyes.

Simply select the red-eyed pupils in Photoshop with a lasso tool at a 3 to 5 pixel tolerance, open Saturation and pull down the red and magenta channels to 50 percent saturation and lightness. This is enough to remove the red without making the players look like dead sharks or zombies.

Use low film speed and fast lenses
In all lighting situations, shoot with the lowest film ISO possible and at the widest aperture setting the PJ can successfully handle (800 iso and f/2.8 are favored for night). I haven't seen football shot too fast yet (boxing, karate, and hockey can be shot too fast) because there are plenty of blurred shots running throughout the season. However, remember the more fractions of a second there are to shoot, the more fractions of the same second will be missed (8 fps at 1/8000 = 7,992 missed moments).

Take follow shots
Because football teams have more players than other sports and the players are constantly changed for specialized plays, PJs need to take more "follow shots" than game shots. Follow shots identify the participants of a play. These images can be slightly out of focus without concern. We only need to know which players (by jersey number) were involved in the play. This can be extremely critical for teams that stress uniformity (same color everything including shoes), and those with only front and/or back numbers (kudos to the coaches of teams with shoulder, sleeve, helmet and hip numbers). Many great shots get scrapped because the players can't be positively identified.

Edit with dead frames
To save editing time, PJs who know they have a great shot get the follow shots and then fire two frames at the ground or cover the lens for two frames. On tight deadlines, this code quickly lets the PJ know where to look first for the best images. With digital cameras, simply lock the best frames so they are marked when imported in PhotoMechanic.

Enough for now,

Please also see How to shoot football - Part II
 

Monday, August 16, 2004

How to calculate Exposure Values (EV)


Mark M. Hancock / © The Dallas Morning News

McKamy Middle School 7th-grader William Dutcher counts donated pencils at the school in Flower Mound on Friday, October 24, 2003. Spanish class students in the school's Pan American Student Forum of Texas organization collected school supplies to share with students in Mexico and at Central Elementary in the Lewisville ISD.

I'll talk more about exposure, dynamic range and the Zone System in future blog entries. Today, we're going to change the capabilities and/or appearance of a known light source through Exposure Value (EV) calculations.

I'll keep this simple to reinforce the process. The common example uses a (figurative) bucket of water. Light is to a properly exposed image as water is to filling a bucket. We can change the diameter of the water hose (aperture) and thus the amount of time it takes to fill the bucket (shutter speed) or even the size of the bucket (film speed / ISO). All three ways fill a (figurative) bucket with the correct amount of water. Each approach has a use and trade-off. Each approach affects the other two variables.

An EV is an equivalency measurement of light. I'm trying to skip explaining the hard stuff, so this is one a situation where readers can either take my word or look it up at How Stuff Works.

Here are some examples of EVs:

1)   f/5.6   1/60   100iso   (0+0+0=0)
2)   f/2.8   1/250   100iso   (+2-2+0=0)
3)   f/5.6   1/250   400iso   (0-2+2=0)
4)   f/2.8   1/4000   1600iso   (+2-6+4=0)

All of the examples capture the same measurement of light. There are many more examples I could list to accomplish this same amount of light. The "f" number is the aperture setting. The divisional number is the shutter speed measured in fractions of a second. The ISO is the responsive speed of the film (or equivalent digital setting).

All three of these measurements can be divided into 1/3 increments. Again, it would be really complicated to explain how, but understand each full stop is three clicks away from the next full "stop" of light in each of these measurements on a pro camera and one click away from each other on an average manual SLR camera.

For anyone still reading, we're moving toward getting the camera on the lowest ISO possible for available light on a maximum length lens with the fastest aperture. The point is to show there are multiple ways to get the right amount of light. If PJs bracket exposures in constant light situations, they are only wasting valuable time and film or disk space.

Likewise, if PJs use auto exposure in a constant-light venue and the teams are wearing white or black, there may be a problem. Watch the camera settings for variations. If the settings change a stop or more, PJs need to manually control the exposure.

Yesterday we determined the minimum shutter speed for various lenses. Using a 200mm lens as an example, we need to shoot at a minimum speed of 1/250th of a second. With this one fixed variable, we can determine the other two settings required for a proper exposure of a constant light source.

For today's example, we'll be blessed with a stadium or gym with lots of light. The ambient light meter reads f/4 at 1/60 on 400ISO film. This is the constant light source.

We must adjust the EV to meet one fixed variable (1/250th). Using our example, we have the following whole-stop EV options:

1)   f/4   1/60   400iso   (0+0+0=0)
2)   f/4   1/125   800ISO   (0-1+1=0)
3)   f/4   1/250   1600ISO   (0-2+2=0)
4)   f/2.8   1/125   400ISO   (+1-1+0=0)
5)   f/2.8   1/250   800ISO   (+1-2+1=0)
6)   f/2.8   1/500   1600ISO   (+1-3+2=0)

Each setting yields the proper amount of light for the available light. The bold examples meet the minimum shutter speed requirement. For sports, I would choose option No. 5 as the preferred option. It allows the minimum speed while maintaining a relatively high-quality film speed. The depth of field is tight, but in sports it's best to shoot wide open with long lenses to blur out distracting background while directing viewers to the sharpest portion of the frame (where the PJ wants the viewer to look).

I'm going to save everyone the long list of numbers to do EV calculations for every possible setting. Instead, remember to adjust one full stop at a time and compensate for the movement with one of the other two variables. Then repeat as necessary until the optimal setting is achieved for the desired result.

Enough for now,

Sunday, August 15, 2004

Adjust speed for focal length

Let's discuss focal length requirements before we approach Exposure Value (EV) changes as needed to shoot night and indoor sports.

Use proper support to ensure a stable image. However, also set the shutter speed to facilitate a sharp image with the lens used.

The rule for stable image quality is: use a shutter speed faster than the focal length of the lens. On zoom lenses, set the speed for the maximum focal length (200mm for an 80~200mm zoom, 35mm for a 17~35mm zoom). For simplicity, I'll give whole-stop examples. Third stops could be an obvious choice for those using professional cameras with fractional settings. Use the rule above to find the correct third stop for the lens focal length.

35mm = 1/60
100mm = 1/125
200mm = 1/250
300mm = 1/500
600mm = 1/1000

A shutter speed slower than the suggested speed requires major stabilization of the lens (tripod) or excellent breath and body control.

The resulting shutter speed is considered the minimum shooting shutter speed with each lens for assignments. PJs need to make EV adjustments to ensure the minimum speed, minimum film ISO and appropriate aperture setting.

Enough for now,

Saturday, August 14, 2004

Use decent filters, not tricks

Because many beginning PJs spend so much money on quality lenses, they're temped to protect the lens. They often use an ultraviolet (UV) filter or a "sky filter" to protect the lens from mud, blood and other junk. This is fine and actually a good suggestion – as long as it's also the same brand as the lens.

If someone tries to skimp on filter quality, images from the $5,000 lens become $25 filter images (unacceptable). Image quality is only as good as its weakest link.

Here, a cheap filter equals a cheap image. The PJ is best served without a filter than with a cheap filter. There's a risk of scratching the lens. However, if the lens is properly stored, it's less likely to be scratched.

While I am on the subject of filters, avoid "special effects" filters. The world is filled with enough special effects to keep every PJ happy. Most of these trick filters are made of plastic (read as garbage). Sure, they are interesting to see once or twice, but then it gets old. I bought some while I was visually experimenting in college, but they're collecting dust and highly unlikely to change status.

Polarizing filter:
A polarizing filter is an acceptable alternative to a gradient filter (see below) for PJ work. To a purist, it's a neutral density filter. The filter allows the photographer to control reflected light without stepping over any ethical line.

I'll save everyone the quantum physics and suggest the filter "straightens" or limits the waves of light and directs them into the lens from desired angles. Much oblique light and many reflections can be eliminated by harmonizing the direction of light from different subjects.

The end result (what most people want) is minimization of randomly scattered light from reflective surfaces. Since the sky is full of tiny particles with tiny surfaces, the polarizing filter can be rotated to eliminate random light from many of the directions and effectively darken the sky without changing its perceived color.

There's 1.5 to 2 stops of light lost by using a polarizing filter. The costs for high-quality polarizing filters for fast lenses are ... ouch. It's important to get a circular polarizing filter for use with autofocus cameras. It allows the autofocus program to set focus without "hunting" (constantly changing focus) for the subject. Linear polarizers are fine for manual lenses, but it's safest to spend the extra cash to get the circular polarizer.

Popular visual tricks can often be accomplished without a trick filter. Here's how:

Star filter:
The purpose of this filter is to make spectral highlights streak outward from their brightest point. Essentially this is a sky filter which has been deliberately scratched in multiple directions to channel light. It's dependent on spectral highlights (those points of direct reflection of light) to accomplish the desired result.

To accomplish this trick (this is fair game for news photos too), simply stop down to the maximum lens aperture (the highest number –f/22, f/32, f/64, etc.). Since spectral highlights are already a prerequisite, stopping down automatically makes a six pointed star. It may not be quite as dramatic, but the image is actually in sharper focus.

Soft focus filter:
The purpose of this filter is to scatter light to give a younger appearance to someone with wrinkles. It places extra light in the darker areas (usually wrinkles) and increases the size of the circles of confusion.

Obviously, this is the opposite of a quality lens. It deliberately uses poor image sharpness to make someone supposedly look younger.

To accomplish this trick (for a wedding, freelance non-news gig, or illustrations), bend a wire coat hanger into a circle a bit larger than the lens shade. Straiten the excess wire to use as a handle for control from behind the camera or attach to a light stand. Stretch sheer, black pantyhose material over the circle and Superglue it into place. Shoot through the circle. The pantyhose scatters light as it passes through and misdirects the light going through a good lens. This gives the desired effect.

If the light is metered manually, make sure to increase the exposure by a stop or two. If shooting digitally, chimp it until it's right. If on film, bracket exposures and make sure to remember or write down which frames had compensation to know the correct compensation the next time.

There are two other ways to get this effect without filters (for non-news). The first is to use a strobe to sharply focus the subject while giving the background a halo effect.

This is best accomplished in a darker situation (indoors or dusk). Position the subject facing away from the light source or lit area (facing the camera with over the shoulder). Use a flash or strobe and set the lens to the highest depth of field (f/16 for most). Meter the ambient light at one or two stops under correct exposure.

Using a front synch technique, focus on the subject and shoot with the flash then immediately rack the lens out of focus while the subject remains still. This causes the subject to be sharp while the background has an initial sharpness with a halo effect.

The other way is always with the photographer. Use a tripod and frame the subject. Move to the side of the camera and breathe on the lens to make it fog up. Move out of the way and shoot. It has the same effect as real fog without the mess. This technique works best in cooler, wetter climates.

Gradient filter:
Gradient filters are popular with architectural and some commercial shooters. These filters gradually add extra blue or orange hues to the sky. It keeps a plain sky from blowing out and adds something different and surreal to the image.

The surreal trait is a direct result of cheap, colored plastic. It doesn't look real because it isn't. Everything gets the same pseudo-sky discoloration (trees, buildings, people, etc.). Just avoid it.

Enough for now,

Friday, August 13, 2004

Most clocks have happy hands

If you have some time to kill, here's a challenge: find a commercial image (ad) of a watch without "happy hands" (the hands set at the 10 and 2 o'clock positions).
My college was known for its commercial photographers. Commercial photographers (advertising photographers) use large-format view cameras to make everything beautiful and create a want, need or desire from the public. As a result, I learned some strange techniques commercial photographers use. One is "happy hands."

Someone apparently studied the hands of the watch as they apply to customer response and willingness to purchase the product. As a result, people think more positively about a watch with its hands set to the 10 and 2 o’clock positions.

These positions were determined to make the watch look "happy." Consequently, a watch with hands set at the 7 and 5 o’clock positions are "sad."

However, this idea is so deeply ingrained into the commercial psyche now as to preclude logical alternatives. I have seen digital alarm clocks set to show the time 10:10 p.m. – the "happy hands" time - although digital clocks don’t have hands. I have also seen watches advertised upside down (making the happy hands suddenly sad).

So as y'all cruise the Net, product catalogues or favorite publications, see if there is a watch ad without "happy hands."

Enough for now,
 

Thursday, August 12, 2004

Take a break

We've had two difficult blog entries in a row. Let's all take a break.

I've been placing some older photos on this blog. I have many more to add to fill out the year. I wonder if y'all would prefer I kept them at the top for a day before I moved them to where they belong, or should I keep doing it the way I have been. Some feedback would help.

I can't post current DMN images until they run somewhere (in print or online). Therefore, I'll always need to place them into previous posts later (or move them to the date I shot them). However, I could post images and leave them until my next written entry before I move them.

I'm trying to establish a style. From my own reading habits, I like to see images. So, I think others might feel this way as well.

Thanks in advance for any feedback.

Enough for now,

Wednesday, August 11, 2004

How to shoot volleyball


Mark M. Hancock / © The Dallas Morning News

Southlake Carroll's Dani Johnson (No. 11, left) hits past Flower Mound Marcus' Katherine Adams (No. 3, right) during a high school volleyball match at Flower Mound Marcus High School on Tuesday, October 14, 2003.

Since I don't have a lot of time today, I'll avoid talking about remote strobes. So, I'll assume we're shooting in a well-lit gym (Ba ha ha ... hold on, let me get back into my chair). OK. I'm better now.

Volleyball is the first official sport of the year at most high schools. As such, it is a fast way for editors to evaluate freelancers for the rest of the sports season. This sport will show a PJ’s technical weaknesses. If a Sports PJ can’t handle volleyball’s demands, s/he won't be of much use in the long run. S/he can always get a second chance, but if there are two people vying for the same slot, the one who comes back with publishable images wins the position.

Volleyball is a game of speed, strategy and timing. Advanced teams will distract opponents (and PJs) and send three hitters into the air early for an off-timed spike by yet another player. Fast, long glass is required as well as a monopod.

It is not a high-contact sport, so there is seldom a bone-crushing image. However, it's very fast. A normal spike will move in excess of 1/500th of a second off a hand. At the same time, it is often played in what can best be described as a barn (poor light, but not today, nope I won’t go there). At least the light is constant (if all the gym lights are working), so set the camera to manual mode metered for ambient light. Do whatever EV changes (aperture or iso) are required to get at least 1/250 shutter speed.

The game is played in a smaller section of a standard basketball gymnasium. The refs will let PJs stand/sit/crawl-on-their-belly-like-a-reptile as far as the bold exterior stripe of the basketball area. Going beyond this stripe might interfere with the game and/or injure the players (a liability issue).

Get the standard safe shots before the game begins.

With the new rally scoring system, matches tend to last a little longer, but they can still finish before the PJ is ready (if it's a mismatched game). So CYA, then go for harder shots.

For simplicity, we're going to only have one team from our readership playing this game. Shooting both sides limits time and this is not a sport with a lot of spare time. Therefore, I'll refer to the subject team as "home" and the opponents as "visitors."

For new PJs, the editor only wants shots with the focus on the home team unless otherwise stated. It doesn't matter how great the visitors are, focus on the home team. It's better if images show faces from both teams because one went to the net backwards, but get the home team’s faces first.

Average:
Start by working shots for publication. Often these will not be published because they are a stepped-up version of safe shots. Each sport will have its own variation of average shots (think a "C" on a college exam). These images might be great (someone could always spontaneously combust), but you are honestly covering your rump.

Go to baseline of the visitor’s side and center on the court. From a standing position with a 80~200mm lens and monopod, focus on the middle person in the front line of the home team. At this distance, most shots along the net should be nearly in focus. I normally shoot on manual focus for these and let my depth of field handle variances.

Get a few shots of some spikes and blocks along the net. Shutter timing is critical. At 1/250, there are 249 wrong times to shoot. There is only one right time to shoot. The PJ better get it because the ball is completely out of the frame in 3/250 seconds.

Get some shots of the coach giving instructions and teammates cheering.

Good:
After a few safe net shots are in the bag, move to the side of the court. Sit on the floor near the bleachers or guard wall. Align yourself between the two lines of players. From here, the PJ can get backline digs and frontline sets. These are the "B" grade shots.

At this point, it becomes important to understand the game. For time's sake, I'm going to give the suggestions without answering "why." Focus on the middle backline player while the visitors serve. If one of the outside backline is weak, focus on her instead because the visitor will already know the weakness and try to exploit her (volleyball is a girls-only high school sport in Texas). Get the dig.

If home is serving, get a few serve shots if the server is on a streak, otherwise it is just a waste of time. Instead, focus on the other backline girls for the return.

After a few digs, get some shots of the setter. The setter is often the most important team member because she makes the spike possible. An 8'2" player becomes an angry blocker if the setter sets the visitors.
Setters tend to be shorter than other players (this is why they specialized). This makes it easier to get a good shot from the ground. However, if the PJ can stand to shoot the setter, it will be a better shot because she tends to look up at the ball while setting.

Once these are accomplished, get the overhead view. These images depend on gym design. Some have catwalks (always leave camera vests/bags behind and tape the camera onto your hand with gaffer's tape). Some have observation decks over the basketball hoops (makes for great net shots). Most only have bleachers.

In some tournament situations, the bleachers are closed and moved to separate courts. These create a nice overhead view about 10 feet from the court over the ref's stand (not ideal for agoraphobics, since the bleachers must be climbed).

If assigned to get the setter, this is the best angle because the setter will be looking up at the ball (and the PJ). She will form a circle with her arms and have the ball at the end of her fingertips. The PJ gets the ball and the face of the subject in one frame.

Then stand behind the ref's stand with a 80~200mm autofocus (AF) and follow the ball for a while. The PJ might get lucky.

On important games, skip the last point and focus on the home sideline for the reaction.

Excellent:
These images are high risk. The likelihood of anything useful is minimal, but if it happens, won’t the PJ look brilliant at the editing desk. These are the "A" grade shots. Again I will stress not to try these until some publishable shots have already been accomplished.

Break out the 300mm or 400mm (if you’re freaking crazy). Sit on the visitor’s backline corner. Shoot for crosscourt outside-hitter spikes. Aim through the legs of the visitors to the backline of the home team and get the power digs.

Once the PJ's gotten a bag full of these, sit by the ref's stand. Switch to a 17mm or 14mm and try to get a front line dig. No problem? OK. Layer it. Oh, that's what I thought.

Go into the catwalk with long glass and see how tight you can get a pre-spike or set.

Next, try some of the "cool" things. Try a few panning blurs (synch them if you can, but I'm not going there). Look around for anything reflective for surreal shots. Try a slow-shutter, double-action zoom for a hit (if you pull this off, I hope you're in a different competition region).

Then, it's up to your imagination and technical prowess.

Enough for now,
 

Tuesday, August 10, 2004

Get the safe shots

Wow, summer sure was fast. The education and sports beats are heating up, and they're expecting iconic images of the newest rookie athletes. Groovy.

Some readers of this blog may be trying their first round of shooting sports professionally (for pay) this fall. The good news is the PJ is only expected to deliver one to three shots by deadline per sporting event. The bad news is those images better be perfectly timed and amazing.

Over a short period of time, I'll go into the safe shots for each sport. The safe shots are the "must have" images. These save everyone down the line when the game is miserable and the expected winner becomes the looser, or the PJ gets called to a homicide after five minutes of shooting the cross-town championship game.

Obviously, preparation makes everything easier. If available, know some key players and why they're important. Try to get advanced copies of rosters from team Web sites or other resources. These rosters can later be compared against those acquired at the game for accuracy.

Safe shots are the first shots in the bag of any game. These aren't the ones PJs want their name under, but they're insurance against camera malfunctions or any number of other problems. They're standard (redundant) images. Once a PJ has the safe shots, s/he can move on to more challenging aspects of the game, which probably won't happen since s/he's looking for them. Now aren't we glad we have the safe shots?

Arrive at least 30 minutes early to have time to acquire rosters and adjust to a last-minute venue change (or wrong venue on the assignment).

The first shots on any roll/disk should be the official venue name sign and rosters. Don't fire a frame until these are shot or in progress. Even if the PJ gets paper copies to keep, shoot the rosters anyway to keep the information with the images for eternity.

The rosters can be found on the scorekeepers table at gymnasium events. It'll be found in the press box (announcer's booth) at stadium events. If it's a minor game (league, junior high or pre-season) go directly to the coach.

If the coach says s/he did not bring a roster (expect this in the beginning of each season), pull out the PJ notepad and pencil (if it rains, pencil doesn't wash away), and ask which player on the sideline knows the correct spellings (first and last name of each player as well as each player's jersey number).

Hand the pad to this person and let her/him know the importance of accuracy. Get this person's name if something goes wrong. For the really paranoid folks, get a cell number for the coach to clarify any later problems.

If the PJ already has a copy of the roster have a designated person check it for accuracy and completeness (toward the end of the season, players are added to fill in for injured varsity players).

Shoot the rosters at +1 light compensation with a reflective (in-camera) meter or at standard available light for ambient light (hand metered).

Double check the assignment for any specifically identified players. If the teams are warming up, identify these players. If possible, go up to each, have each player drop to a knee and quickly get a mug shot (the background should be solid green [grass] or brown [gym floor] and below the camera level). Then shoot each requested person as they warm up. The PJ can get closer to them at this time and they'll typically not be in full battle gear (helmet). Get a few shots of each team's head coach at work for file.

If the pager goes off, the PJ could leave now and have something publishable. Hope it doesn't.

Check the time. If there is plenty of time, start working the stands for feature photos. Look for bright colors, painted faces or other strange behaviors. Listen for laughter or shouting. Often, this leads the PJ to the best shots.

Watch what people are doing. Is anyone taping up signs, inflating break-through objects or cooking hot dogs? What are the cheerleaders/mascots doing? These images are as much a part of the first games of the season as the game itself.

Consider the weather and light. The light prior to a football game in the fall is often spectacular. Find the best foreground to showcase this light before it arrives. If it's cold or rainy, shoot people protecting themselves. It might get picked up by another section of the paper the following day as a historical it-was-a-cold-and-rainy-night shot. Always get complete cutline information.

For sports with three or fewer referees, get the names and hometowns of the refs. Although these won't be used often, it's always safe to have the names. Often the refs are in the background of a critical play. It's nice to recognize them and let them have something to pin on the wall at their day job. It also lets them know who the PJ is and why s/he is there. Lastly, it makes it harder for them to be difficult toward the PJ once they have given their name.

Before the game, some sports have introductory lineups. Because some teams only put one set of numbers on jerseys (normally the back), take wide shots of the line up to match hair, shoes, laces, bows, armbands and whatever to the players. These shots may salvage a great shot from vanishing into oblivion.

Now the PJ is ready to shoot the game. Each game has its own idiosyncrasies, but the common thread is scores. A recurring safe shot is the scoreboard. Again, each sport is different, but shoot the scoreboard to separate significant events. Shoot football after each point is scored. Shoot volleyball at the end of each set. Shoot baseball/softball at the end of each inning. Shoot hockey, soccer, lacrosse and field hockey after each goal. Shoot basketball at the end of each quarter. Shoot swimming after all lanes have finished.

Throughout the game, shoot the jersey numbers of the players after significant plays to ensure they can be identified.

Prepare to leave at halftime of any game to make deadline. If deadline isn't tight, get some additional shots during the game of the fans cheering and the coach yelling. Shoot some of the halftime show (if there's one).

If the PJ stays to the end of the game, get a shot of the final score and look for any happy, sad or good sportsmanship moments after the game. Then, crank it out before deadline baby.

Enough for now,
 

Quality is all in the lens

Let's talk about something basic today: lens quality.

Lenses are the most important part of a camera system. The most expensive camera in the world is still a light-proof storage box for film. Without a lens to focus the waves of light, the camera is useless. The light focusing quality of a lens directly affects the image.

We want our images to be "sharp" (extremely well focused). PJs pay a lot of money to have the sharpest lenses we can acquire for the camera system we use.

The lens is the single automatic way to improve images. For PJs on a budget, start building your system with a modest camera body, but get the best glass available.

Often, these are used, manual-focus lenses. They aren't as fancy as the ones the pros use, but they aren't as expensive, heavy or fragile (in most cases). Don't get talked into less-expensive auto-everything lenses produced by an off-brand manufacturer. Stick with lenses from the company who manufactured the camera body.

Lenses control light. Light is focused as it passes through the lens. The light then strikes the film or digital sensor (the film plane). This is the critical point in the photographic process. At this point, the circles of confusion are set.

Circles of confusion are points of light, which are focused to strike the film plane. If these circles are broad, they give the image a "fuzzy" look (slightly out of focus). If the circles of confusion are tight, they make a sharp image.

Since light is both a wave and a particle, think of light as water through a sprayer bottle or water pick. There are some lenses which only spray and some which only have a tight stream setting. Get the lens with the tightest circles of confusion to direct the light exactly where it's needed.

The other major consideration with a lens is its "speed." Lens speed is measured in "f-stops." The f-stop is a determination of how much light is allowed through a lens.

A lens with a maximum aperture of f/5.6 is considered "slow." In other words, these lenses are best used outside during the daylight.

A lens with a maximum aperture of f/2 is considered "fast." The f/2 lens is three stops faster (allows eight times the amount of light to pass through the lens in the same amount of time). It can be used in lower light or allows for faster action in moderate light (as in a gym). Costs climbs considerably as lenses become faster.

Enough for now,
 

Monday, August 09, 2004

PJs shoot weddings differently

I shot a wedding over the weekend (actually, a 10th anniversary redo). It's strange to shoot film on important shoots now. I caught myself chimping (checking the back of the camera) several times. Since film cameras don't have preview screens, I had to actually "trust" my own light calculations. Spooky.

Now, I'm waiting on somebody other than myself to develop the film and make the CDs. I'm not too terribly worried about this, but I'm sufficiently expectant. I've seen a PJ (luckily not me) lose a $5,000 wedding shoot due to a commercial machine malfunction. I can't imagine the conversation with the parents of the bride afterward.

In one of my sociology classes I learned about suicide rates. Wedding photographers were No. 5 on the list of professions with the highest suicide rates. I think dentists were No. 1. So, if you think wedding photography is an "easy" profession think again.

Most PJs start shooting weddings in college. At the time, the PJ is the friend of the bride or groom who knows how to operate a camera and is cheap. Since college weddings are typically financed on a shoestring, the price is the key. We all get better images and more expensive with time and experience.

Consequently, most PJs have already shot a few weddings before they get their first staff job. Since most news jobs have disgustingly low salaries, PJs often supplement their incomes with weddings and other freelance gigs. After enough weddings, it's breaking news in a white dress.

In the last few years, PJ wedding photos have become en vogue. The reason is because we work the entire day and get the truly memorable images. Yes, we can do the grand display portraits of the whole wedding party, but we also get the little details often missed by standard wedding photographers. We tell the whole story of the wedding day: the raw emotional tension and the quiet moments of reflection.

One photographer in town, who is well respected and does high-end studio portrait work, said a client requested a PJ treatment of the wedding. He asked me if this meant he should shoot 3200 iso, B&W film to make it look like PJ. I blinked (are we this misunderstood). I told him to shoot 100 iso color film if he honestly wanted it to look like PJ. The difference is in the approach.

I have different levels of weddings I shoot. The top level is a start-to-finish wedding. I arrive at the bride’s home before she wakes up (she typically stays with the parents the night before the wedding). I photograph her from the time her folks wake her up until the time the limo drives the happy, exhausted couple away to their honeymoon.

In between these moments, I shoot the chaos we all know is involved in a wedding. I get both the joys and the frustrations. By the time the couple leaves, I'm in pain - absolutely everything hurts.

I wish I could show you some older images, but I formerly gave the film to the couple and was done. Then, they had the film to order as many reprints as they wish. It was no longer my problem. I got paid to shoot. I shot. I delivered. They were happy.

This time, I had the film developed and CDs cut. I'll edit down the images to only those I'm proud to affix my name. With those, I'll color correct them using a batch process and cut final CDs. I'll also choose the 20 images I feel tell the total story best and desaturate those images as an additional B&W slideshow.

I'll give the couple the CDs and a certificate of unlimited use (I retain the copyright), then they can pop it in the DVD player, have a bottle of wine and laugh at themselves all night. Later, they can go to a local camera store and have quality reprints at reasonable prices.

Someday I'll discuss front-end vs. back-end billing. I'm a front-end guy. There’s no surprise after the wedding. There will be enough of those for years to come. I want the couple to be happy with their memories and my images.

Enough for now,
 

08/09/2004 UPDATE:

Well folks, don't trust other people. Now I regret my plan. I should have simply handed the film to the family and walked away. I took the negs to Eckerd's photo center and requested development and scans. I should have known when they said they could do it in under an hour it was going to be a problem, but the file size is appropriate for a quality scan.

Now, the negatives are ok, but I must manually re-scan them. Eckerd's CD scans look horrible while the negs are fine. They are completely full of noise. I think they have some old generation dit camera with a macro lens and run it through a cc program. This would explain the look and speed. It doesn't exactly explain why some CDs are upside down though -- not all CDs, just some (really doesn't make sense).

Next time, I think I'll just rent a dit camera ($200 p/day). I can't use my DMN camera bodies for some bean-counter reason I don't quite comprehend. But, this is a chance for us all to learn from my mistake. At least this can be overcome with a little time.

Friday, August 06, 2004

DJ Drama


Mark M. Hancock / © The Dallas Morning News

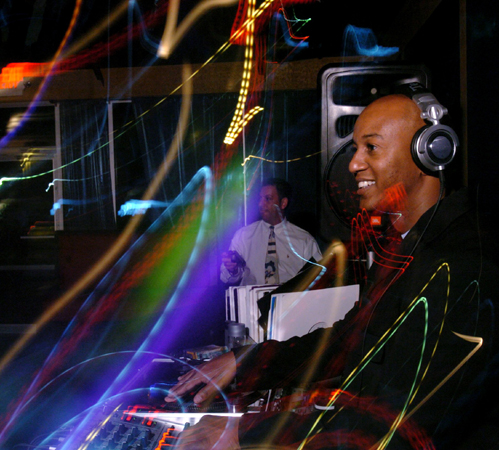
Michael Jerome works the turntables at the Drama Room in Dallas on Friday, August 6, 2004. It is one of the newest and hottest clubs in the Knox-Henderson area.

I tried something slightly different with this image. I used a hand-held, front-synch flash (color corrected for tungsten light) and burned in the lights by covering the section of the lens the DJ occupied (like buring-in a print) while the shutter was open for 30 seconds. I think it'll have a better effect with some practice and better light sources. I'll work on the technique some more.

If anyone else gives this a go, make sure the subject is in front of a dark, solid background during the flash exposure to lift the subject off the background and not smear light across her/his face.

Enough for now,

Thursday, August 05, 2004

Henri Cartier-Bresson dies

Henri Cartier-Bresson died on Tuesday. All PJs have studied his work. He founded Magnum photo agency. He coined the term "the decisive moment" as it applies to PJ. He became a painter for the last 25 of his 95 years, but he will always be considered the "father of photojournalism" to many.

Magnum has posted a retrospective of his work here.

Enough for now,
 

How to handle "Media Day"


Mark M. Hancock / © The Dallas Morning News

Irving MacArthur defensive tackle Eddie Walton screams during practice with the team at the school in Irving. The senior is one of the defensive stars, who have allowed only seven points in two games.

I see the signs. It's almost the start of football season in Texas. The Sports reporters are working on their pigskin previews. The bands are practicing. Team mascots are learning how not to sneeze inside the head (yuck!). Here come the mugs.

Since football players wear helmets, most people don't know what they look like. Each Saturday, we need some way to show the people behind the weekly stats. Scheduled pre-season mug shots are better than run-and-git-it mugs. Or the ever present, "Do you have a shot without a helmet?"

Since neither coaches, players nor PJs particularly enjoy this annual cattle drive, get it done quick. Here are some tips to make the process less painful to everyone involved. I know PJs aren't into too much advanced planning, but this is one situation to do it.

Supplies needed:
neutral gray seemless paper (cut a 4' x 6' piece)
gaffer's tape
clipboard, clip tab or industrial paper clip
half-page, cut prints of each player's name, number, classification (Fr., So., Jr., Sr.) and position in a large font
spare plain white paper (8.5" x 11")
three heavy black markers

Arrive early and set up a station. Some mug shot days (called "media day") are scheduled to coincide with the team shots. In some areas, there may be up to four newspapers getting mugs in addition to the sometimes insecure portrait photographer the team hired.

Find a place with a large blank wall with constant shade for the players (typically on the north side of a building). This keeps the light even for both strobes and available light shooting. It also opens up the eyes of the players because they aren't squinting at the sun.

Tape the seemless paper to the wall with the gaffer's tape high enough to accommodate all players from the angle of a camera on a tripod. You don't want the gray paper drawing a line (going tangent) through a player's head with the orange wall showing above the ear. If the PJ isn't taller than 6 feet, consider using a chair for the players. Adjust the background accordingly.

Four to five feet in front of the background, dust the ground and place a piece of gaffers tape. This is where the players stand (if sitting put two small marks for the front chair legs). This is far enough away from the background to avoid shadows from the player on the background when using a flash or some strange bounced light.

Place a trash can within reach near the line. It will be used later.

Next, set up a table (or bench if you must) near a different section of the wall. Tape clear, large-font instructions (see below) on the wall as to what the players must do. Football players can read and are really good at following instructions.

Firmly clip the name sheets together so they don't blow away. Place them on the table along with some blank sheets (also clipped together) and the black markers.

Set up your tripod and place your strobe or flash on a camera stand (you only need one, but two looks a bit better). Use a shutter release plunger cord or electronic equivalent. Use a 100mm to 200mm range lens. Make sure everything is working (batteries are new, wireless connections work, reformatted card or plenty of film, etc.).

Ask a manager or one of the other kids to stand on the line and make a test exposure with digital cameras to check the light. Set the focus and switch to manual-mode focus (everyone will stand in the same spot). Set the light adjustments to manual-mode (because skin reflectivity messes with the meter). Test once more.

From here, it's a piece of cake. The players get their half-sheets of paper, check it for accuracy and move to the line. Tell them to hold the paper directly under their chin (so the name appears with their face since you can't see their number). Shoot.

Have them place the paper in the trash can. Shoot again.

Instead of looking through the camera on the second shot, I look at their eyes. If I don't see the reflection of the strobe off their eyes, they probably blinked and I take one extra shot.

Say "thank you" and "next" in a calm voice... shampoo, rinse and repeat...

Most high school kids think it's cool to look tough. There's no talking most of them into smiling and looking pleasant. So, make an example sheet (8.5 x 11) with mug shots of smiling professional athletes. Label this one "Right." Also make an example sheet of unhappy mug shots of police department arrestees. Label this one "Wrong."

Tape both on the wall near the instructions. The players should get the hint and smile when they arrive. Otherwise, just let them all know the photos will run next to their accomplishments on the field and their moms aren't going to be happy with frowny faces.

In a best-case shoot, a prepared PJ can shoot the whole 80-person football team and staff in less than 20 minutes. Shooting order doesn't matter because each person is holding up his/her own name.

Wall instructions:

1) Find a paper with your name and information. If any information below is missing, add it with the black pens provided. If one does not have your name, follow these instructions.

2) Write your first name in CAPITAL BLOCK LETTERS.

3) Below that, write your last name in CAPITAL BLOCK LETTERS.

4) Below that, on the lefthand side of the page, write your position in abbreviated form (WR, DE, RB, QB, etc.).

5) To the right of that, write your classification (Fr., So., Jr., Sr.).

6) If you know your jersey number write a # symbol and the number.

You are responsible for the spelling of your own name. This spelling will be used for the entire year. Make certain it's correct.

If you make a mistake, use a new sheet of paper.

If your name has capital letters in the middle, place three small underlines under the letter to be capitalized other than the first letter.

Refer to the example for any questions.

When completed, step up to the line and place this information under your chin so the photographer can read it.

Enough for now,

Wednesday, August 04, 2004

McMeans beaming shadow


Mark M. Hancock / © The Dallas Morning News

Texas Woman's University (TWU) junior Amber McMeans practices on the balance beam at Achievers Gymnastics Center in Denton on Wednesday, August 4, 2004.

How to order prints

Reprint policy:

Due to low sales compared to the cost of maintaining state tax records, we no longer offer photo-quality reprints, posters, mugs, mouse pads and other items (printed products) for sale to the public.

Although there is no alternative way to purchase printed products, no reproduction permissions of any kind are granted.

We still license individual image use to publishers (please see below).

Reproduction of images
Images with © before "Mark M. Hancock" or "NewsEagles.com" are owned by the photojournalist.

Publishers wanting to license images for reproduction (print or electronic) should contact Mark by email or call 214.862.7212.

Publishers can commission assignments for Mark M. Hancock via email at markhancockrealty@gmail.com, phone 214.862.7212 or see the "Contact Me" section of the DFWmark site. Mark also accepts assignments through Zuma Press via the regular publisher channels.

Other company photos
Images with © next to a company name belong to the company and need to be ordered as directed through the company. Please follow these links:

The Dallas Morning News
The Beaumont Enterprise

Missing and/or older images
When ordering prints from authorized clients, please help them locate the correct image(s) by describing the image(s) and caption information along with the publication date and location if known. Please email this information to them.

Additional questions
If you have additional questions or seek reproduction rights, please call 214.862.7212.

Enough for now,

How to order DMN prints

Images with © The Dallas Morning News belong to the company and will need to be ordered as directed below.

Images with © Mark M. Hancock are owned by me. Please see these instructions to order prints or purchase reproduction rights (print or electronic).

Thanks,

The Dallas Morning News reprint policy:

To order photo-quality reprints, the images must have been published in the newspapers (The Dallas Morning News, Al Dia or Quick) or posted at www.dallasnews.com. Images must have been shot by TDMN staff photographers or special contributors.
Please help us locate the correct image by including a clipping, photocopy or screen print of the image along with the publication date, section and page number.

Personal Use Prices
size
8x10 - $34.95 (unframed) or $110.00 (framed)
11x14 - $59.95 (unframed) or $150.00 (framed)
16x20 - $79.95 (unframed) or $200.00 (framed)
Tax and shipping is included in these prices.

Almost all images are available in color even if they were published in black and white.

Please send a check, made out to The Dallas Morning News, along with the requested image information to the following address:

Photo reprints
The Dallas Morning News
PO Box 655237
Dallas, TX 75265-5237

If preferred, DallasNews.com has added an online order form for photo reprints. It's not real clear about how payment is transacted. I guess customers submit a print request and contact information and someone replies with availability (only DMN/Al Dia/Quick-generated images are available).

If you have additional questions, please call 214-977-8045

If you seek editorial or commercial reproduction rights, please contact 214-977-7993.

Sunday, August 01, 2004

Working in the coal mine

I’m obviously making some changes to this blog. For one, I’ve added comments sections. I question the wisdom of this decision during an election year, but we’ll try it for a while. Let’s just keep comments to the subject listed. Thanks.

You will need a Blogger profile to comment. Otherwise, the e-mail still works.

In other tinkerings, I am adding images to older files. When I started blogging, there was no cost-free way to do this, and I’m poor. The additional problem is scooping my own paper. I won’t do this.

Before the big dallasnews.com change, I could post images onto my section of the site and all was good. Nobody got scooped, and I would refer to their site. Since they took away our ability to modify our own profiles, I was left without an alternative.

This has led me to another decision. From now onward, I may write as if there is an image posted when there isn’t. Since this is not a fixed medium like newspapers, changes can be made. The image might show up at a later date after it is published in The DMN. Likewise, it might get killed, and I’ll add an update. Let’s all be flexible for a while.

Enough for now,

Look cool with lens shades


Mark M. Hancock / © The Dallas Morning News

Hall Office Park in Frisco features the Texas Sculpture Garden throughout the front four acres of the complex. This sculpture is a big steel piece titled "Blanco #17" by Ovilla artist Mac Whitney.

I wrote a long entry about lenses and filters. Since the actual entry would be huge, I'm breaking it apart to make each entry manageable for average readers. Today I'll discuss lens shades (also called lens hoods).

Lens shades are one of the easiest and cheapest ways to improve images. Even a cheap shade is better than none.

Most SLR lens shades screw onto the front of a lens or mount on the barrel exterior. Inexpensive rubber shades will perform well for most PJs. As the lens quality and expense increases, some PJs may opt for metal or hard carbon-fiber shades.

Carbon shades are very expensive but provide better light control and lens protection. They also don't interfere with other screw-on lens filters. For studio shooters, there are bellows-style hoods, which offer superb light control and flexibility, but are more delicate.

Lens shades are sold in different sizes (measured in millimeters). This is a measurement of the diagonal distance of a lens filter mount. Some lenses have this information printed on the front near the objective lens (the most forward lens element).

If ordering online or via mail, this is a critical fact to know. For example, I have four old Nikon lenses (28mm, 50mm, 100mm and 80-200 f/4) which can all use a 52mm lens shade. Modern lenses typically have dedicated barrel-mounted shades.

The best bet is to take all the lenses to a local camera shop and get assistance. If in doubt, ask for the cheapest shades. You can always upgrade later.

The shade's purpose is to block stray light from entering the lens and keep the image's appearance sharp (extremely well focused). By blocking stray light, image contrast is increased. The shade keeps the dark areas dark by removing stray light particles, which gives the overall image a washed-out ("flat") look on a non-shaded image.

Shades also take the brunt of impact damage when the camera hits something or is dropped. I have a box full of broken and bent ones to prove this point.

A shade helps keep rain, snow and side-blowing dust away from the lens or filter. It doesn't eliminate these problems; it lessens the effect.

If the lens is facing into the wind during a storm, the lens still gets soaked. Whenever possible, PJs shoot with the wind to our backs while covering news during a storm and the shade helps keep water drops off the lens.

As with raindrops, the lens shade helps with most lens flare. Lens flare occurs when light from a strong source (the sun, spotlights, a strobe, etc.) directly hits the lens from an oblique angle (see photo above).

Flare aberrations appear in the image area as bluish polygonal areas (matching the number of aperture leaves). One aberration is typically present for each actual internal lens element the light penetrates.

Often, lens flare ruins an image. If used wisely and with knowledge, it can become a cool effect. As a rule of thumb, avoid it whenever possible.

To avoid other problems, make sure the lens shade is appropriate for the lens it's placed upon. There are wide-angle, normal and telephoto (long-lens) shades. Each is designed to give maximum shade while allowing the proper angles of light to enter the lens.

If the wrong shade is used, a "vignette" or "keyhole" effect occurs. The vignette can produce a darkening and diffusion of light at the edges of the frame. A more profound vignette actually intrudes into the image area and blocks out all light from large areas around the corners of the frame.

Since shades are often one of the cheapest accessories PJs purchase, I suggest putting a dedicated shade on each lens. Over time, PJs learn to feel for the shade in the dark to know which lens it is.

As a bonus for the pros who suffered through this entry, when the exterior band of a rubber shade rips off, it's the perfect size to wrap snugly around a flash head to hold color-correction gels or softboxes.

Enough for now,