Professional photojournalist Mark M. Hancock discusses photojournalism and the eccentricities associated with gathering images for daily newspapers and magazines.
My clients and colleagues know I give little pop-by gifts to my clients when we tour homes or whenever I’m in their neighborhood. I also have smaller ones for open houses. Each one comes with a “cheesy” little saying about real estate or my services.
I had the fastest-ever hunt-and-kill for a new home. Consequently, I stacked up some gifts while we were inspecting their future home. They were amused and said I could share their video.
This is an updated repost of the information presented on April 4, 2008 at the New York Press Association Annual Convention.
While there is no way to "pin" a post, I have set the date to keep this post on the front page for new visitors. Please scroll down to see newer content as it's added.
If you find the "Quick Tips" version to be visual hot sauce, please watch "Savory Tips to Improve Photos." It's the same presentation with more time to savor each image.
Additional information is located on the All PJ-related posts section of this blog. Underlined topics are linked to previous posts with detailed information about the subject.
Timing:
Have patience.
Look for repeated action patterns.
Anticipate the action.
Shoot at apex.
Shoot before collision - wind through reaction.
Get reflective shots (quiet moments)
Seek "timeless" images.
Time of day.
Upon arrival:
Arrive early. Stay late. Shoot signs and rosters. Collect paperwork. Shoot name tags and numbers.
Shoot basic package: scene, normal, tight
Shoot story: lede, transitions, kicker, emotion. Get cutline information (5W & H). Get sound if possible.
Selecting subjects:
Hunting techniques: shadows, oblique angle, concealment, pre-compose, pre-focus Emotion
Activity
Color
Sound
Use attention span limitations.
Goals:
Tell the story.
Get main subjects.
Get emotion. Shoot 100-frame minimum.
Use each lens.
Shoot each angle (left, right, high, low).
Shoot reflection / refraction.
Shoot silhouette / isolation.
Shoot blur.
Before leaving:
Understand the story.
Be able to tell the story in one frame, three frames, five frames, 20 frames.
Have all cutline information. Have 100+ images.
Count equipment.
Advanced: Find new word.
Make unique (rare) images: access, subject, news value, combination.
Multi layers
Multi meaning
Please watch “Know Your Rights as a Citizen Photojournalist.”
Know your rights (most is covered on this link)
It's best to be courteous to defuse confrontations.
Don't be belligerent.
The First Amendment provides the right for anyone to make photos.
Anyone can shoot in public places, streets and sidewalks.
Anyone can shoot where access is granted.
Property owners have the right to deny access.
Understand trespass law by state.
Generally, PJs can shoot until asked to stop.
Exceptions include military facilities and some areas within nuclear plants. Model releases aren't required for editorial use (but pubs may still require).
Celebrities, politicians and emergency workers limited their right to privacy (injected themselves into spotlight).
Felony criminals have no right to privacy until in prison.
The right to privacy is seriously limited in public places.
The exception to this is medical facilities (which include ambulances in some states).
Business security isn't sufficient to prohibit photography.
Trade secrets aren't in public view. Trade dress doesn't apply to photojournalism.
Police may limit access, but can't prohibit photography (prior restraint).
You aren't required to explain the purpose of your photography.
Coercion and harassment by private security is a criminal offense in all states.
Private parties have limited rights to detain and could face criminal and civil charges.
Without a court order, private parties can't confiscate film.
Ask what law was specifically violated.
Ask for this person's name, and who they represent.
Report rights violations to police. Call before the offender does. Enough for now,
Skillman St., Unit 304C
Dallas, Texas 75231
Listed at $200,000 - BAC 3%
MLS# 20818558
This is a perfect property for your investment portfolio. The tenant signed a 12-month lease starting 1 Feb. 2025. This ground-level 964 sq. ft. condominium in Dallas has 2 bedrooms, 2 full baths, clothes washer and dryer, refrigerator, and a covered and fenced porch with outside storage. It’s ideally located near shopping, transportation, employment, dining and entertainment inside the desirable Richardson ISD.
Luxury vinyl plank flooring in the common areas and carpet in the bedrooms were recently installed. The interior was freshly painted. The kitchen features Kenmore appliances, large stainless-steel sink, loads of storage space, a pantry and a window for fresh air. Bathrooms feature new cabinets, sinks and faucets. The community mailboxes are located to the west of the building and the community pool is to the east with sidewalks connecting to both. The Lake Highlands Trail and Jackson Branch Creek are located behind the complex. The trail connects to White Rock Trail about a half mile from the complex.
2809 Lakeside Dr.
Aubrey, Texas 76227
Listed at $500,000
Listed by Mark M. Hancock
MLS# 20674193
Move-in ready, east-facing 3,145 sq. ft. home in the Arrow Brooke community of Aubrey backs to a greenbelt has 4 bedrooms, 3 full baths, game room, media room, covered porch, and a 3-car garage.
Rare home is near the community pool and stocked fishing ponds. Home has Luxury Vinyl Plank flooring throughout the ground floor common areas and bedrooms. Bathrooms feature designer ceramic tile floors. Front downstairs bedroom is beside a guest bath. Open-concept plan includes living room, breakfast area and kitchen. The chef’s dream kitchen has a gas cooktop and oven, granite island with sink, reverse osmosis filtration system, breakfast bar, and stainless-steel appliances. Primary ensuite bedroom has trayed ceiling, dual vanities, garden tub and separate shower. Laundry and covered patio complete the ground floor. Upstairs features two bedrooms with walk-in closets, a full bath, a massive game room and media room wired for surround sound.
Open House on Saturday, Dec. 7 from 2-4 p.m. and Sunday, Dec. 8 from 12-2 p.m.
Our Treat House on Meadow Glade in Frisco is decorated and ready for family photos each night for about four hours after sundown through Thursday, 31 Oct. 2024. It will be turned off during any rain.
Located at the DEAD END of Meadow Glade in Preston Glen in Frisco, it’s the place to be to get a treat. The yard features a high-end gravestone along with skeletons as well as plenty of spiders of all sizes and shapes. The planters and glow web feature energy-saving LED lighting while the sidewalks include retro-style stake lights with modern LED flair.
Younger children should feel safe for photos because nothing jumps or screams. Bring your whole family for ghoulish portraits in our yard if you wish.
I’ve Got Your Six!
Mark M. Hancock, GRI, MRP, AHWD
REALTOR, New Construction certified
214-862-7212
DFWmark@kw.com
DFWmark.com
Keller Williams North Country Agents tour properties during the Summer 2024 Farm & Ranch Tour on 25 June 2024. Tour stops included the following properties:
• 12255 Strittmatter Road in Pilot Point listed by Jessica Self.
• 2412 Ranch Road in Whitesboro listed by Jeremy Lock.
• 256 Green Oaks Drive in Sadler listed by Leia Turner.
• 6904 Southmayd Road in Collinsville listed by Jessica Self.
• 626 Scoggins Road in Tioga listed by Jeremy Lock.
If you are ready for the big skies of Texas, contact me to see these beautiful properties in person and submit an offer.
Guests gathered at the Frisco Rail Yard to observe the total solar eclipse as the moon obscured the sun at 1:40 p.m. on Monday, April 8, 2024. The 125-mile-wide shadow of the moon will cross the Earth at 1,600 miles per hour. The 2024 eclipse will cross many major cities from Texas to Maine. It’s the last total eclipse visible over the USA until 23 Aug. 2044. It was one of the most viewed celestial events in recorded history.
Cirque du Soleil performs “Crystal” at Comerica Center in Frisco on Thursday, Feb. 9, 2024. The presentation is aerial and on ice to combine the dangers of both acrobatics and skating. It’s always a joy to see any of the Cirque du Soleil performances. If you’ve never seen one in person, you must.
We visited “Harry Potter: A Forbidden Forest Experience” last week in Little Elm. It was about as we expected. The lighting is phenomenal. The statues are designed to withstand any weather. You should go in costume if you’re extremely into Harry Potter. This short video has the highlights. It will continue through January 2024.
I’m preparing for a weekend of open houses. Please visit, get some information, get a snack, get a toy, get a dog treat (because it’s a “ruff market”) and have some fun. See you soon!
I took a CE class today about intro to Chat GPT. It’s an artificial intelligence (AI) platform that can function as a virtual assistant for some minor tasks such as writing property descriptions and such. It has read every book, recorded and transcribed every podcast and combed through most of the internet before 2021 (a cutoff point to check accuracy). This allows it to “create” text based on its own “knowledge” and predictable speech patterns.
To test it, I asked it to define photojournalism. I started snort-laughing in class when its answer randomly paraphrased ME by NAME. 🤣🤣🤣
It just takes a little dough to buy a house! Veterans and USDA loans allow $0 down while conventional can be as little as 3% down. If you want to move ANYWHERE, I’m ready to help!
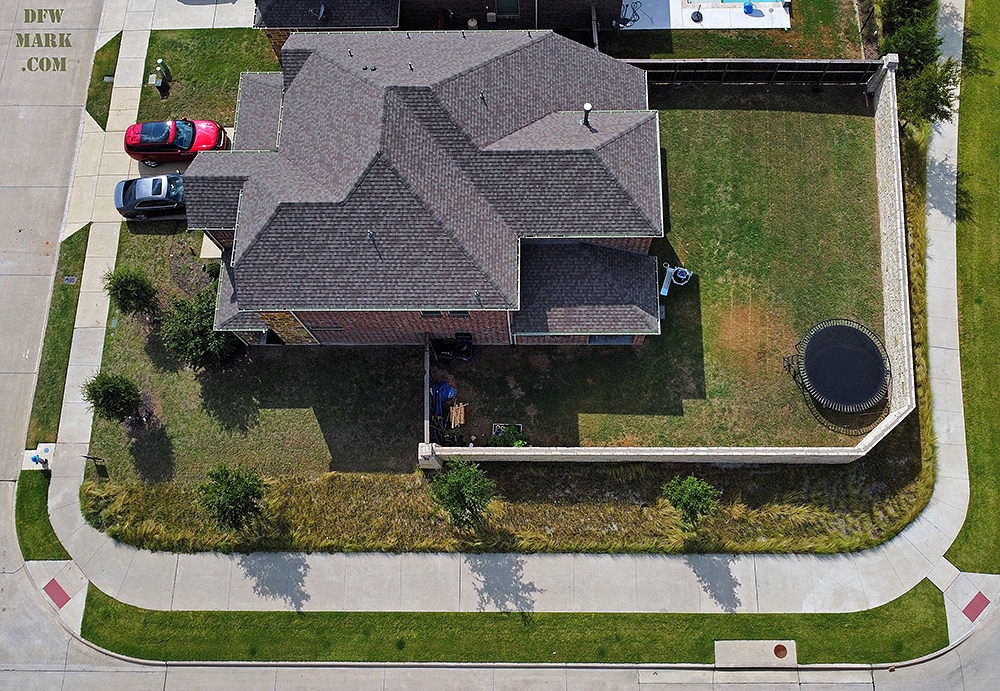
Here’s some drone photos of the house where
you can get some cookies and treats during my open house tomorrow. Not only is it a corner lot with only one shared fence, it’s literally across the street
from the community pool.
Open House
Saturday, Sept. 3, 2022
From 2 p.m. to 4 p.m.
924 Lawndale St., Celina
Listed at $625,000
Listed by Christy Williamson
This 2,809 sq. ft. corner lot home in the Bluewood community was built by Meritage in 2018. The home has 4 bedrooms, 2 and a half baths, front porch, outdoor living, game room, and flex room.
The house features both a covered front porch and a rear covered outdoor living room. Downstairs has wood and tile floors. Private flex room off the large foyer can act as an office with a nearby powder room. Walk through the butler’s pantry into the open-concept kitchen with an island sink and seating. Kitchen has white cabinets, granite countertops, gas cooktop and double ovens. Casual dining room and living room with a fireplace are off the kitchen.
The primary suite is on the ground floor and features a garden tub, separate shower and dual vanities, linen closet and walk-in closet. Upstairs has the game room, 3 bedrooms and a full bathroom.
Community features a pool, fishing, paths, park, playground and an amenity center in the Celina ISD.
710 Emerald Sound Blvd.
Oak Point 75068
Offered at $650,000
MLS# 14755249
This 2,971 sq.ft. home has 4 bedrooms, 2.1 baths, 2-car garage attached with separate detached 2-car garage/workshop, 2 living rooms, dining and breakfast rooms, game room, fireplace, screened patio, spacious barn-style shed on a full acre of land.
Roof replaced March 2022. Screened outdoor living was completed in 2021. Enjoy the firepit, yard to romp and space to park RVs.
Kitchen has double oven, island, planning desk, walk-in pantry, and window bench. Formal dining and parlor are great for entertaining or convert into a relaxed home office. Downstairs is complete with a powder room, utility room and large family room with a fireplace.
Upstairs, primary suite can easily handle a Texas King bed, has walk-in closet, garden tub, separate shower and double sinks. Three bedrooms share a Hollywood bath with two separate sinks and vanities. The large game room can convert to a 5th bedroom, media room or super-sized office. Solar panel lease must transfer.
3/13/22 Update: Congratulations to the winners. See y'all at 4 million!
2/12/22 UPDATE: I realized that I had the wrong email address, the correct email address is DFWmark21@gmail.com so I am extending the contest to 3/12/22. If you sent your information before, please send it again. Thanks!
If you like photography or photos, you can win a prize in honor of the PhotoJournalism blog getting more than 3 million views. I never expected to get 5,000 visitors, so this achievement is remarkable.
To celebrate this milestone, I'm offering a signed print of my work to three different blog visitors (one for each million views). I normally don't sign prints, so these are rare.
For example, this image isn't included, but this image is. They were both shot for DMN, but the first is as staff and the second is freelance. Simply look at the copyright symbol location and pick your favorite.
Older images may look out of focus on the blog, but it's an image compression problem from back when Blogger was new. They're as sharp and clear as any of the newer images.
Everyone who enters gets my monthly Information Of Value newsletter (you can download the book for free from my Google Drive). You can unsubscribe at any time.
What's the catch?
Winners will be selected in a randomized computer drawing after the contest period ends on 28 Feb. 2022. Winners’ names will be posted on the blog and those winners will be notified to select a preferred image.
Contest is limited to one entry per person/email address/phone. I need each entrant’s name, email address and phone number to verify. If the winner is under 18, the winner’s parents/guardian must approve their photo selection.
I'm only going to pay shipping inside the U.S. If the winner is outside the U.S., we can work out some arrangement to get the print to you. Otherwise, whomever wins gets a prize.
How to win?
Email your Name and phone number to DFWmark21@gmail.com. Each complete entry (name and phone number via email) will be assigned a number. On March 1, I’ll load the number of complete entries into a randomizer and allow it to pick three numbers. The people assigned to those numbers will be notified to claim their prize. I’ll need physical mailing addresses at that point for the winners.
If I only get a comment, it's not a winner. I'll add the winners’ names and general location (city, state, country) to this post when there are confirmed winners.
Good luck to all. Please share a link to this information and invite your friends to enter!
Since you enjoy the Information of Value (IOV) sheets that I create and post monthly on the DFWmark blog, you’ve probably wanted them all in one place. I’ve Got Your Six!
I assembled and updated a book of all the IOVs that I’ve produced since March 2020. The book will be updated with each new IOV on my Google Drive. Because it’s a PDF file, it can be printed at home in full size without additional rasterization. Also, all the websites mentioned are hyperlinked in the PDF.
When you need access to information such as what to do after severe weather hits or where to take visitors for fun in DFW, it’s all in one place at no cost to you!
I’m honored beyond words to have such amazing clients! I will Always Have Your Six!
“Our experience with Mark has been outstanding to say the least. He is truly a wealth of knowledge, a trove of fun facts and the ultimate spokesperson for Texas! Mark walked into every house prepared to help us find the perfect the one and having the ability to share the vision we had. When we finally decided on our forever home, Mark was there every step of the way! He was there for every meeting no matter how big or small to ensure we had the support we needed as first time home buyers. Mark ensured we were prepared with any questions that may come up as well as additional insight that ultimately help us avoid many "pitfalls". We ended with our dream house and an the addition of a new member to our family, Mark. Our conversation always ended with Mark stating he "has your six", with conviction we can say we have yours.”
Mark M. Hancock, GRI, MRP, AHWD
REALTOR, New Build Certified
214-862-7212 DFWmark.com
Type "photojournalism + mark" in most search engines to return here.
* Hold Ctrl and scroll mouse to change font size.
* Click on pictures to see larger photos.
Rita Captured - Katie Award winner
The 2nd printing has also SOLD OUT. Thanks for your support and helping The United Way.