Several blogs are doing annual retrospectives today. Since today is a day of reflection, I'll point you toward a story I wrote years ago. Before I was a PJ, I spent New Year’s Eve on the Berlin Wall the night it fell forever. The story is titled "Freedom."
My wish for this New Year is freedom for all. Freedom comes with weighty personal responsibility and sacrifice, but it's worth it. Yesterday, today, tomorrow and forever.
Enough for now,
Friday, December 31, 2004
Thursday, December 30, 2004
"Job cuts" illustration

I've had a few days without assignments, so I decided to self-assign an illustration for "Job cuts." I think it would be useful to illustrate anything from outsourcing to layoffs.
I made about 300 different variations for this series to make sure it would meet magazine cover formats as well as inside images or even full page background with lots of space for text.
Photo illustrations © Mark M. Hancock


I mainly concentrated on the psychological affect it has on co-workers and/or competition (particularly in white-collar professions).
The airline industry is facing cutbacks and no one seems happy about it – not even the competition. Meanwhile WTO textile quotas are about to end. It will benefit developing countries while it probably means job cuts for workers in America and the United Kingdom.
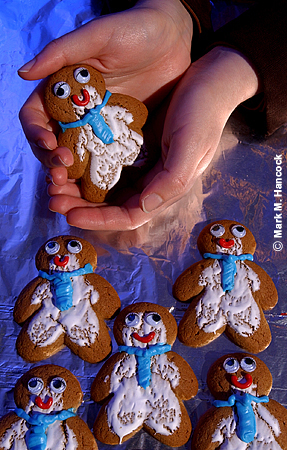
Meanwhile, workers spared from the job cuts are simply happy it wasn't them.
Yes, the hands belong to the famous blogger Fayrouz.
Enough for now,
Tuesday, December 28, 2004
Balance the light
A photograph is a cumulative record of light. The light can either be reflected or transmitted. Furthermore, each thermal light source has a different color measured in Kelvin (K) degrees.
End easy part.
PJs must deal with whatever light they encounter and try to make it look as it would to the human eye. Since the camera records in absolute terms, this is frequently impossible and requires color correction or filtration.
Color correction ethics
Before anyone has a cow, understand all photographic processes are corrected to what the human eye sees. The use of color correction (cc) gels with light sources or correction filters on the lens is typically employed to make the scene appear as it would to the human eye.
Most modern films are panchromatic. This means they capture the color spectrums most humans see. Color negative film is on a brown substrate, which requires correction. Then, it must be corrected back to standard colors from their complementary color (i.e. cyan = red, magenta = green and yellow = blue).
Furthermore, each brand and type of film has a color bias. Films are selected specifically to exploit these biases. Since film is becoming less common, we won't discuss it much here. Positive film (chrome, slide) is the closest to neutral although each has its own bias as well.
In short, we're not talking about changing the color of someone's tie to please a design color pallet. We're discussing light and film balance to make sure Granny's hair doesn't turn green under a fluorescent kitchen light because it doesn't appear green when the PJ sees her sitting there.
What is normal light?
Daylight and artificial light (flash) are around 5000K degrees. Common films and digital cameras record everything at this color temperature unless corrected.
The PJ's goal is to record all light as if it were normal (5000K degrees). Sometimes this requires putting cc gels on light sources, putting cc filters on the camera lens or adjusting the color afterward via software. For film it's often all of the above.
Common light colors
In loose terms, the light sources encountered most by PJs are daylight, shadow, tungsten and fluorescent. Each has its own color and correction method. Although there is no "one" way to correct for these light colors, we'll discuss the most likely methods to be successful.
Here's a list of the commonly encountered light colors. Although all of them could be balanced and/or corrected, we'll only deal with the most common. However, it's important to understand where each light source falls within the Kelvin black body measurement spectrum.
1000K Candles; oil lamps; most open flames
2500K Household light bulbs (tungsten)
3200K Studio lights, photofloods (tungsten)
5000K Typical daylight; electronic flash; strobes
5500K Noontime sun
6000K Bright sunshine with clear sky
7000K Slightly overcast sky
8000K Hazy sky
9000K Open shade on clear days
10,000K Heavily overcast sky
20,000+K Open shade in mountains on clear days
Using cc gels
Once PJs start shooting color and move beyond standard daylight environments, it becomes necessary to use cc gels with a flash and/or use correction filters on the lens.
To gel a flash, simply cut a large sheet of gel material into a segment slightly larger than the flash head. Then use tape or Velcro to fasten it to the head. Softboxes, bounce cards and other light-diffusing devices can be added after the cc gel is attached.
An inexpensive way to manage this is to buy a Roscolux Swatch Book (about $2.50). The book has one sample of every gel they make. These gels are about the same size as most hand-held flashes.
Instead of buying the larger (and more expensive) individual sheets of cc gels or an entire cc kit , PJs can get the swatch book and have everything. However, I'd suggest getting two books because they get torn up with use and once PJs are past the learning curve, they can't live without these.
When purchasing the gels, make certain they are photographic quality and heat resistant. I've had several (expensive) gels evaporate into oblivion after one flash pop.
Daylight
Daylight is fairly simple. It's already around 5000K. Use standard film or set digital cameras on daylight. Use flash/strobes without filtration.
Shadow
Shadow color temperatures can vary widely. Basically, it's all shades of blue. Blue is considered a "cool" light temperature. It's a fine background color and actually helps lift the subject off the background if the subject is lit with standard flash or strobe (5000K-5500K). It allows the subject to reflect "warmer" tones and appear more alive than the background.
Shadow corrections
Correct for open shade with digital cameras by setting to shade. The overall scene will be warmed. It's important not to have natural daylight spilling into the scene or it'll appear grotesquely yellow.
For many years, I didn't correct for shadows while using a flash unless I saw a distracting difference. However, it makes a significant difference in the red and yellow portions of an image. Consequently, if the subject(s) has blonde or red hair or the scene is red or yellow, use the gel. It only takes a few seconds to attach the filter and it makes all the difference.
To correct for shadows, add a Cinegel Half Blue #3206 cc gel onto the flash and set digital cameras to shade. Film needs to be corrected in Photoshop or PJs can add a "warming filter" (81A) to the lens to correct in camera for chrome film.
Tungsten
Tungsten light is the light emitted from most household light bulbs and photofloods. The light is created when an electronically charged filament (wire) is heated and glows. It is a constant light source (as opposed to pulse). It measures around 3200K degrees on a black body light chart. To film and filtration, it's reddish orange.
Tungsten corrections
In all cases where tungsten light is the prominent light source, it's best to gel flash and strobes to match available light. With flash, Rosco suggests Cinegel #3411: Roscosun 3/4 CTO. It converts 5500K daylight sources to 3200K to somewhat match ambient light.
Although household light bulbs are about 2500K, the gel correction leaves a touch of warmth in the room once color corrected. It's enough red to give the background a "home" feel without making it look like a furnace or disco.
There are both positive (chrome, slide) and negative tungsten-balanced films. Using available tungsten light, shoot as normal with T-type film.
With digital cameras, set the color balance for tungsten and shoot as normal with available light.
With standard negative film, shoot as normal for available light. Color needs to be corrected in Photoshop.
With standard positive film (chrome, slide) consider sacrificing two stops of light and use an 80A filter. It filters 3200K to 5500K.
Fluorescent
If you noticed, fluorescent light doesn't appear on the chart above. It isn't part of the black body light spectrum. Instead, fluorescent lamps create light by electronically charging phosphors within a vacuum-sealed tube. Each fluorescent tube transmits a different range of colors depending on the age and composition of the tube. Generally, it transmits light in the yellowish green range.
Furthermore, it's a pulsating light source. It's regulated by alternating current (60 cycles per second in the U.S.). This means any shutter exposure faster than 1/50th is still unpredictable after all other variables are removed.
Fluorescent corrections
Most PJs start banging their head on the counter when asked how to correct for this light. There really isn't a sure-fire correction for fluorescent light. As stated above, each tube is different and unpredictable.
However, we must still do what we can to make it look somewhat "normal."
The best way is to custom white balance the light with a digital camera. Next would be to shoot with available light on negative film (try adding an FL-Day filter to the lens as well) and color correct in Photoshop. Then, it gets harder.
With flash, Rosco suggests Cinegel #3304: Tough PlusGreen gel. This gel "adds green to natural and artificial daylight sources to balance with U.S. Cool White or daylight type fluorescents. To be used with overall correction at the lens or in the lab."
Frequently, the gelled flash appears more cyan than the background. By the time it's corrected, the background shifts slightly toward red, which is good in moderation.
With positive (chrome, slide) or negative film, PJs can gel the flash and try to counter filter the color with a FL-Day correction filter on the lens. It frequently doesn't work, but it's still better than bug green.
Although I can't see a PJ doing it, I'll also mention cc gels can be purchased by the roll and sleeved around the light tube to restrict green range transmission. Supposedly this has adequate results, but it takes time, labor and permission to start ripping down lights.
Mark's solution
My solution isn't for everyone, but it works. Blast the heck out of all available light with a really powerful strobe at a high synch speed, on a low ISO with a small aperture (F/22 is my favorite). Then, the color of available light isn't an issue. ;-}
How's this possible? A strobe can fire at about 1/8000th of a second. The camera's synch speed is determined by the speed at which the shutter is completely open. This means the strobe has the same effect at 1/500th of a second or several minutes. The only difference is the accumulation of available light.
If the available light is metered on 200 ISO at 1/30th on F/2.8, and the PJ sets the strobes on 200 ISO at 1/500th on F/16, the stop difference (using EV calculations) is nine stops. As we've determined before, the dynamic range is only five stops. We've effectively moved middle gray deep within the black range. We've also moved the highlights with detail to four stops below black with detail. Therefore, it's negligible. So, only the light from the strobe accumulates on the film or CCD. End color correction debate.
An extra bonus to this method is no blur. Since strobes actually fire somewhere around 1/8000th of a second. It becomes the de facto shutter speed. Angry bulls fly through the air and move in several directions simultaneously. But they are frozen in time at 1/8000th of a second. Any subject blur is a result of available light accumulation.
Now does everyone understand why I got so upset when the camera manufacturers decided to use a "new technology" and slowed the synch speed to 1/250th? Color correction and blur became problematic again.
Enough for now,
What's a Kelvin black body?
William Thomson was an Irish mathematical physicist, who specialized in thermodynamics. He created the absolute temperture scale. He was titled 1st Baron Kelvin for his work. The Kelvin River flows past Glasgow University in Scotland where he was a professor.
Gustav Kirchhoff actually introduced black body radiation theory into the mix. According to Wikipedia, "In physics, a black body is an object that absorbs all electromagnetic radiation that falls onto it. No radiation passes through it and none is reflected. It is this lack of both transmission and reflection to which the name refers. These properties make black bodies ideal sources of thermal radiation."
From there it becomes quantum physics and drool. Just consider the colors magma would radiate as it's heated. It starts black, warms from red to blue and then becomes invisible (again, due to your friend: quantum physics).
End easy part.
PJs must deal with whatever light they encounter and try to make it look as it would to the human eye. Since the camera records in absolute terms, this is frequently impossible and requires color correction or filtration.
Color correction ethics
Before anyone has a cow, understand all photographic processes are corrected to what the human eye sees. The use of color correction (cc) gels with light sources or correction filters on the lens is typically employed to make the scene appear as it would to the human eye.
Most modern films are panchromatic. This means they capture the color spectrums most humans see. Color negative film is on a brown substrate, which requires correction. Then, it must be corrected back to standard colors from their complementary color (i.e. cyan = red, magenta = green and yellow = blue).
Furthermore, each brand and type of film has a color bias. Films are selected specifically to exploit these biases. Since film is becoming less common, we won't discuss it much here. Positive film (chrome, slide) is the closest to neutral although each has its own bias as well.
In short, we're not talking about changing the color of someone's tie to please a design color pallet. We're discussing light and film balance to make sure Granny's hair doesn't turn green under a fluorescent kitchen light because it doesn't appear green when the PJ sees her sitting there.
What is normal light?
Daylight and artificial light (flash) are around 5000K degrees. Common films and digital cameras record everything at this color temperature unless corrected.
The PJ's goal is to record all light as if it were normal (5000K degrees). Sometimes this requires putting cc gels on light sources, putting cc filters on the camera lens or adjusting the color afterward via software. For film it's often all of the above.
Common light colors
In loose terms, the light sources encountered most by PJs are daylight, shadow, tungsten and fluorescent. Each has its own color and correction method. Although there is no "one" way to correct for these light colors, we'll discuss the most likely methods to be successful.
Here's a list of the commonly encountered light colors. Although all of them could be balanced and/or corrected, we'll only deal with the most common. However, it's important to understand where each light source falls within the Kelvin black body measurement spectrum.
1000K Candles; oil lamps; most open flames
2500K Household light bulbs (tungsten)
3200K Studio lights, photofloods (tungsten)
5000K Typical daylight; electronic flash; strobes
5500K Noontime sun
6000K Bright sunshine with clear sky
7000K Slightly overcast sky
8000K Hazy sky
9000K Open shade on clear days
10,000K Heavily overcast sky
20,000+K Open shade in mountains on clear days
Using cc gels
Once PJs start shooting color and move beyond standard daylight environments, it becomes necessary to use cc gels with a flash and/or use correction filters on the lens.
To gel a flash, simply cut a large sheet of gel material into a segment slightly larger than the flash head. Then use tape or Velcro to fasten it to the head. Softboxes, bounce cards and other light-diffusing devices can be added after the cc gel is attached.
An inexpensive way to manage this is to buy a Roscolux Swatch Book (about $2.50). The book has one sample of every gel they make. These gels are about the same size as most hand-held flashes.
Instead of buying the larger (and more expensive) individual sheets of cc gels or an entire cc kit
When purchasing the gels, make certain they are photographic quality and heat resistant. I've had several (expensive) gels evaporate into oblivion after one flash pop.
Daylight
Daylight is fairly simple. It's already around 5000K. Use standard film or set digital cameras on daylight. Use flash/strobes without filtration.
Shadow
Shadow color temperatures can vary widely. Basically, it's all shades of blue. Blue is considered a "cool" light temperature. It's a fine background color and actually helps lift the subject off the background if the subject is lit with standard flash or strobe (5000K-5500K). It allows the subject to reflect "warmer" tones and appear more alive than the background.
Shadow corrections
Correct for open shade with digital cameras by setting to shade. The overall scene will be warmed. It's important not to have natural daylight spilling into the scene or it'll appear grotesquely yellow.
For many years, I didn't correct for shadows while using a flash unless I saw a distracting difference. However, it makes a significant difference in the red and yellow portions of an image. Consequently, if the subject(s) has blonde or red hair or the scene is red or yellow, use the gel. It only takes a few seconds to attach the filter and it makes all the difference.
To correct for shadows, add a Cinegel Half Blue #3206
Tungsten
Tungsten light is the light emitted from most household light bulbs and photofloods. The light is created when an electronically charged filament (wire) is heated and glows. It is a constant light source (as opposed to pulse). It measures around 3200K degrees on a black body light chart. To film and filtration, it's reddish orange.
Tungsten corrections
In all cases where tungsten light is the prominent light source, it's best to gel flash and strobes to match available light. With flash, Rosco suggests Cinegel #3411: Roscosun 3/4 CTO
Although household light bulbs are about 2500K, the gel correction leaves a touch of warmth in the room once color corrected. It's enough red to give the background a "home" feel without making it look like a furnace or disco.
There are both positive (chrome, slide) and negative tungsten-balanced films. Using available tungsten light, shoot as normal with T-type film.
With digital cameras, set the color balance for tungsten and shoot as normal with available light.
With standard negative film, shoot as normal for available light. Color needs to be corrected in Photoshop.
With standard positive film (chrome, slide) consider sacrificing two stops of light and use an 80A filter. It filters 3200K to 5500K.
Fluorescent
If you noticed, fluorescent light doesn't appear on the chart above. It isn't part of the black body light spectrum. Instead, fluorescent lamps create light by electronically charging phosphors within a vacuum-sealed tube. Each fluorescent tube transmits a different range of colors depending on the age and composition of the tube. Generally, it transmits light in the yellowish green range.
Furthermore, it's a pulsating light source. It's regulated by alternating current (60 cycles per second in the U.S.). This means any shutter exposure faster than 1/50th is still unpredictable after all other variables are removed.
Fluorescent corrections
Most PJs start banging their head on the counter when asked how to correct for this light. There really isn't a sure-fire correction for fluorescent light. As stated above, each tube is different and unpredictable.
However, we must still do what we can to make it look somewhat "normal."
The best way is to custom white balance the light with a digital camera. Next would be to shoot with available light on negative film (try adding an FL-Day filter to the lens as well) and color correct in Photoshop. Then, it gets harder.
With flash, Rosco suggests Cinegel #3304: Tough PlusGreen
Frequently, the gelled flash appears more cyan than the background. By the time it's corrected, the background shifts slightly toward red, which is good in moderation.
With positive (chrome, slide) or negative film, PJs can gel the flash and try to counter filter the color with a FL-Day correction filter on the lens. It frequently doesn't work, but it's still better than bug green.
Although I can't see a PJ doing it, I'll also mention cc gels can be purchased by the roll and sleeved around the light tube to restrict green range transmission. Supposedly this has adequate results, but it takes time, labor and permission to start ripping down lights.
Mark's solution
My solution isn't for everyone, but it works. Blast the heck out of all available light with a really powerful strobe at a high synch speed, on a low ISO with a small aperture (F/22 is my favorite). Then, the color of available light isn't an issue. ;-}
How's this possible? A strobe can fire at about 1/8000th of a second. The camera's synch speed is determined by the speed at which the shutter is completely open. This means the strobe has the same effect at 1/500th of a second or several minutes. The only difference is the accumulation of available light.
If the available light is metered on 200 ISO at 1/30th on F/2.8, and the PJ sets the strobes on 200 ISO at 1/500th on F/16, the stop difference (using EV calculations) is nine stops. As we've determined before, the dynamic range is only five stops. We've effectively moved middle gray deep within the black range. We've also moved the highlights with detail to four stops below black with detail. Therefore, it's negligible. So, only the light from the strobe accumulates on the film or CCD. End color correction debate.
An extra bonus to this method is no blur. Since strobes actually fire somewhere around 1/8000th of a second. It becomes the de facto shutter speed. Angry bulls fly through the air and move in several directions simultaneously. But they are frozen in time at 1/8000th of a second. Any subject blur is a result of available light accumulation.
Now does everyone understand why I got so upset when the camera manufacturers decided to use a "new technology" and slowed the synch speed to 1/250th? Color correction and blur became problematic again.
Enough for now,
What's a Kelvin black body?
William Thomson was an Irish mathematical physicist, who specialized in thermodynamics. He created the absolute temperture scale. He was titled 1st Baron Kelvin for his work. The Kelvin River flows past Glasgow University in Scotland where he was a professor.
Gustav Kirchhoff actually introduced black body radiation theory into the mix. According to Wikipedia, "In physics, a black body is an object that absorbs all electromagnetic radiation that falls onto it. No radiation passes through it and none is reflected. It is this lack of both transmission and reflection to which the name refers. These properties make black bodies ideal sources of thermal radiation."
From there it becomes quantum physics and drool. Just consider the colors magma would radiate as it's heated. It starts black, warms from red to blue and then becomes invisible (again, due to your friend: quantum physics).
Sunday, December 26, 2004
Ask a question
Ever wanted advice from Pulitzer-Prize winning photojournalists? Well, here’s your chance. David Leeson (2004) has already agreed. I’ll see if I can talk Cheryl Diaz Meyer (2004) and William Snyder (1991, 1993) into a little of their time.
Leave your questions in the comment section or drop me an e-mail. I plan on asking the standard "what advice would you give to young PJs" question, but this is a chance to ask a specific question and get a specific answer.
Please leave your questions by Friday, December 31, 2004.
Enough for now,
Leave your questions in the comment section or drop me an e-mail. I plan on asking the standard "what advice would you give to young PJs" question, but this is a chance to ask a specific question and get a specific answer.
Please leave your questions by Friday, December 31, 2004.
Enough for now,
Tuesday, December 21, 2004
Hoops drive

© Mark M. Hancock and The Dallas Morning News
Flower Mound High School's Chelsey Walker (No. 10, left) tries to drive past Lewisville High School's Britni Crooms (No.20, right) during a basketball game at Lewisville High School on Tuesday, December 21, 2004.
Top hoopsters
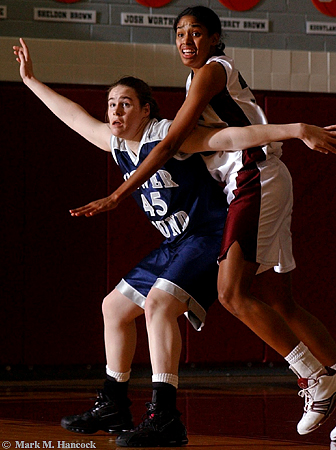 Flower Mound High School's Renee Renz (No. 45, left) calls for a ball while Lewisville High School's Keshia Warren (No. 33, right) tries to break up the pass during a basketball game at Lewisville High School on Tuesday, December 21, 2004.
© Mark M. Hancock and The Dallas Morning News
This assignment specifically asked for both of these players in the same frame. Other than the tip-off, it was tough to show the faces of both players at the same time. Although there's no ball in this frame (it was passed elsewhere), I think it shows the competitiveness of these two top players.
Just to ruin the holidays
Cool Yule y'all. :-)
Well folks, it's contest season again. I have the list of major contests on my sidebar. Does everyone have their best images selected, sized, captioned and ready to mail? Good. Good.
For a little inspiration and to know what the competition looks like, go see the MSNBC Pictures of the Year presentation. It's always "fun" to see what you're up against before you drop your little CD in the mail.
I know, it's merely a sample. We really don't know what wonderful images are hiding elsewhere in someone's archive, but itlet's us know how much our images suck inspires us to do better each year.
Each major news outlet should have a similar year-end image display at the end of the month as a point of reference. Remember, there's 10 shooting days left until the end of the contest period. It only takes 1/60th of a second to win a prize. ;-)
Enough for now,
Well folks, it's contest season again. I have the list of major contests on my sidebar. Does everyone have their best images selected, sized, captioned and ready to mail? Good. Good.
For a little inspiration and to know what the competition looks like, go see the MSNBC Pictures of the Year presentation. It's always "fun" to see what you're up against before you drop your little CD in the mail.
I know, it's merely a sample. We really don't know what wonderful images are hiding elsewhere in someone's archive, but it
Each major news outlet should have a similar year-end image display at the end of the month as a point of reference. Remember, there's 10 shooting days left until the end of the contest period. It only takes 1/60th of a second to win a prize. ;-)
Enough for now,
Sunday, December 19, 2004
Eliminate red eye
Red eye is a common theme elsewhere (I've seen too many examples lately). I haven't fully addressed it here. Let's solve the problem.
Red-eye can be touched up after-the-fact with pens and software, but it doesn't look completely correct. It's best to avoid it altogether particularly when shooting film.
How it happens
Red-eye occurs when light (primarily from a flash) reflects off the retina of the subjects' eyes at or near the axis of the lens.
When subjects are in low light, their eye pupils are required to open wider (dilate) to allow more light into the eye. This is also when most people tend to use a flash. So, the light from the flash moves from the camera to the subject and reflects directly off the retina.
The retina is a wide area located at the back of the subject's eyes and continuous with the optic nerve. It consists of several layers and a web of blood-carrying veins. Therefore, the color reflected from humans is red or occasionally brown (depends on light angle). Color varies with different animals depending on the shape and the natural filtration qualities of their eyes.
How to eliminate red eye
Increase ambient light
Instead of making a portrait in a dark room, take the person to a better lit area. The subject's pupils constrict and red eye vanishes most of the time.
Red eye camera programs
Cameras equipped with red-eye reduction systems emit a series of pre-flashes or a beam of light to try to cause the subjects' eyes to constrict. This works sometimes, but not well enough or often enough. The process is annoying to both the photographer and the subjects. Use one of the methods below instead. Everyone will be happier with the process and the results.
Change light angle
To eliminate red eye, change the light angle. Since light is restricted as it passes through the pupil, it only reflects in the direction of the light. The remainder of the retina remains unlit and thusly appears normal.
Bounce light
The fastest way for most PJs to change the light angle is to bounce the light off a neutral-colored ceiling or wall. With tilt head flashes, the head is pointed in one of these directions and red-eye vanishes.
The additional benefit is the light becomes softer and more even. However, watch out for colored walls because they change the color of the light to the color of the wall surface.
Diffusion
If the flash is integrated with the camera body, try diffusing the light with a handkerchief, gauze or other neutral material. Simply tape a small piece over the flash. Although red eye can still occur, the light direction may be scrambled enough to avoid red eye.
If nothing else, a diffused image looks much better - even with slight red eye.
Move closer
This is a worst-case attempt at a solution. Parallax is the difference between the view of object through a camera lens and a separate viewing eyepiece.
The same occurs with light (light parallax). Since the flash is separated from the lens, the closer the photographer is to the subject, the more parallax occurs between the flash angle and the lens axis. If the photographer is close enough and the camera can handle close focus, red eye can be reduced.
The opposite is almost certain. As the PJ moves further from the subject, red eye is more likely to happen because the parallax allows the axis lines to intersect and overlap.
Change PJ angle
Since PJs cover events and try to be unobtrusive, they normally move around and can decide when and from what angle to shoot. If PJs move to the side of subjects rather than directly facing them, the likelihood of red eye is reduced from an oblique angle.
Shooting from an oblique angle to the eye opening restricts the amount of light actually bouncing off the retina. Since red eye happens mostly when the flash is shot directly into a person's eye through a wide, circular pupil opening, it's less likely to occur when the circle becomes a tight oval (i.e. from the side).
Although it's not a guaranteed method to eliminate red eye, it helps.
This is the preferred method. A through-the-lens (TTL) sync cord is about $80 and worth every penny. It allows PJs to control light volume and angle. I need to do a whole entry about how important it is to have the flash off camera. For now, we'll say this is best.
Special circumstances
Night sports are notorious for red eye. PJs must use long lenses and powerful flashes in low light to capture fast action across the field. As the lens angle and the flash angle reach further to a subject, the angles are more likely to intersect and cause red eye.
If PJs are shooting players' faces at a considerable distance in low light, red eye is almost certain. Using a combination of suggestions above is helpful. For example, PJs might diffuse with softboxes at close range from an oblique angle.
Flash brackets
As insurance, many PJs use flash brackets. A flash bracket is a metal or durable plastic frame equipped to mount both a camera and a flash. It increases the distance from the flash axis to the lens axis and increases light parallax angle.
Because PJs want the flash to hit the exact area in which the lens is viewing, the bracket locks the light and lens angles together to allow maximum light coverage. This increases the likelihood of red eye at greater distances, but reduces it at a normal distance even in low light (because light parallax is less).
Telescopic flash brackets are most useful for longer lenses. The further apart the PJ can mount the light from the lens, the higher the parallax angle is. Telescopic flash brackets extend mount sections to as much as a meter above the camera lens. As with tripods, the bracket becomes less stable the further it's extended. This does become more problematic when action goes out of bounds and lands on the PJ, but it's an issue each PJ must address.
When using most common flash brackets, see if the manufacturer makes camera-specific anti-twist plates to keep the flash and camera aligned.
Light the whole venue
PJs with Pocket Wizards and hand-held flashes or studio strobes (400WS minimum) commonly cross light gyms.
It can also be done with an outdoor field. This isn't a good option for most PJs. It takes a lot of work, time, weather cooperation and deadline flexibility. But, I've done it before. I'll probably do it again.
Undermount the flash
I haven't tried this because I prefer shadows to go down, many sports shooters mount their flash on a monopod below the camera with a Super Clamp or similar bracket. It achieves the same red-eye elimination as an extended flash bracket, but is more stable and mobile.
If choosing this option, make sure flash is set below ambient light (use as fill) so the shadows aren't as obvious. Low flash angle typically produces a horror-movie look and doesn't work well with face mask patterns.
Reverse engineering
Let's say you want someone to have red eye (for an illustrationor you really dislike someone). Place the flash as close as possible to the lens axis. The light bounces off the subject's retina and directly back into the lens. Obviously, this works best in an unlit environment where the subjects' eyes are forced to dilate.
Enough for now,
Red-eye can be touched up after-the-fact with pens and software, but it doesn't look completely correct. It's best to avoid it altogether particularly when shooting film.
How it happens
Red-eye occurs when light (primarily from a flash) reflects off the retina of the subjects' eyes at or near the axis of the lens.
When subjects are in low light, their eye pupils are required to open wider (dilate) to allow more light into the eye. This is also when most people tend to use a flash. So, the light from the flash moves from the camera to the subject and reflects directly off the retina.
The retina is a wide area located at the back of the subject's eyes and continuous with the optic nerve. It consists of several layers and a web of blood-carrying veins. Therefore, the color reflected from humans is red or occasionally brown (depends on light angle). Color varies with different animals depending on the shape and the natural filtration qualities of their eyes.
How to eliminate red eye
Increase ambient light
Instead of making a portrait in a dark room, take the person to a better lit area. The subject's pupils constrict and red eye vanishes most of the time.
Red eye camera programs
Cameras equipped with red-eye reduction systems emit a series of pre-flashes or a beam of light to try to cause the subjects' eyes to constrict. This works sometimes, but not well enough or often enough. The process is annoying to both the photographer and the subjects. Use one of the methods below instead. Everyone will be happier with the process and the results.
Change light angle
To eliminate red eye, change the light angle. Since light is restricted as it passes through the pupil, it only reflects in the direction of the light. The remainder of the retina remains unlit and thusly appears normal.
Bounce light
The fastest way for most PJs to change the light angle is to bounce the light off a neutral-colored ceiling or wall. With tilt head flashes, the head is pointed in one of these directions and red-eye vanishes.
The additional benefit is the light becomes softer and more even. However, watch out for colored walls because they change the color of the light to the color of the wall surface.
Diffusion
If the flash is integrated with the camera body, try diffusing the light with a handkerchief, gauze or other neutral material. Simply tape a small piece over the flash. Although red eye can still occur, the light direction may be scrambled enough to avoid red eye.
If nothing else, a diffused image looks much better - even with slight red eye.
Move closer
This is a worst-case attempt at a solution. Parallax is the difference between the view of object through a camera lens and a separate viewing eyepiece.
The same occurs with light (light parallax). Since the flash is separated from the lens, the closer the photographer is to the subject, the more parallax occurs between the flash angle and the lens axis. If the photographer is close enough and the camera can handle close focus, red eye can be reduced.
The opposite is almost certain. As the PJ moves further from the subject, red eye is more likely to happen because the parallax allows the axis lines to intersect and overlap.
Change PJ angle
Since PJs cover events and try to be unobtrusive, they normally move around and can decide when and from what angle to shoot. If PJs move to the side of subjects rather than directly facing them, the likelihood of red eye is reduced from an oblique angle.
Shooting from an oblique angle to the eye opening restricts the amount of light actually bouncing off the retina. Since red eye happens mostly when the flash is shot directly into a person's eye through a wide, circular pupil opening, it's less likely to occur when the circle becomes a tight oval (i.e. from the side).
Although it's not a guaranteed method to eliminate red eye, it helps.
Everything from here onward involves additional hardware. Most of these items are listed in the PJ Candy Store.Get the flash off camera
This is the preferred method. A through-the-lens (TTL) sync cord is about $80 and worth every penny. It allows PJs to control light volume and angle. I need to do a whole entry about how important it is to have the flash off camera. For now, we'll say this is best.
Special circumstances
Night sports are notorious for red eye. PJs must use long lenses and powerful flashes in low light to capture fast action across the field. As the lens angle and the flash angle reach further to a subject, the angles are more likely to intersect and cause red eye.
If PJs are shooting players' faces at a considerable distance in low light, red eye is almost certain. Using a combination of suggestions above is helpful. For example, PJs might diffuse with softboxes at close range from an oblique angle.
Flash brackets
As insurance, many PJs use flash brackets. A flash bracket is a metal or durable plastic frame equipped to mount both a camera and a flash. It increases the distance from the flash axis to the lens axis and increases light parallax angle.
Because PJs want the flash to hit the exact area in which the lens is viewing, the bracket locks the light and lens angles together to allow maximum light coverage. This increases the likelihood of red eye at greater distances, but reduces it at a normal distance even in low light (because light parallax is less).
Telescopic flash brackets are most useful for longer lenses. The further apart the PJ can mount the light from the lens, the higher the parallax angle is. Telescopic flash brackets extend mount sections to as much as a meter above the camera lens. As with tripods, the bracket becomes less stable the further it's extended. This does become more problematic when action goes out of bounds and lands on the PJ, but it's an issue each PJ must address.
When using most common flash brackets, see if the manufacturer makes camera-specific anti-twist plates to keep the flash and camera aligned.
Light the whole venue
PJs with Pocket Wizards and hand-held flashes or studio strobes (400WS minimum) commonly cross light gyms.
It can also be done with an outdoor field. This isn't a good option for most PJs. It takes a lot of work, time, weather cooperation and deadline flexibility. But, I've done it before. I'll probably do it again.
Undermount the flash
I haven't tried this because I prefer shadows to go down, many sports shooters mount their flash on a monopod below the camera with a Super Clamp or similar bracket. It achieves the same red-eye elimination as an extended flash bracket, but is more stable and mobile.
If choosing this option, make sure flash is set below ambient light (use as fill) so the shadows aren't as obvious. Low flash angle typically produces a horror-movie look and doesn't work well with face mask patterns.
Reverse engineering
Let's say you want someone to have red eye (for an illustration
Enough for now,
Saturday, December 18, 2004
Domestic abuse warrant roundup
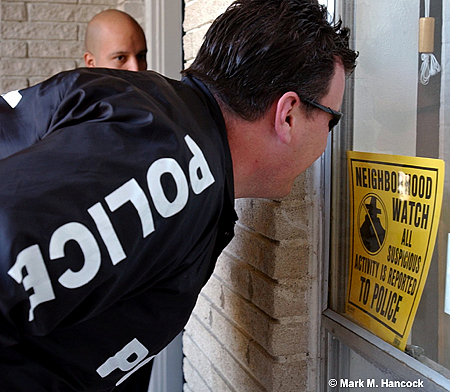
Photos © Mark M. Hancock and Al Dia
Dallas city deputy marshals Patrick Sullivan (right) and Cesar Soto (left) try to find a person wanted on a domestic abuse warrant at a home in North Dallas on Saturday, December 18, 2004.
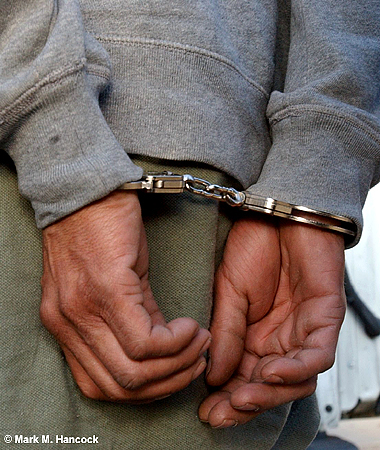
(Left) A man arrested on a domestic abuse warrant waits to be placed in a van at a collection point in Dallas.
City marshal Joseph R. Polino said the city has 27,000 active warrants in the Dallas municipal court.

(Left) Sgt. Desi Tanner (left) and Rebecca Smith (right) with the Dallas marshal's office search a domestic abuse warrant detainee at a collection point in Dallas.
(Below) Rebecca Smith with the Dallas marshal's office escorts people arrested on outstanding domestic abuse warrant to the office in Dallas.
See related post.

Turn down the light
While making a portrait in a home or office with a common flash, turn off or dim most of the lights. This eliminates stray, off-color light from reflecting from the subject and keeps the color balance to only the light emitted from the flash.
I'll get into color temperatures and color balance soon, but this is the most expedient way to make satisfactory portraits.
The point of this strategy is to have enough available light to properly focus. Any more available light starts to create color balance problems unless the available lights are properly color balanced (most aren't).
Alternatively, PJs can arrange the portrait subject, set focus, turn lights off, shoot and then turn lights back on. This is best done with a volunteer near the light switch, but it can be done singly by a PJ in a small room.
Enough for now,
Friday, December 17, 2004
Where to crop
While I struggle with plain ways to explain horribly complicated photographic problems, I'll offer some simple suggestions for the next few days.
Where to crop
Don't crop (in camera or afterward) people or animals at a joint (elbow, knee, ankle, etc.). If a crop is at a joint, it makes subjects look like they're missing body parts.
Instead, crop into straight portions of limbs or the body.
While we're on the topic, crop mid-pelvis on frontal views instead of near the top of the thigh. Trust me on this one. It will only make the PJ's life easier.
Lastly, since we also tend to make ultra-tight face shots, crop slightly above the hair line on folks with hair. For those folks like me, crop mid-forehead to spare them the shiny results of stress and too much testosterone.
Enough for now,
Wednesday, December 15, 2004
I'm alive
I’m still alive. I’ve been working like a maniac both behind the camera and sending resumes in the right directions.
I’ve posted older images this month because I needed to build a 30-day delay on some freelance images. It’s not required on published images, but it’s easier to post after the 30-day exclusive period. Then, when someone requests prints or reproduction rights, I can negotiate immediately rather than saying I need to wait another "x" days.
So, the new digital images will start appearing next Monday (November images below were shot on film). The coolest part is I’m now able to publish images which didn’t run in the newspaper. Before, the images were the property of the newspaper. The images had to run in the paper or on the Web before I could post them. Now, once the 30-day period is over, the copyright returns to me. Then, I can publish the images which were cut for space, etc...
It’s hard to explain, but photography makes me happy again. :-)
Enough for now,
Sunday, December 12, 2004
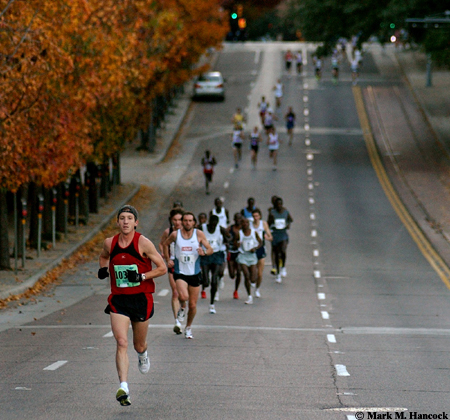
White Rock Marathon

E.C. Brock leads the charge from the starting line during the 35th White Rock Marathon at American Airlines Center in Dallas on Sunday, December 12, 2004.
Photos © Mark M. Hancock and The Dallas Morning News

Kevin Lemaster of Frisco prepares for marathon at the American Airlines Center in Dallas.

Marathoners run through the Uptown area of Dallas (above) and downtown(below) during the marathon.

 (Above) Marathoners run past the Dallas skyline.
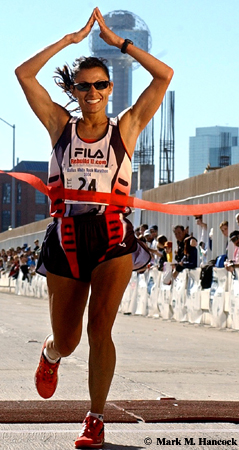
(Left) Liza Hunter-Galvan of San Antonio crosses the finish line to win the women's title of the 35th White Rock Marathon at American Airlines Center in Dallas.
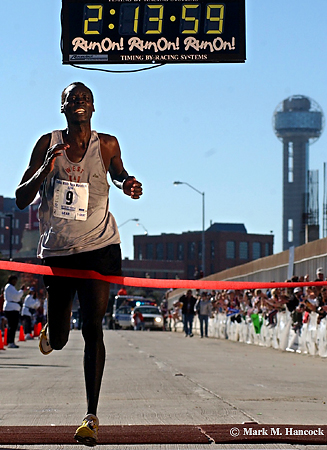
(Below)Elly Rono of Raleigh, N.C. crosses the finish line to win the men's title of the 35th White Rock Marathon at American Airlines Center in Dallas.
Since the White Rock Marathon is a big event, two PJs were assigned. Chris Hamilton and I coordinated before the event and established our shooting list and locations.
Chris would start with overhead views from a nearby construction site. He would then drive to White Rock Lake and get runners there with the Dallas Skyline behind them. Meanwhile, I would start in the lead truck. I planned to bail from the truck in the Uptown area, get some shots and walk back to the finish before the winners arrived.
Although sometimes PJs must "wing it," it's often useful to know what, when and where to shoot. It reduces redundant images while ensuring complete coverage of a relatively predictable event. We'll discuss this more in the future.
Enough for now,
Please see the YouTube version of this slideshow with an original beat composition by Mark M. Hancock. Please set your YouTube viewer to 1080p to see the show in high definition.
Saturday, December 11, 2004
SMU rebound
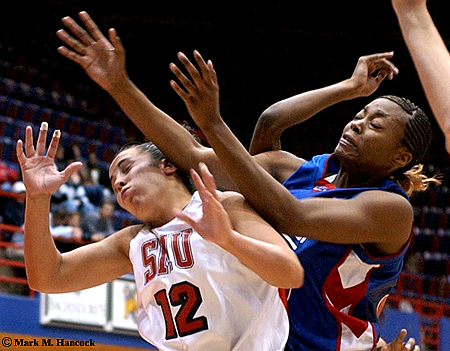
© Mark M. Hancock and The Dallas Morning News
SMU's Katy Cobb (No. 12, left) gets knocked away from a rebound by UTA's Rola Ogunoye of Cedar Hill (No. 33, right) during a women's basketball game at SMU in University Park on Saturday, December 11, 2004.
Bird doggin'
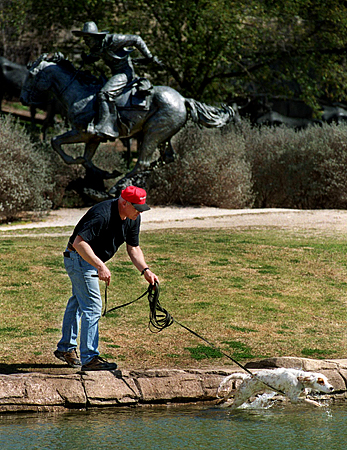
Gary Campbell of Tulsa, Oklahoma takes advantage of the weather to train Silky, a 9-month-old English setter, to be a bird dog at Pioneer Plaza in downtown Dallas. Campbell, who is a project manager for ConstructComm, Inc. said Silky loves to find birds and fish as well as travel around the country. His company is installing fiber optics in the downtown area.
Mark M. Hancock / © The Dallas Morning News
Friday, December 10, 2004
Memorial Shootout

© Mark M. Hancock and The Dallas Morning News
North Mesquite High School's Kenny Hewitt (No. 15, right) moves to the basket past Rowlett High School's Terrance Jackson (No. 22, left) during a basketball game of the Brooke D. Nichols Memorial Shootout at South Garland High School in Garland on Friday, December 10, 2004.
Nativity camels

© Mark M. Hancock and The Dallas Morning News
Lorne McMillan's camels munch on hay at his farm in Waxahachie on Friday, December 10, 2004. McMillan rents the camels for live Nativity scenes to area churches. He has many exotic animals including zebras and lemurs at HiView Farm.
Llama Papa

© Mark M. Hancock and The Dallas Morning News
Lorne McMillan gets a surprise kiss from one of the llamas at his farm in Waxahachie on Friday, December 10, 2004. McMillan rents camels and other petting-zoo animals for live Nativity scenes to area churches. He has many exotic animals including zebras and lemurs at HiView Farm.
I fell in love with this llama. It was so curious, cool and expressive. Fayrouz promised to get me one when we finally settle down. I can't have a puppy now, but I can have a llama in a few years. It's a good trade. :-)
Wednesday, December 08, 2004
An environmental pop quiz
Many newspapers publish variations of "snapshot" profiles. These are mini-environmental portraits of outstanding community members. However, the portraits often have strict formats due to layout. They must be vertical and relatively tight because they run about the size of the old, broadsheet one column image (about 2 x 3 inches).
Within these rules, we still need to make each image unique enough to quickly identify something about the person in the image for the readers. This is the core difference between a portrait and an environmental portrait. The image isn't a generic person on a generic background like a studio portrait. An environmental portrait is a specific person and some insight into this person from their specific environment and artifacts.
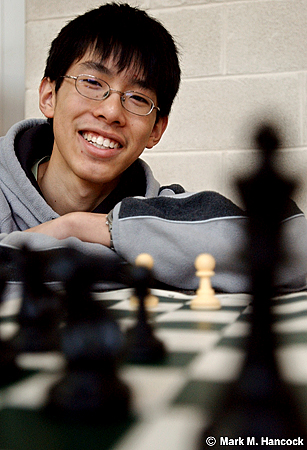
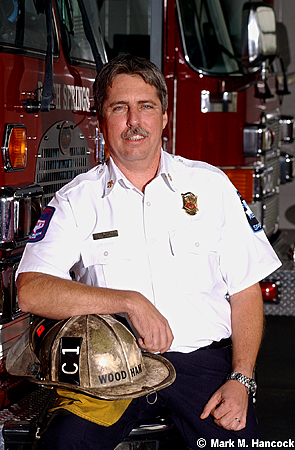
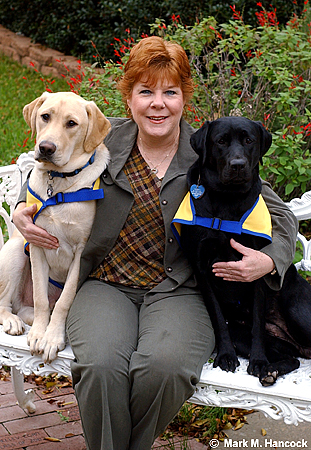
Here's the quiz: match the cutlines with the portraits below. The answers are at the bottom of this post.
A) Jeremy Jenkins poses for a snapshot portrait at Hebron High School in Carrollton on Wednesday, December 8, 2004. He is in the National Honor Society as well as the captain of the varsity soccer team.
B) Barbara Naylor poses for a snapshot portrait with Labrador retrievers Ascot, 8 months, (left) and Rindy, 1 year, (right) at the Sunnyvale School in Sunnyvale on Wednesday, December 8, 2004. She is a K-to-8 art teacher and Canine Companion trainer.
C) Leonard Untung poses for a snapshot portrait at Hebron High School in Carrollton on Wednesday, December 8, 2004. The senior is in the National Honor Society as well as the math and chess clubs.
D) Balch Springs fire chief Ricky Woodham poses for a snapshot portrait at the Balch Springs Fire Station in Balch Springs on Wednesday, December 8, 2004.


Photos © Mark M. Hancock and The Dallas Morning News

All four images were shot on the same day in three different cities. None took more than 30 minutes. I'll admit the students were trickier because we didn't have a soccer ball available. However, it shouldn't have been difficult to tell each person from the next. I've probably taken more than 100 of these images over the last five years. No two look alike. Each subject has her/his own unique environment.
Again, these are simple, straight-forward portraits with tight shooting constraints. Pro PJs already know to track trends and environmental changes over time. It's this skill which makes their images either timeless or timely. For the folks who don't do this for a living, make your family photo albums become a living history of the people and their environments.
Enough for now,
(Answers) A, C, D, B
Since this post has an education-based link to it, please read "Primary educator's introduction to photojournalism" and see additional environmental portraits in my portfolio.
Within these rules, we still need to make each image unique enough to quickly identify something about the person in the image for the readers. This is the core difference between a portrait and an environmental portrait. The image isn't a generic person on a generic background like a studio portrait. An environmental portrait is a specific person and some insight into this person from their specific environment and artifacts.
Here's the quiz: match the cutlines with the portraits below. The answers are at the bottom of this post.
A) Jeremy Jenkins poses for a snapshot portrait at Hebron High School in Carrollton on Wednesday, December 8, 2004. He is in the National Honor Society as well as the captain of the varsity soccer team.
B) Barbara Naylor poses for a snapshot portrait with Labrador retrievers Ascot, 8 months, (left) and Rindy, 1 year, (right) at the Sunnyvale School in Sunnyvale on Wednesday, December 8, 2004. She is a K-to-8 art teacher and Canine Companion trainer.
C) Leonard Untung poses for a snapshot portrait at Hebron High School in Carrollton on Wednesday, December 8, 2004. The senior is in the National Honor Society as well as the math and chess clubs.
D) Balch Springs fire chief Ricky Woodham poses for a snapshot portrait at the Balch Springs Fire Station in Balch Springs on Wednesday, December 8, 2004.

Photos © Mark M. Hancock and The Dallas Morning News
All four images were shot on the same day in three different cities. None took more than 30 minutes. I'll admit the students were trickier because we didn't have a soccer ball available. However, it shouldn't have been difficult to tell each person from the next. I've probably taken more than 100 of these images over the last five years. No two look alike. Each subject has her/his own unique environment.
Again, these are simple, straight-forward portraits with tight shooting constraints. Pro PJs already know to track trends and environmental changes over time. It's this skill which makes their images either timeless or timely. For the folks who don't do this for a living, make your family photo albums become a living history of the people and their environments.
Enough for now,
(Answers) A, C, D, B
Since this post has an education-based link to it, please read "Primary educator's introduction to photojournalism" and see additional environmental portraits in my portfolio.
Building the belfry

© Mark M. Hancock and The Dallas Morning News
Andres Construction Services workers move a 27,000-pound section of steel infrastructure onto the Cathedral Shrine of the Virgin of Guadalupe in Dallas on Wednesday, December 8, 2004. The infrastructure is part of a 20-story bell tower the church will have as part of a $4.5 million restoration.
ArchiTexas Architecture Planning and Historic Preservation, Inc. were the architects of the tower construction although it was part of the original design of the 106-year-old cathedral.
Tuesday, December 07, 2004
Hoopin' Hawks
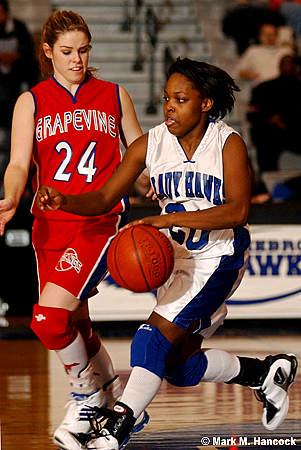
Hebron High School's Brittany Butler (No. 20, right) tries to move past Grapevine High School's Emily Harvell (No. 24, left) during a basketball game at Hebron High School in Carrollton on Tuesday, December 7, 2004.
© Mark M. Hancock and The Dallas Morning News
Sunday, December 05, 2004
Bell ringer

Salvation Army bell ringer Cirenio Velasquez waits for donations outside Foley's at Valley View Mall in Dallas on Monday, December 5, 2004. This year, Target prohibited the bell ringers from setting up a its stores.
Photos © Mark M. Hancock and The Dallas Morning News

Salvation Army bell ringer Cirenio Velasquez rings his bell and waits for donations outside Foley's at Valley View Mall.
These images will be important again for magazines next June (for their December issues). Many magazines typically run a story about charitable contributions in their December issues.
I like the top image as a stand-alone. The secondary image is a supporting image, it probably gets to the point of the story faster, but the first image is more graphic and shows the overall problem: less donations this year due to location.
Saturday, December 04, 2004
Luck and strategy
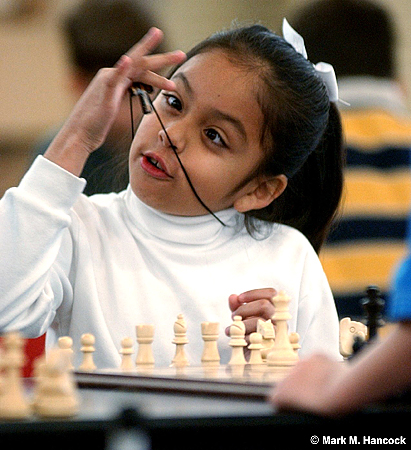
Yvette Sanchez has a discussion with her good luck piece during a chess match of the Lewisville ISD annual chess tournament at Marcus High School in Flower Mound on Saturday, December 4, 2004.
© Mark M. Hancock and The Dallas Morning News
Fowler power

Kevin Fowler performs during Lewisville's Holiday at the Hall in Lewisville on Saturday, December 4, 2004.
© Mark M. Hancock and The Dallas Morning News
Chess judge

© Mark M. Hancock and The Dallas Morning News
Michael Dione Smith (left) and judge Karl Bentz (center) watch as Samuel Cole (right) makes his move during a chess match of the Lewisville ISD annual chess tournament at Marcus High School in Flower Mound on Saturday, December 4, 2004. Smith won the game.
Thursday, December 02, 2004
Crystal oranda
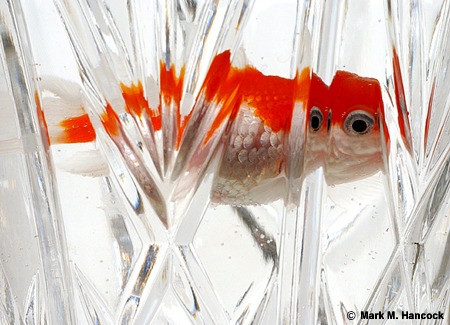
© Mark M. Hancock
An oranda fish looks through a crystal vase in Dallas on Thursday, December 2, 2004.
A side effect of recent changes is what I can post on this site. I’ll actually be able to post more images of my choosing. This image is an example. It’s actually a side-project failure, but it’s still a cool shot (IMHO). So, I can post it here for y’all to enjoy. Expect to see more simple, graphic images in the coming months.
Enough for now,

Tuesday, November 30, 2004
Frozen gravel

Mark M. Hancock / © The Dallas Morning News
Gravel hides under a layer of ice in the parking lot of North Rich Plaza in Richardson. The shopping center's sprinklers formed the ice which lasted with the freezing temperatures.
New finds
The last few entries have been a little heavy. Here's light reading for a change.
Photo bloggers have been busily surfing over the holiday. Blue Ridge Blog found some really interesting high-speed images while From The Night Desk found PhoToonz. Check them out.
Enough for now,
Photo bloggers have been busily surfing over the holiday. Blue Ridge Blog found some really interesting high-speed images while From The Night Desk found PhoToonz. Check them out.
Enough for now,
Monday, November 29, 2004
Morning frost
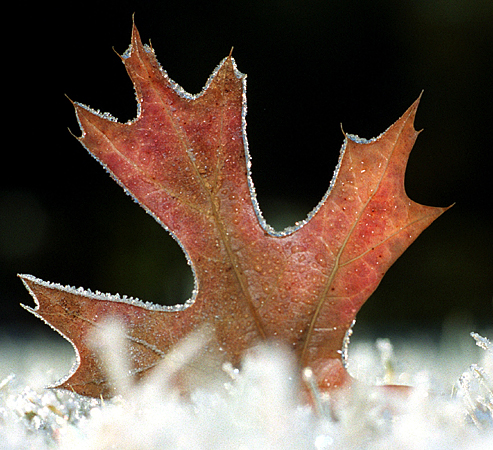
Mark M. Hancock / © The Dallas Morning News
Morning frost begins to melt from a fallen leaf near the Twin Creeks Golf Course in Allen.
Incidentally, the image above was made within minutes of this image.
Depth of field
Depth of field is the area of sharp focus between the nearest and farthest distance of possible focus for any given f-stop. Roughly, it's a range of focus. It's determined by the amount of light allowed to pass through a constricted opening (f-stop).
As a practical tool, using depth of field increases the thickness (depth) of the focal plane. Depth of field is measurable and predictable although most PJs use alternative methods to "guesstimate" it.
We learn depth of field from practical applications. As the f-stop becomes smaller, the depth of field becomes greater. Eventually, if the PJ gets a small enough f-stop, practically everything could be in focus.
It would take a lot of time and moneyand possibly some bent coat hangers dangling from the lens housing, but it's possible to create a 0-to-infinity lens. But, it's not practical for PJ work.
Ultimate depth of field works great for someone with a tripod and a lot of time to photograph a bouquet of flowers or a landscape. However, it doesn't apply well to most PJ assignments.
Instead, PJs need to know how to keep two or more objects or layers of the image area in focus. They also need to know how to get the depth of field exactly on these items so the subject could do normal activities (like breathing). They try not to surpass the required f-stop for the subject matter to keep shutter speed useful. In practical low-light terms, consider one stop is the difference between hand-held and a monopod and two stops requires a tripod.
Additionally, PJs need to understand which lens combination is most likely to yield the desired result. Often this is akin to hammering a square peg into a round hole.
Common method
This is sloppy, but it works. For any given f-stop, the total depth of field can be divided into three parts. One-third is in front of the focal plane at the maximum aperture (what's visible through the eyepiece) while two-thirds is behind the focal plane.
For the technical folks out there, it's one-half the distance forward and two times the distance back. It's the same result either way.
In either case, it's important to understand this rule while covering extremely quick subjects (races) - particularly when the PJ is positioned in front of the subjects (near the finish line). If the PJ is concerned about making a mistake, go with caution and actually focus slightly in front of the subject and let the depth of field make up for the difference.
I said it was sloppy. Let's talk about absolute precision after you cover hydroplane races. ;-}
Lens markings
High-quality lenses have depth of field guide marks. These are the strange, multi-colored lines on the lens barrel near the range number guide. If a lens is handy, take a look at it. Some older, manual lenses have a whole rainbow of lines spaced equally from the focus range line (center line). Newer lenses may have two sets of lines or none at all.
If we look at the line colors, we notice they match the color markings of different f-stops. F/11 may be blue and f/22 may be yellow, etc... Newer lenses don't use the color code, but have a small number next to the line (11, 22, etc...). These lines are depth-of-field guide lines. Everything between the depth-of-field guide lines is in focus for a given f-stop.
Meanwhile, some modern zoom lens may not even have the guides. Recently, I saw a new lens without any f-stops on the lens because it was designed to only work with "pro-sumer" digital cameras.
Precise depth of field distance
Below is the method to maximize depth of field. The process takes practice (like everything else we do). As PJs settle into their own style, they use a combination of general and precise measurements to get what they want for different assignments.
It doesn't matter if the numbers align in meters or feet, but make sure not to switch between scales while working (especially if using laser range finders or parabolic mirrors).
Obviously, use a tripod whenever possible both to stabilize the camera and make range measurements more accurate. Next decide which two objects or layers to keep in focus.
1. Focus on the nearest object and note the distance.
2. Focus on the farther object and note the distance.
3. Move the focus ring until both distances fit between the depth of field guides.
As the PJ looks through the lens, most elements appear out of focus because the focal plane is between the two objects while the lens is at its maximum aperture. The PJ could hit the depth-of-field preview button, but it still looks slightly off due to light loss. On a dit, fire a frame and chimp the results.
Making adjustments
Frequently, the two objects or layers don't immediately fit into the depth of field. Then, PJs can either back away from the subjects or change lenses.
As evinced below (hyperfocal distance), a lens with a smaller focal length yields a greater depth of field at closer ranges. Frequently, this determination can be handled without moving because the lens itself because it lets the PJ know which ones can handle the range.
The trick is to choose the correct distance and/or lens for the subject. Decisions are determined by how large and close together the two objects are as well as what's happening in the background. I'll save the lens optics and dot-gain discussions for another day, but PJs need to understand the same visual information is held in both a severely cropped 15mm image and a full-frame 600mm image. However, if the crop is too severe, the image can become useless.
Deliberate background blur
When a PJ wants a background to be muted or lost in circles of confusion, the most common remedy is to set the lens to its maximum aperture (f/2.8). This works fine most of the time.
Occasionally, the PJ needs fill flash during a bright, sunny day and also needs to diminish a "busy" background. This is when the maximum depth of field distance again becomes useful. It also becomes somewhat complicated, but we'll work through it. Below is a step-by-step method.
1. Establish the synch speed of the camera.
2. Make EV calculations to match the film speed and aperture for available light.
3. Calculate the flash-to-subject distance and adjust the distance or flash output until it falls within the range set by the other factors.
4. Focus on the subject and note the distance.
5. Move this distance to the farthest point on the depth of field range.
6. Press the shutter release button.
The result is a focused subject with proper ambient and fill light. Additionally, all other elements are outside the depth of field. The PJ has lifted the sharply-focused subject from a cluttered background while still shooting at around f/22.
If the PJ looks through the lens, the subject appears out of focus because the focal plane is far in front of the actual subject. As long as the range is correct on the depth of field guide, the image will be fine.
Hyperfocal distance
Hyperfocal distance is the distance, at a given f-stop, between a camera lens and the nearest point (hyperfocal point) which yields sharpness to infinity. This distance varies in proportion to the focal length of the lens. Again, this term only applies for depth-of-field to infinity measurements (mostly landscapes).
Each lens has a different hyperfocal distance range. The range is based on mathematics and lens optical corrections.
The equation is: the square of the focal length divided by the product of the f-stop times the circle of confusion. The circle-of-confusion variable changes for each film format.
As practical examples, a particular 50mm lens can handle everything between six feet and infinity at f/22. While a particular 100mm lens handles from 19 feet to infinity and a particular 300mm lens can only handle everything between 150 feet and infinity at f/22.
For those who aren't already confused, a smaller focal length offers more depth of field at a given f-stop, but a wider angle of view (so scene elements appear further away with greater separation). The inverse is true.
Enough for now,
As a practical tool, using depth of field increases the thickness (depth) of the focal plane. Depth of field is measurable and predictable although most PJs use alternative methods to "guesstimate" it.
We learn depth of field from practical applications. As the f-stop becomes smaller, the depth of field becomes greater. Eventually, if the PJ gets a small enough f-stop, practically everything could be in focus.
It would take a lot of time and money
Ultimate depth of field works great for someone with a tripod and a lot of time to photograph a bouquet of flowers or a landscape. However, it doesn't apply well to most PJ assignments.
Instead, PJs need to know how to keep two or more objects or layers of the image area in focus. They also need to know how to get the depth of field exactly on these items so the subject could do normal activities (like breathing). They try not to surpass the required f-stop for the subject matter to keep shutter speed useful. In practical low-light terms, consider one stop is the difference between hand-held and a monopod and two stops requires a tripod.
Additionally, PJs need to understand which lens combination is most likely to yield the desired result. Often this is akin to hammering a square peg into a round hole.
Common method
This is sloppy, but it works. For any given f-stop, the total depth of field can be divided into three parts. One-third is in front of the focal plane at the maximum aperture (what's visible through the eyepiece) while two-thirds is behind the focal plane.
For the technical folks out there, it's one-half the distance forward and two times the distance back. It's the same result either way.
In either case, it's important to understand this rule while covering extremely quick subjects (races) - particularly when the PJ is positioned in front of the subjects (near the finish line). If the PJ is concerned about making a mistake, go with caution and actually focus slightly in front of the subject and let the depth of field make up for the difference.
I said it was sloppy. Let's talk about absolute precision after you cover hydroplane races. ;-}
Lens markings
High-quality lenses have depth of field guide marks. These are the strange, multi-colored lines on the lens barrel near the range number guide. If a lens is handy, take a look at it. Some older, manual lenses have a whole rainbow of lines spaced equally from the focus range line (center line). Newer lenses may have two sets of lines or none at all.
If we look at the line colors, we notice they match the color markings of different f-stops. F/11 may be blue and f/22 may be yellow, etc... Newer lenses don't use the color code, but have a small number next to the line (11, 22, etc...). These lines are depth-of-field guide lines. Everything between the depth-of-field guide lines is in focus for a given f-stop.
Meanwhile, some modern zoom lens may not even have the guides. Recently, I saw a new lens without any f-stops on the lens because it was designed to only work with "pro-sumer" digital cameras.
Precise depth of field distance
Below is the method to maximize depth of field. The process takes practice (like everything else we do). As PJs settle into their own style, they use a combination of general and precise measurements to get what they want for different assignments.
It doesn't matter if the numbers align in meters or feet, but make sure not to switch between scales while working (especially if using laser range finders or parabolic mirrors).
Obviously, use a tripod whenever possible both to stabilize the camera and make range measurements more accurate. Next decide which two objects or layers to keep in focus.
1. Focus on the nearest object and note the distance.
2. Focus on the farther object and note the distance.
3. Move the focus ring until both distances fit between the depth of field guides.
As the PJ looks through the lens, most elements appear out of focus because the focal plane is between the two objects while the lens is at its maximum aperture. The PJ could hit the depth-of-field preview button, but it still looks slightly off due to light loss. On a dit, fire a frame and chimp the results.
Making adjustments
Frequently, the two objects or layers don't immediately fit into the depth of field. Then, PJs can either back away from the subjects or change lenses.
As evinced below (hyperfocal distance), a lens with a smaller focal length yields a greater depth of field at closer ranges. Frequently, this determination can be handled without moving because the lens itself because it lets the PJ know which ones can handle the range.
The trick is to choose the correct distance and/or lens for the subject. Decisions are determined by how large and close together the two objects are as well as what's happening in the background. I'll save the lens optics and dot-gain discussions for another day, but PJs need to understand the same visual information is held in both a severely cropped 15mm image and a full-frame 600mm image. However, if the crop is too severe, the image can become useless.
Deliberate background blur
When a PJ wants a background to be muted or lost in circles of confusion, the most common remedy is to set the lens to its maximum aperture (f/2.8). This works fine most of the time.
Occasionally, the PJ needs fill flash during a bright, sunny day and also needs to diminish a "busy" background. This is when the maximum depth of field distance again becomes useful. It also becomes somewhat complicated, but we'll work through it. Below is a step-by-step method.
1. Establish the synch speed of the camera.
2. Make EV calculations to match the film speed and aperture for available light.
3. Calculate the flash-to-subject distance and adjust the distance or flash output until it falls within the range set by the other factors.
4. Focus on the subject and note the distance.
5. Move this distance to the farthest point on the depth of field range.
6. Press the shutter release button.
The result is a focused subject with proper ambient and fill light. Additionally, all other elements are outside the depth of field. The PJ has lifted the sharply-focused subject from a cluttered background while still shooting at around f/22.
If the PJ looks through the lens, the subject appears out of focus because the focal plane is far in front of the actual subject. As long as the range is correct on the depth of field guide, the image will be fine.
Hyperfocal distance
Hyperfocal distance is the distance, at a given f-stop, between a camera lens and the nearest point (hyperfocal point) which yields sharpness to infinity. This distance varies in proportion to the focal length of the lens. Again, this term only applies for depth-of-field to infinity measurements (mostly landscapes).
Each lens has a different hyperfocal distance range. The range is based on mathematics and lens optical corrections.
The equation is: the square of the focal length divided by the product of the f-stop times the circle of confusion. The circle-of-confusion variable changes for each film format.
As practical examples, a particular 50mm lens can handle everything between six feet and infinity at f/22. While a particular 100mm lens handles from 19 feet to infinity and a particular 300mm lens can only handle everything between 150 feet and infinity at f/22.
For those who aren't already confused, a smaller focal length offers more depth of field at a given f-stop, but a wider angle of view (so scene elements appear further away with greater separation). The inverse is true.
Enough for now,
Saturday, November 27, 2004
Answers to tough PJ questions
One of this blog's readers asked some questions for her college research. I think many readers would like to know the answers. Like many bright, young PJs, she's trying to estimate the landscape before she leaves academia.
Basically, the PJ landscape is made of gelatin nowadays. For a new PJ who has a good eye, a strong knowledge of photography techniques, enjoys the biz side and loves adventure, the future looks bright. For the rest, it's bleak.
Even for the best photographers, PJ is an eat-you-up-and-spit-you-out profession. Those who aren't ready for this reality are heading toward hardship and heartache. Her questions and my answers should sum up the major aspects of consideration.
Start-up costs
Q) I'm trying to get an idea about set-up costs. You mentioned that an aspiring PJ should get $20K and meet you on Monday with equipment from your list. I laughed at first, but then I realized that you probably weren't kidding. So, I'd like to know what basic equipment a PJ needs, and what would be a minimum ball-park cost.
A) For a pro, the list is about the minimum. I just bought a dit (high-end digital camera) this week. I got a bargain at $1,500 (it should go for about $3,200). The top-of-the-line body costs more.
Although a 50mm lens is cheap (about $200), most other lenses are in the $1,500 to $4k range. A PJ must have three basic lenses - a 50mm, a 17~35mm and a 80~200mm. All of these must be f/2.8 or faster. I strongly encourage an additional 300mm (f/2.8) or longer lens as well as a micro/macro lens.
Flashes are cheap, about $300-500 each. A decent strobe with all the proper gizmos and gadgets can set someone back $2k to $10k. The remote transceivers are about $180 each (PJs need at least a transmitter and two receivers or three transceivers).
Since staff jobs are almost impossible for new grads, a Mac laptop with a wireless transmitter is also required (about another $1k or more). Then the PJ needs a monopod, tripod, synch cords, a camera bag, some filters, light stands, etc...
Yes, $20k is the starting point.
Since the holiday gift-giving season is coming, parents need to be reminded what their little PJs need. ;-)
Specialization
Q) What types of projects/genres can a PJ specialize? I've checked out your section on "Pro Photographer's sites" and found that some of the PJs photograph weddings, news, sports, war and nature. At what point does a PJ become a photographer? I loved David and Kim's site, but wondered if their pictures of flowers qualified as PJ pictures.
A) Good eye. David won the Pulitzer Prize this year while covering the war in Iraq. He also won the Lone Star Emmy Award for Outstanding Documentary Program this year for his documentary "War Stories."
PJs are visual chameleons. Rather than specializing, we diversify. David is a good example. Most PJs are fairly smart and get bored easily. So, we do something for a while until we master it. Then we try something new. It doesn't mean we ever stop doing the first specialization, we simply add to our toolbox.
In our daily work, we're expected to know how to handle anything. We cover almost every sub-genre of photography - often in the same day. If it's a new technology (like dit cameras or digital video were), we're given a day to figure it out and then expected to master it.
Because newspaper readers are as diverse as the community, we try to keep everyone happy. Gardeners want to know about flowers, so we photograph flowers. Entomologists want to know about bugs, so we photograph butterflies. If we can get both in one frame, we just made two people happy as well as provided some variety for all the readers.
PJs are PJs as long as they have notepads. Photographers aren't responsible for reporting (or even photographing) facts. Photojournalism is a marriage of truthful words and images. We must collect visual, factual information as well as the words placed near our photographs. We must also condense these facts down to one image and two sentences (a cutline).
If I make an image because it's important to me, I'm a photographer. Anyone can be a photographer. If I know why I made the image, the subject's proper name and all the facts surrounding the image, and I make an image because it's important to the readers, then I'm a PJ.
Each person who knows how to wield a hammer cannot make a violin.
PJ schools
Q) Do you recommend any particular schools for PJ preparation?
A) Ohio University, Western Kentucky, Missouri and Brooks have strong PJ programs lately. However, the school doesn't make the student. The student makes the education.
Most of the top-level PJs actually come from different backgrounds (electrical engineering, languages, philosophy, political science and business majors). They all have well-rounded educations and are typically in the top of their class academically (because they understand everything is important). A 3.5 or higher GPA is the norm.
Money
Q) What are starting salary ranges for small/large newspapers?
A) We don't do this for the money.
People who love money should get into banking. People who love photos should get into commercial photography. People who love poverty and near-death experiences should get into PJ.
Starting salaries in PJ are $25. Oh, you meant per/year. OK, $25. Freelancers earn by the assignment or image. Their income is determined by their own motivation, energy, talent and biz sense.
There is no adequate way to compare fruit and flamingos. Use this calculator to get market comparisons. I'm using Dallas numbers, and you can adjust from there.
Realistically, a GREAT college photographer could make about $12k-$20k p/yr at their first small daily/weekly staff job.
Let's see here... equipment costs $20k, education was another $60k, but I'm earning $12k... this means I'll need to live in a box and forage for food for the first few years... Yup! Sign me up. :-)
Once a PJ has several years of experience and some major awards, they can move up into the major metro daily papers and get about $30k.
At the biggest papers with all the bells and whistles (car, phone and equipment allowances and after-market sharing), they could get $50k or slightly more.
Having given the depressing part of this story, the up-side is freelance and awards. This is what actually keeps some PJs at a decent standard of living. Well... and wealthy relatives...
Some photo awards come with hefty cash prizes (Pulitzer, World Press Photo and other international awards). Otherwise, a high-end PJ can earn $5k or more for a single day shooting a wedding (including all the additional preparation and delivery work). Low-end PJs can still earn $250 p/hour shooting "events" for the event organizer (public relations).
Moonlight work is dangerous though. First, at small papers, editors may call the PJ from a freelance gig to cover something for the community. Then, there's the potential of stepping over an ethical boundary and having a conflict of interest (working for a politician for example). However, most PJs know the line and won't cross it. More often, there's the lure of crossing to the "dark side" (making a real living).
Some staffers make more income from shooting weddings than from the newspaper. They use the staff job to promote their talent and leverage their name to get a regular freelance clientele. Then, they can eventually walk away to a lucrative new career. Everyone must find their own tipping point.
Important note: The junior PJs tend to work on weekends while some senior PJs get the wedding gigs. In other words, when a PJ makes it to the big time, there's still a long way to go. If PJs make it to the very top, they'll be in conflict areas and won't have time to arrange weddings. So again I'll say, don't get in this for the money.
Enough for now,
Friday, November 26, 2004
Art therapy

Mark M. Hancock / © The Dallas Morning News
A child works with art therapist Dana Tittle at the Children's Advocacy Center in Dallas. The center joins the efforts of five public and private agencies to treat abused children and bring their offenders to justice.
Note: The child's name cannot be released because of her protected status.
Critique of the day: Emily Ding – Advanced amateur
Emily Ding requests an advanced amateur critique of the images on her blog (blog no longer exists) from Nov. 8 to 25, 2004. There is a comment section, please add critique comments there. She is a law student and photography hobbyist. There is no deadline.
"I took these pictures of the European Social Forum 2004 simply out of my own interest," she stated. "I'll be able to handle a harsh critique" of the images.
Please review how to give and get a critique before commenting on her site.
Enough for now,
"I took these pictures of the European Social Forum 2004 simply out of my own interest," she stated. "I'll be able to handle a harsh critique" of the images.
Please review how to give and get a critique before commenting on her site.
Enough for now,
Tuesday, November 23, 2004
Bond
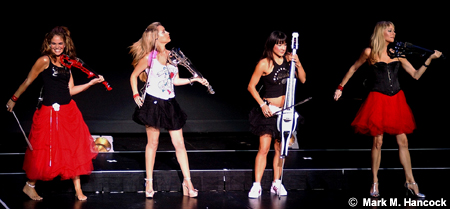
photos © Mark M. Hancock and The Dallas Morning News
The string quartet Bond performs at the Irving Arts Center in Irving on Tuesday, November 23, 2004. The quartet includes (from left to right) Haylie Ecker, Eos Chater, Gay-Yee Westerhoff and Tania Davis.
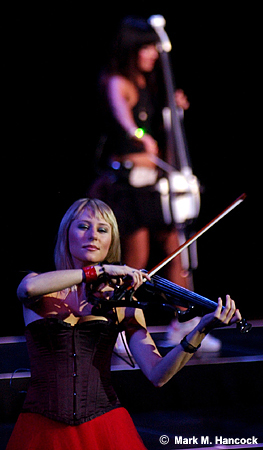
Tania Davis (left) and Gay-Yee Westerhoff (right) of the string quartet Bond performs at the Irving Arts Center in Irving on Tuesday, November 23, 2004.
This assignment was a very pleasant surprise. The assignment was to shoot a string quartet. So, I showed up at the venue with my camera in a blimp, a bulky sound dampener. Then I found out it’s a rockin’ string quartet. OK, maybe not rockin’, but loud enough to ditch the blimp.
There was great rejoicing in the land of Mark.
Enough for now,
Monday, November 22, 2004
Ivan Moravec performs

© Mark M. Hancock and The Dallas Morning News
Pianist Ivan Moravec performs at the Bass Performance Hall in Fort Worth on Monday, November 22, 2004.
Piano concerts are a challenge. Typically, the performer concentrates on his/her hands on the ivories. If it's in a darkened hall, this means the pianist's face is normally in shadow. Add to this the need to blimp the camera, there's no way to get the keys in the same frame as the performer’s eyes, they typically wear black on a dark background with a black piano... The problems mount.
The high point of an entire concert (from a PJ's point of view) is when the pianist suddenly looks up and possibly raises one hand high enough to see. It's the visual equivalent of a blocked punt.
Enough for now,
La Calle Doce bartender

© Mark M. Hancock and The Dallas Morning News
Miguel Hernandez, a bartender at La Calle Doce, poses for a portrait at the restaurant in Dallas on Monday, November 22, 2004.
Sunday, November 21, 2004
Gingerbread family
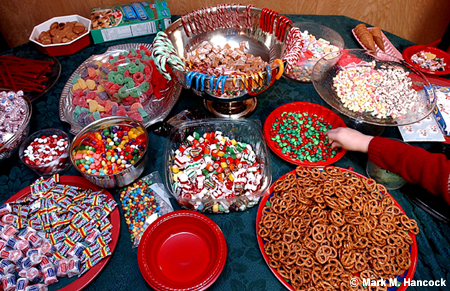
Photos © Mark M. Hancock and The Dallas Morning News
Austin Bond, 5, helps himself to some decorating candy before other family members arrive to decorate gingerbread houses at the Thorne family home in Grand Prairie on Sunday, November 21, 2004.
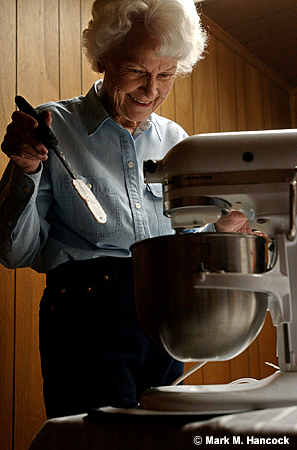
Although her ankle is broken, Lois Thorne, 80, prepares icing to decorate gingerbread houses at her home. The family gathers annually at the family home to participate in the gingerbread house tradition.
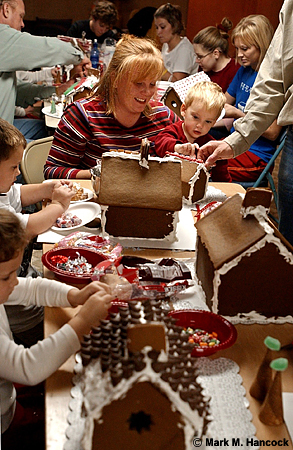
(Right)
Amy McCauley (left of center) helps Campbell McCauley, 2, (right of center) decorate a gingerbread house. It was Campbell McCauley's birthday.
(Below)
Tori Thorne (center) watches as Hannah Wangler, 14, (left) and Hannah Cook, 15, (center, background) decorate a gingerbread house.

Subscribe to:
Posts (Atom)

